

Persian Pebble Bread~Hot Rocks Bread~
Wild Naan Sangak
adapted from our recipe for Wild Naan, and the recipe for Persian Pebble Bread in “Taste of Persia” by Naomi Duguid
makes one long bread
Have I ever said Baking Bread is an Adventure…? Well, if I have failed to tell you such, let me just be sure to iterate it loud and clear now. Baking Bread is an Adventure! Baking Bread is an Adventure! Baking Bread is an Adventure!

Elizabeth, our Kitchen of the Month, was very up front as to the rock being involved in the recipe she was considering. She says she more or less forced us into this recipe. I thought we all pretty much thought this sounded like a great idea. So here we go, off to find rocks…what kind of rocks. Oh, you know, pebbles, river rocks. Elizabeth found her’s at a garden store. The stores around here seemed either not to know what I was asking for or they were sold out. So I looked for an alternate source.
The business we’ve worked with for driveway gravel and excavation seemed like a good place to try. Try explaining to an excavator/concrete mixer fellow how you’d like to purchase enough small rocks, pebbles, fairly smooth to cover the bottom of a half sheet pain. It did make it easier to explain that I took my sheet pan with me. Jim Beckman gave me directions to the gravel pile and I drove out, parked in front of it, climbed up the gravel, sat down and hand picked each rock. Big gravel, dirt and cement trucks rolled by as I filled my sheet pan. I got several looks but no one stopped to ask what I was doing.
Hot Rocks Bread (renamed from Elizabeth’s Wild Naan Sangak and the recipe for Persian Pebble Bread in “Taste of Persia” by Naomi Duguid)
makes one long bread

Leavener
• 50 grams rye sourdough culture 100% hydration
• 50 grams room temperature water
• 50 grams ‘no-additives’ 100% whole wheat flour
Leavener, continued (optional for hot weather baking)
• all of the above
• 15 grams room temperature water
• 15 grams ‘no-additives’ 100% whole wheat flour
Actual Dough
• 320 grams unbleached organic all-purpose flour (I mixed white whole wheat, spelt and AP flour all organic.)
• 5 grams wheat germ
• 15 ground flax seed
• 180 grams room temperature water
• 25 grams plain Greek yoghurt
• 15 grams (1 Tbsp) olive oil
• All of the leavener, when it floats – showing that it’s as strong as it can be
• 8 grams salt + 5 grams water
Shaping
• flat bottomed cookie sheet
• water
Topping, optional
• sesame seeds
1. Leavener Late in the evening on the day before you will be making naan sangak, put a spoonful of culture from the fridge into a small bowl. Stir in 50 grams water and 50 grams whole wheat flour. Cover with a plate and put into the cold oven (if the night temperatures are cool, turn the oven light on) to leave overnight.
2. Leavener, continued In the morning of the day you will be making naan sangak, particularly if the weather is warm, take a small spoonful of the leavener and see if it floats in a bowl of cool water. If the starter is quite bubbly but that little amount sinks, stir 15 grams water and 15 grams whole wheat flour into the bowl from the previous night. Cover with a plate and leave until about noon. If the kitchen is cool, omit this step and proceed to the next one. I do apologize Elizabeth, I guess I just have great faith/trust in my rye starter and skipped this.
3. Actual Dough On the day you will be making naan sangak, check to see if the leavener floats in a small bowl of cool water. If the leavener is domed but it doesn’t float, wait for 30 minutes or so and try again. If the leavener is bubbly but flat or concave on the surface, stir in about 5 grams each of whole wheat flour and water. Cover with a plate and leave it on the counter out of draughts. Check again again for floating about 20-30 minutes later. It will probably float. Proceed with making the actual dough.
4. Using a bowl that is large enough for the dough to triple, sift flour in. Whisk in wheat germ. Add 180 grams water, yoghurt, olive oil, and all of the leavener. Using a dough whisk or wooden spoon, stir just enough to mix it together. Cover with a plate and leave on counter for about 20 minutes. Here I felt the dough was sticky and stiff.
5. Kneading and adding the salt: Whisk salt and 5 grams water into a small bowl and pour on top of the dough. Wash your hands and leave one hand wet. With the back of your hand against the side of the bowl, reach down into the bowl to the bottom of the dough and pull it up to the fold it over the top. Turn the bowl with your other hand and repeat 4 or 5 times. Cover the bowl with a plate and set aside on the counter for about 20 minutes. The addition of the water and salt and the dough began to loosen a little and was slightly less sticky.
6. Repeat the previous step 2 or 3 times more. You’ll notice that the dough is smooth and silky to the touch. It may also be quite slack. Don’t be overly concerned. Slack is good. Each time I folded the dough, I dipped my hands in water which resulted in a beautifully smooth silky dough.

7. Proofing: Cover with a plate and leave on the counter. (Check the dough from time to time as the afternoon progresses into evening. Wet your hands and gently fold it whenever it has doubled. I did this once.
8. Preheating the Stones: Around dinnertime on the day you will be baking the bread, put the cookie tray of stones into

◦ the barbecue on a pizza stone over direct heat, close the lid, and turn it to high.
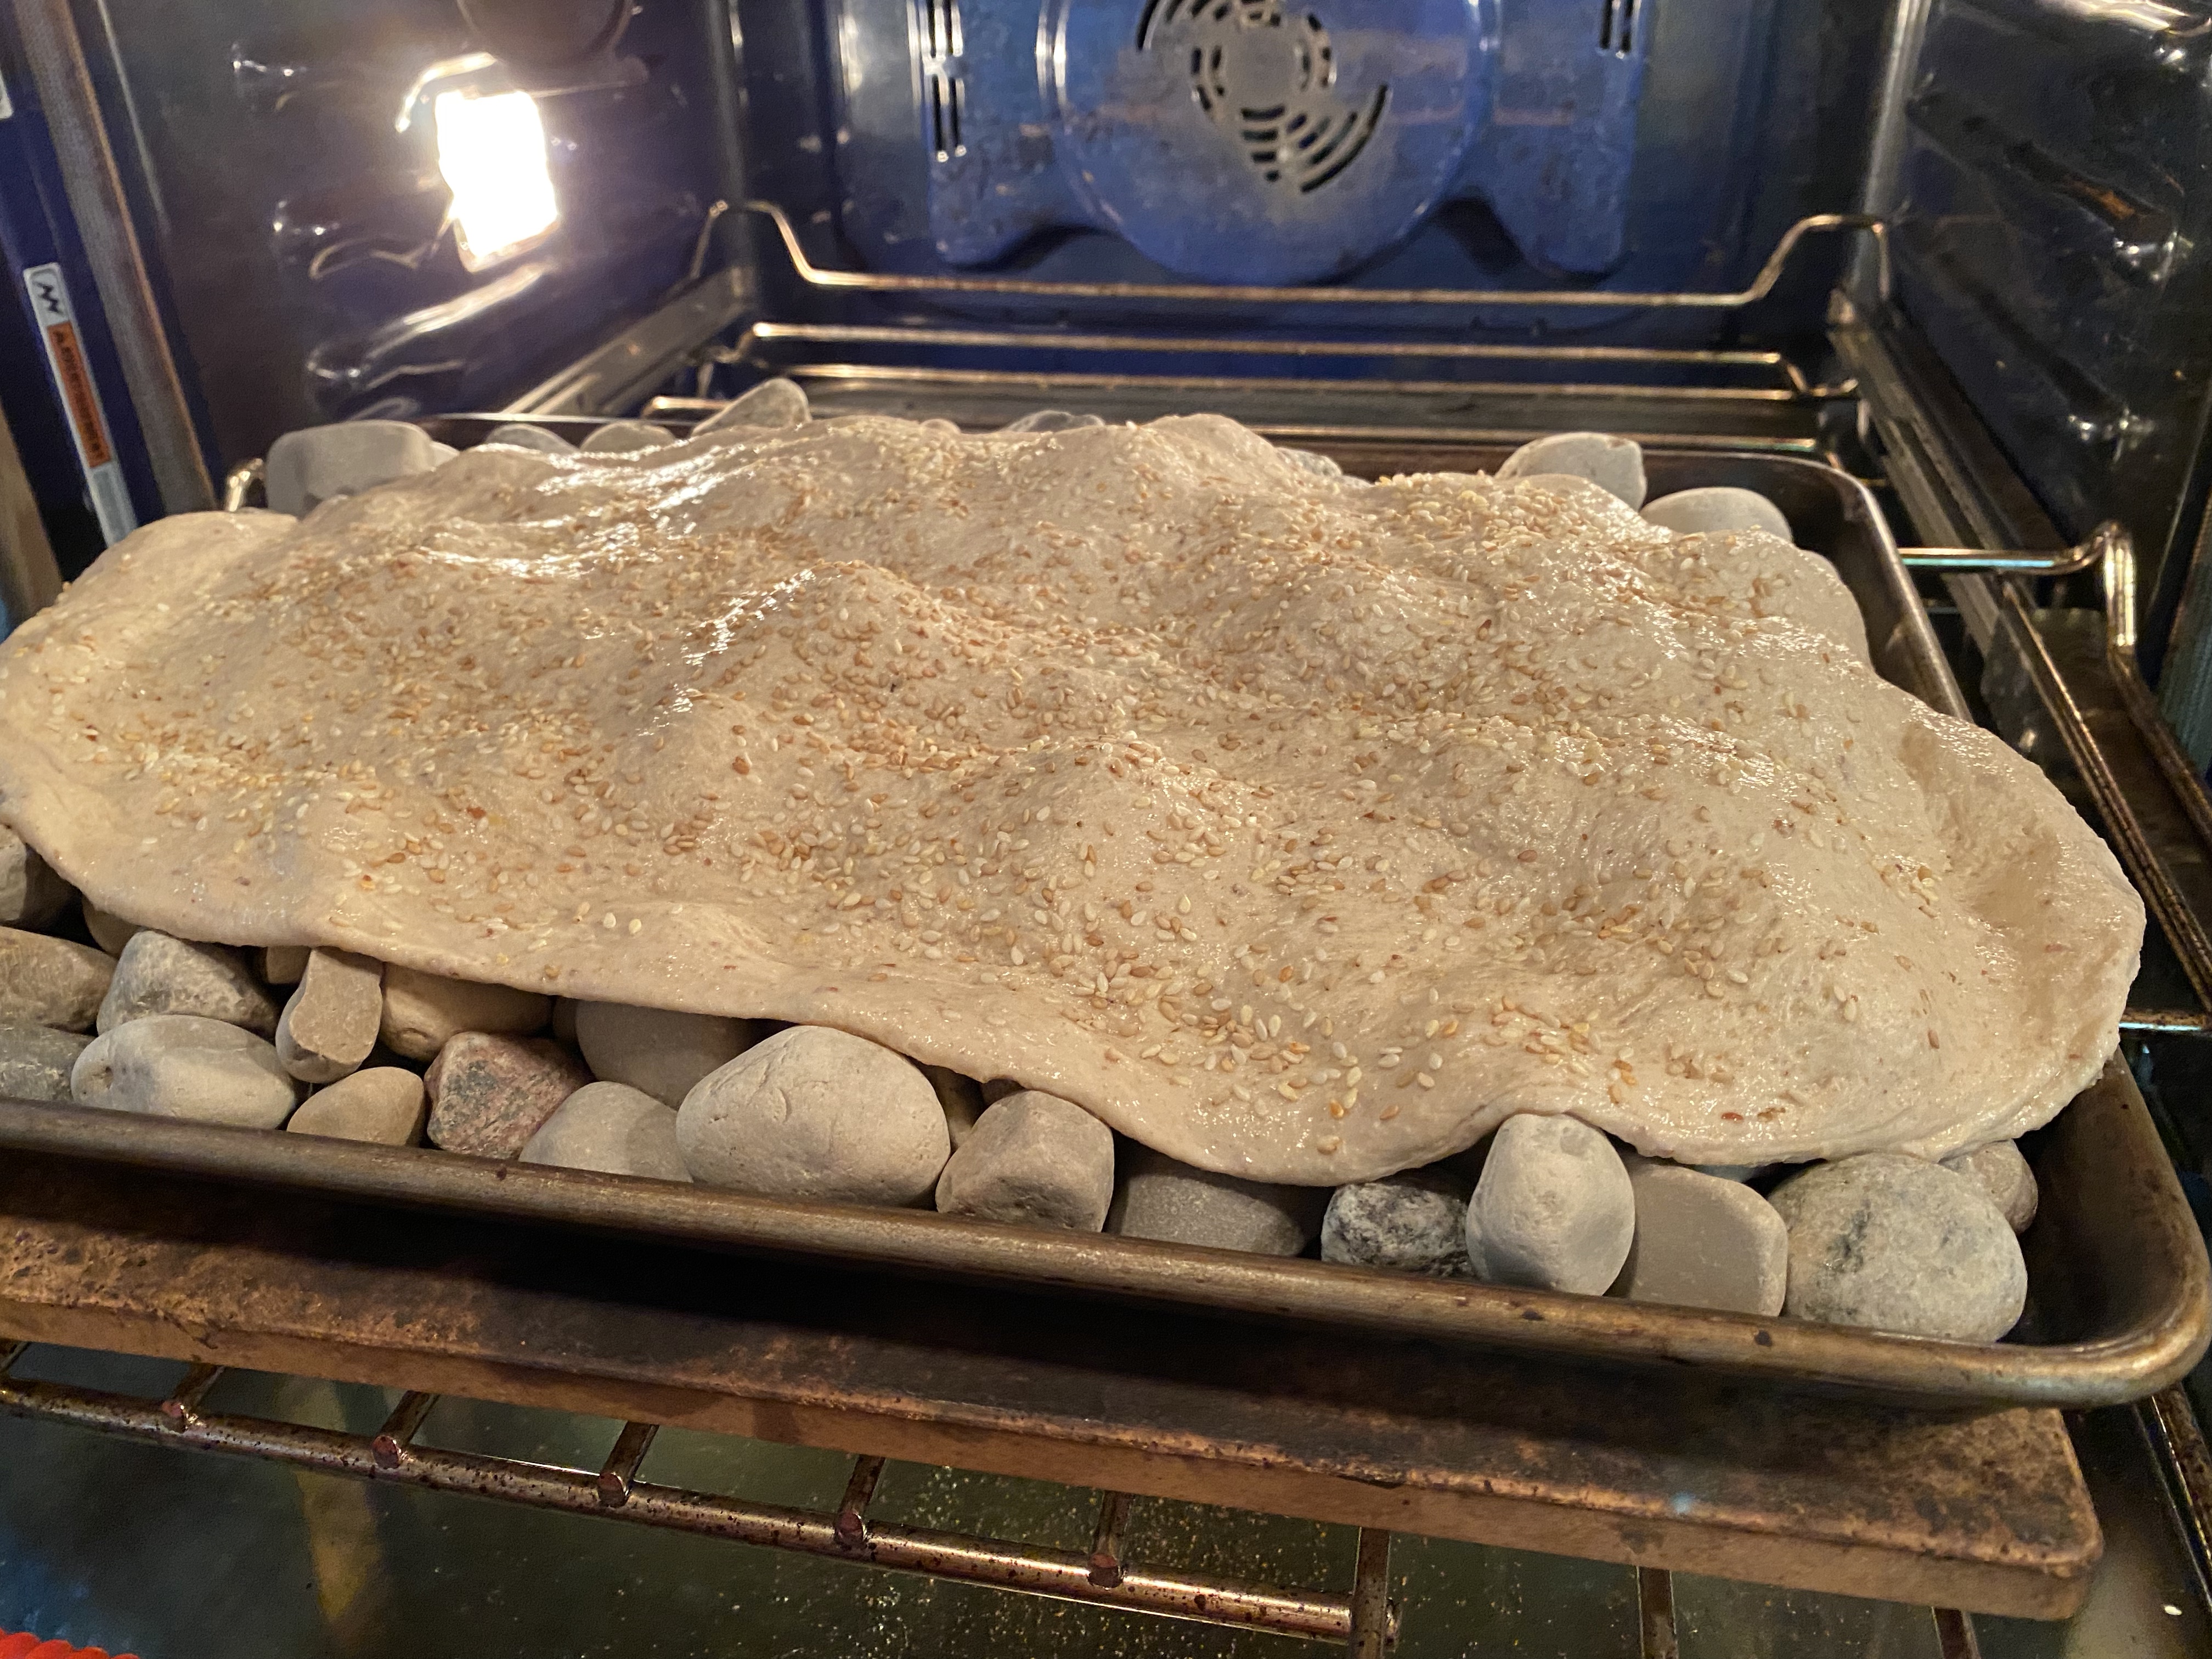
◦ the oven on the middle shelf of the oven set at 450F. This is the way I baked the HOT ROCKS BREAD.
◦ Shaping: While the stones are preheating, use the palms of you hands to slather water over the bottom of another cookie tray. Turn the risen dough onto the tray (the dough will still be pretty slack). Wet your hands again and gently guide and flatten the dough into a rectangle, making sure that one end of the rectangle is very close to the narrow side of the tray. Gently lift the bread up and down again to make sure it is not stuck to the pan. Evenly scatter sesame seeds (if using) on top.
◦ Baking: When the stones are hot hot hot, carry the tray of dough and tip it at the back edge of the tray of hot stones. DO NOT TOUCH THE STONES WITH YOUR HANDS! The dough should begin to slide off the back of the wet tray. If it does not, gently nudge any part that is sticking with a thumb or finger. Gently pull the dough tray back towards the front of the barbecue to stretch the dough onto the hot stones. Once the dough is on the stones, it WILL stick for the first part of baking. Don’t even imagine you can rearrange the dough. “Slowly tip the plate so that the dough begins sliding off of the wet plate onto the pebbles. Gently pull the plate back in a smooth slow motion as the rest of the dough slides and lands on the pebbles. Help it along the way but make sure you don’t touch the hot pebbles! Once the dough is on the pebbles do not attempt to rearrange it, as it will already be stuck to the stones.” – Omid Roustaei, The Caspian Chef | Naan Sangak – Persian flatbread
Close the lid of the barbecue if using. (Use direct and indirect heat on the barbecue.)

◦ I considered oiling the rocks to perhaps minimize sticking. My first bake I used water on the bottom of a sheet pan. There was no slide to this method: I lifted an edge and by tilting the pan sharply the dough laid onto the rocks. Virtually every rock that touched the bread stuck to the bread. The rocks were easily knocked off with the end of a knife. For my second bake, I dusted the sheet pan with semolina like when I do pizza. The dough easily slide off and only one rock stuck to the bread. However there were a couple of places where the semolina was thicker and showed a build up. I brushed the excess off before serving.
◦ It takes 5-10 minutes to bake the bread. My bread took about 20 minutes to bake. Turn the tray around from time to time to account for uneven heat in the barbecue and oven. USE OVEN MITTS!! To check to see if the bread is done, use blunt-nosed tongs to gently lift the bread from the stones. Some of the stones may stick to the bread. Don’t worry about that. Enough of the stones will fall off onto the tray to let you check for doneness.

◦ cooling slightly: When the bread is done, bring it inside on its tray of hot stones. Some of the stones will remain attached to the bread. Once the bread cools for about 5 minutes, the stones can be dislodged relatively easily with oven mitts or a spoon. BE CAREFUL!! THE STONES ARE STILL VERY HOT! If the stones are extremely reluctant to release themselves, it seems to indicate that the bread has not quite finished baking; simply bake it a little longer and try again.
Use a pizza wheel to cut the de-stoned bread and serve it immediately with Persian stews, Indian-style curries, chili con carne, soup…. It’s good with grilled vegetables too. I feel it was more interesting and fun to just break a piece off. Served to several friends, this was lovely with cheese or avocado or artichoke or salami or well you get the idea.

And we know that you can’t wait to heat up those river stones on a tray so you can make Naan Sangak too! To receive a Baking Buddy Badge to display on your site, post about your Persian Pebble Bread adventure in the next couple of weeks (we love to see how your bread turns out AND hear what you think about it – what you didn’t like and/or what you liked) before the 29 August 2021.
Here’s how to let us know:
- email me
» Remember to include your name and a link to your post
» Please type “BBB August 2021 bread” in the subject heading
HOT ROCKS MAKE LIFE BEAUTIFUL!!


Bake it up!
