When I first saw the post for January’s Babe bread, I thought here’s a simple easy fun bake perfect for after the holiday crazy actions. A small stuffed roll perfect for just about anytime, anyplace and any occasion. Our host kitchen, FeedingMyEnthusiasms, has a good story on finding this bread you should find fun.
A quick read through the recipe and … Pepperoni…ha, I’m in!
My next reading brought me up short. I left the following on the blog: Ye gad, I’m just looking at that 3/4 cup of sugar! Really with pepperoni?! Sounds terribly sweet. How much sugar does this need? What amount of sugar will change the texture here? Adding this much sugar to something that seems savory is REALLY foreign to me. I get the feeling this is a very Americanized food, we just add sugar to everything.
Simple and easy … Then there was a long discussion of what if you don’t want meat!! That how I happen to have the sautéed mushroom with pepperoni spices idea. VERY good.
Holy Batman! I made them. Did I follow the recipe? Better than I thought I had on initial inspection but I divided the ingredients in half and only added 20 grams of sugar … and when the dough just wouldn’t come together – fully 3/4 of a cup of flour was not going to incorporate – I threw in the rye sourdough throw out from the night before. I threw that in and it was perfect. This took a full 90 minutes to double. We were having our “pod” friends (pod being like minded fully vaccinated friends) for pepperoni pizza dinner. SOOOO for filling I used pepperoni seasoned baby Bella mushrooms sliced, there were 4 half slices of cooked bacon added to the mushrooms … then there were two dough balls left when I ran out of mushrooms and bacon, perhaps there was a slice or two of cheese as well. The last two dough balls: one I filled with pepperoni and one I filled with ……..see below. These were seriously good 😊!!! They were a terrific appetizer for hungry boys before pizza!
Yes it may be pizza like in vision but this is crunchy very unlike a pizza crust. Like pizza it comes from the Mediterranean but from Spain.
So it’s different than pizza altogether but then it’s decidedly just as enthralling in flavor and interest.
It’s simple to mix, the only special thing is an overnight in the fridge and that’s easy.
This fits in my favorite category of mix it days ahead of time and put it together like a magic trick for company. That’s what I did with half the dough, I made this for a big family dinner. “The Littles” (two girls under 10) said that was really good bread … but then so did all the adults.
Two nights later, I baked a quarter of the dough and served it with a salad and called it a light dinner. Four nights later, I served the last quarter dough round with fresh veggies and a guacamole hummus dip and called it dinner. The dough that keeps on giving!
Yes, Karen (Karen’s Kitchen Stories) our kitchen of the month, this is very simple to do by hand, no food processor here.
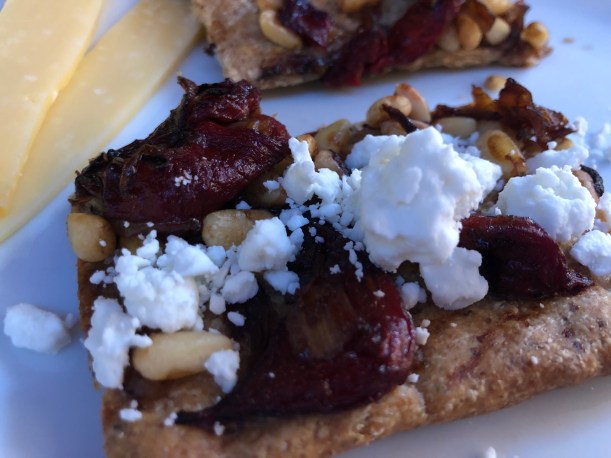
Red Pepper Coques
Dough
268 grams bread flour
200 grams white whole wheat flour
30 grams ground flax seed
2 teaspoons sugar, omitted
1/2 teaspoon instant yeast
10 2/3 ounces ice water
3 tablespoons extra-virgin olive oil
1 1/2 teaspoons table or fine sea salt
Red Pepper Topping
1/2 cup extra-virgin olive oil
2 large onions, peeled, halved, and thinly sliced
2 cups jarred roasted sliced red peppers
3 tablespoons sugar, omitted
3 cloves garlic, thinly sliced
1 1/2 teaspoons salt
1/2 teaspoon crushed red pepper flakes
2 bay leaves
3 tablespoons sherry vinegar, Fini Reduction of Balsamic
1/4 cup pine nuts
1 tablespoon minced fresh parsley, fresh basil
1. Dough
In the bowl of a food processor, pulse the flour, sugar, and yeast about 5 times. Turn the processor on, and slowly pour in the ice water and process for about 10 seconds. Let the dough rest for 10 minutes.
2. Add the oil and the salt to the dough and process for 30 to 60 seconds, until the dough forms a ball. Remove the dough from the the processor, and knead by hand for a few seconds, and form it into a ball. Place it into an oiled bowl, cover, and refrigerate for at least 24 hours, and up to 3 days.
3. Topping
Heat three tablespoons of the olive oil in a 12 inch non stick frying pan over medium heat. Add the onions, red peppers, sugar, garlic, salt, pepper flakes, and bay leaves. Cover the pan and cook for 10 minutes over medium low.
Remove the lid and continue to cook, stirring regularly, for another 10 to 15 minutes, until the onions are golden brown. Remove the pan from the heat and discard the bay leaves. Transfer the mixture to a heatproof bowl and stir in the vinegar. Cool completely before using. You can make the mixture in advance and refrigerate overnight.
4. To Make the Coques:
Deflate the dough and divide it into four equal sized pieces. Shape each piece into a tight ball and place, seam side down on your work surface, and cover with oiled plastic wrap. Let rest for an hour.
Place oven racks in the upper and lower third positions and preheat the oven to 500 degrees F. Brush two half sheet pans with 2 tablespoons of olive oil each.
5. Place one dough ball on your work surface, and roll it out to a 15 inch by 5 inch oval. Place it on the baking sheet, lengthwise. Repeat with the rest of the dough balls, two per baking sheet. If the dough springs back, let it rest for another 10 to 20 minutes, and re-roll. Dock each about 15 times with a fork. Brush each oblong piece of dough with the rest of the olive oil.
6. Bake the dough for 8 minutes, switching the pans at the four minute mark.
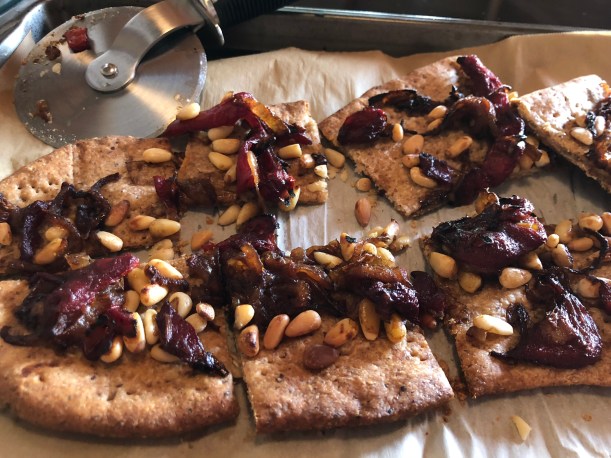
Remove the pans from the oven, and spread them with the red pepper and onion mixture. Sprinkle with the pine nuts. Place the baking sheets back into the oven, and bake for 16 minutes, switching and rotating the pans at the 8 minute mark. Continue to bake until the flatbreads are golden and crispy.
Remove the pans from the oven and let cool on the pans for about 5 minutes. Sprinkle with the parsley, and transfer to a cutting board to slice and serve.
Feta makes it dinner!
There is simply no way you should not bake this … it is just delightful. Too good to pass up and so simple to put together.
If you want to bake along, email Karen your photo or blog link to karen.h.kerr@gmail.com and she’ll feature you in a follow up post and send you a really cool badge.
Here I am Kitchen of the Month, we’re on a cross country road trip and the mission today was to spread some of Dad’s ashes. We drove like crazy yesterday, way past when we should have stopped so our time would work today to spread those ashes and still make it to friends house in St. Louis! We had to stop where there was nearly no choice in motels … and ours had no internet. Now we’re on great internet.
Sorry this has taken so late to post.
I believe we are imprinted to be attracted to little things, babies perhaps being a prime example; it’s probably why our species survived in the first place. We’re attracted to and attach to the small and helpless. Is a bun, a small bread helpless? I don’t really know. I do know I’m really attracted to small breads these days and this particular one I’ve found so many connecting shaping methods that I’m helpless to not bake it.
In my mind, however this is baked it should be a great snack bread or picnic sandwich bread or brunch bread or dinner with a salad bread or … you tell me.
I made the full recipe and we ate it all, reheating each time. Worked beautifully for breakfast lunch dinner and snack. Then we were about to travel … so I made a half recipe. I made smaller rolls. When I ran out of the feta spinach and mint filling, I used just golden raisins. Gorn was wild for the raisins and put honey on each bite!
Double it, half it, reshape it. Let’s see just how wild this one can go. You really want to bake this one. Seriously, this was perfectly delightful.
My first bake was rather dry because I skipped the egg and butter with the mint, basil and feta. My second bake was more moist and we liked that better. But, when I bake again I’ll just use the egg, and no butter; butter was just overkill.
DOUGH
450 grams whole grain sprouted red wheat and whole grain spelt flours, 3 2/3 cups
2 grams instant yeast, 1 1/8 teaspoons; 9 grams/0.3 oz fresh yeast
250 grams milk, warm to room temp, 1 cup
9 grams salt, 2 1/4 teaspoons
100 grams butter, 6 1/2 tablespoons
FILLING
1 egg
250 grams feta cheese crumbled, 8 ounces
50 grams butter melted and cooled, 3 tablespoons (very optional)
paprika for garnish, optional
spinach, mint, basil, garlic, optional
GLAZE
1 egg
1 teaspoon water
PAN
the choice is yours: I used a pie plate for my twist pull apart, 12×12 cm/ 4.5×4.5 inches; at least 5cm/2inchs deep, greased and lined
1. Put the flour and yeast into a bowl and give it a wish to mix. Make a well or do like I did and play with your food, make a star well! Pour on the milk. Close the well by flicking flour on the surface of the milk and allow to rest for 1 hour.
Add the salt and gather everything into a ball in the bowl. Turn it out on the counter and knead for 10 minutes. Add the butter and knead for another 10 minutes. Pop the dough back in the bowl, cover and allow to rest for 2 hours.
Mix the egg together with the herbs, spinach and feta cheese in a bowl. Melt the butter and allow to cool.
Pull the dough out of the bowl onto an un-floured counter. Un-floured so that rolling the dough balls gets traction.
2. SHAPING
Google this bread and you will find MANY different shapes.
Shape the dough into a tight sausage.
Cut into 9 equal pieces.
Lightly flour the top of each piece (I did not do this) and allow to rest for 15 minutes under a dry tea towel (I placed mine under a shower cap).
SHAPE RECTANGLE OR CIRCLE:
Take out one piece and on the counter lightly floured, roll it into a rectangle or circle about 10x10cm/4×4 inches for rectangle or square pan or to fit a pie pan.
Brush it with melted butter.
Take out another piece, roll it into the same size as before, place it on the first piece and brush it with melted butter.
Take out a third piece, roll it into a rectangle the same size as before and place it on the stack. DON”T brush it.
SHAPE INTO PULL APART ROLLS:
Next time I will divide into 16 balls because we enjoyed the rolls smaller.
3. Using a rolling pin, roll the stack of dough into a rectangle the size of your baking pan and lift it up (you can roll it around your rolling pin if that is easier) and place it in the prepared baking pan.
Brush it with melted butter and spread over half the feta cheese mixture and any optional toppings.
Repeat with the next 3 pieces of dough, and place that stack on top of the first stack. Brush this with melted butter and spread it with the remaining half of the feta cheese mixture and any optional toppings.
Repeat with the final 3 pieces of dough, and place the stack on top of the dough in the pan.
4. With your hands, push down all around the outside edge of the stack of dough – between the dough and the pan – so that you seal in the cheese. Really pull down the very top layer of the bread and stick it well on or even under the rest of the dough.
5. Cover with whatever you normally use and allow to rest for an hour.
6. PREHEAT OVEN TO 230°C (450°F) GAS 8
Before baking, brush the top of the dough with the melted butter and sprinkle some paprika on it if you like. I used smoky paprika. I sprinkled from the spice jar but if I’d had a small sifter to use that would have given me a more even distribution. I forgot the paprika the first time. I baked a second half recipe for traveling and we really liked the paprika.
Pop the pan in the preheated oven and immediately turn the oven down to 200°C (400°F) Gas 6.Bake for 35 minutes. Mine took 42 minutes because I used all whole grain flour.7. Remove from the oven.
Transfer carefully to a wire rack(inverting it onto a wire rack works all) and allow it to cool down a bit. When it is still warm (not hot), cut it into squares and eat it up alongside a salad or some soup for a wonderful. tasty meal.
Feta Cheese is a salty cheese. The Bulgarian cheese used traditionally for this bread is Sirene.
Feta is a brined curd white cheese made in Greece from sheep’s milk, or from a mixture of sheep and goat’s milk. Similar brined white cheeses produced in Europe are often made partly or wholly of cow’s milk, and they are also sometimes called feta. It is a crumbly aged cheese, commonly produced in blocks, and has a slightly grainy texture. Feta is used as a table cheese, as well as in salads and pastries. Most notable is its use in the popular phyllo-based dishes spanakopita and tyropita, or served with some olive oil or olives and sprinkled with aromatic herbs such as oregano. It can also be served cooked or grilled, as part of a sandwich, in omelettes, or as a salty alternative to other cheeses in a variety of dishes.
Sirene is a Feta style brined cheese made in South-Eastern Europe, particularly popular in Croatia, Serbia, Bulgaria, Romania, Albania, the Republic of Macedonia, Greece and also in Israel. It is also known as “white brine sirene” or Bulgarian Feta.
Sirene made from goat’s, cow’s or sheep’s milk or a combination of milks. It is soft, wet, and crumbly with a fat content of about 44-48%. It has a slightly grainy texture with a fresh lemony taste. This cheese is served with soups and salads, as a table cheese and also used in baking.
The mint, basil, and garlic were perfect! This would easily take to some kind of meat and most definitely spinach!
It does make a perfect little lunch!
Please Bake with us. Let your creativity carry you away with this one. Be a Bread Baking Buddy. Bake, Post by the 29th and e-mail me at comments my kitchen at mac dot com and I’ll send you a BBB badge and include you in the round up a day or so later.
One of my tasters described Shubbak el-Habayeb in this way “Kept drawing me back. Familiar but not. Unidentifiable but I should know it.” I found this to be a VERY compelling aroma and flavor. If judgement didn’t intervene, you’d eat all 12 rolls at one sitting.
Yes, I have plenty of cookbooks and Yes, I have a multitude of bread books. No, I do not NEED any more cookbooks or bread books. YES, The Book of Buns by Jane Mason (Virtuous Bread) arrived in the mail today because it seems I do KNEAD another bread book!
Who do I have to thank (blame) for this latest itch for another bread book? BBB and Kitchen of the Month Karen of Karen’s Kitchen Stories.
When translated the name Shubak el-Habayeb means The Lover’s Window. With a name like The Lover’s Window, you’d think there would be a story. If there is I couldn’t find it. Now, as I think about how my taster described this and how I just wanted to keep eating this, that pretty much describes how you feel about a lover. There’s your story.
Perhaps visually these might resemble some older factory windows I’ve seen but mostly they make me think of some oddly misshapen face with extra eyes. However, they seem to be sweet, kind eyes. I feel strange I’m having strange visions but these rolls are mysteriously exotic in all the right ways and pair well with elegant cheese and common peanut butter and jelly.
My crumb you can see on this is very tight. I think that might be due to my using a majority of whole wheat flour and no sugar. I’ll probably try adding a tablespoon of some sweetener next time (agave, honey or brown sugar) but I doubt I’ll reduce the whole wheat in fact I’m more likely to use all white whole wheat.
Shubbak el-Habayeb ~ Lover’s Window
DOUGH
600 grams white whole wheat flour, 4 3/4 cups
1/2 teaspoon instant yeast
30 grams ground flax seed
100 g/1/2 cup sugar, omitted
1 cup buttermilk, scalded
2 large eggs
1/2 teaspoon orange blossom water
1/2 teaspoon rose water, omitted
1/2 teaspoon ground cardamom
1/2 teaspoon ground mahlab
1 tablespoon salt, cut this a little short
50 grams butter, 3 tablespoons melted and cooled
about 1/2 cup water, added to the dough by wetting you hands as you knead the dough.
For the Glaze
1 egg
1 tablespoon water
Pinch of salt
Pinch of sugar
Sesame seeds
1. Pour the flour (I used 3 cups white whole wheat and 1 cup bread flour; held back 3/4 cup white whole wheat) into a bowl and whisk in the yeast. Create a well in the middle and add the milk. Cover the full buttermilk with some of the flour from the sides. Cover the bowl with plastic wrap or a towel, and let rest for one hour. I used buttermilk because it was there, I didn’t scald it. I omitted the sugar on purpose: experience has taught me that adding cardamom to anything brings a sweetness that satisfies my taste. Next time I might, maybe add 1 tablespoon for the yeast but I was pretty happy with the rise on these.
2. Add the eggs, flower waters, cardamom, mahlab, and salt to the mixture in the bowl and mix with your hands to form a rough dough. Turn it out onto an unfloured counter, and knead for 10 minutes.
3. Add the butter, and knead for 10 more minutes. While kneading, if the dough is too stiff, dip your hands in the water, and continue to knead. Continue to dip your hands in the water until you have a supple dough. You can also do this with a dough hook, adding the water, one tablespoon at a time.
Since I held back the 3/4 cup white whole wheat, I didn’t really need to add extra water
4. Place the dough into an oiled bowl and let rise in a warm spot, covered, for about two hours, until doubled.
I left mine two and a half hours to rise.
5. Turn the dough out onto a clean work surface. Divide the dough into 12 equal pieces and form them into balls. Cover with a towel or oiled plastic wrap, and let rest for 15 minutes.
6. Roll each ball with a rolling pin into a square that is about 1/2 inch thick. Cut the dough with a sharp knife to make short vertical cuts in each quadrant of the dough. Open the slits with your hands to make sure they are cut through.
7. Place the squares on baking sheets (you will need two sheet pans, prepared with parchment or Silpat), six squares per pan.
8. Cover each sheet pan with oiled plastic wrap, and let rise for one hour. In the meantime, preheat the oven to 425 degrees F (220 degrees C) with a rack in the middle of the oven.
9. Whisk together the glaze ingredients and brush the glaze over the rolls on one of the sheet pans. Sprinkle with the sesame seeds. Bake the first pan of rolls for 15 minutes, until golden. Remove them from the oven and cool on a wire rack. Repeat with the second pan of rolls.
The shape of these reminds me a little of Dhakai Bakharkhani/ Baqeerkhani (Crisp Flatbreads from Dhaka, Bangladesh) that we baked when Aparna was kitchen of the month but there the similarity ends.
If you make this recipe by the end of this month and send Karen a photo or a link to your blog post (if you don’t have a blog, just send a photo), you will be featured in a round up on her blog. She’ll even send you a fancy Buddy Badge! Send your contribution to her at karen.h.kerr@gmail.com, with the subject line, BBB. Please visit all of the Bread Baking Babes and check out their versions of this month’s recipe:
Our Kitchen of the Month, Aparna, has given us a recipe that’s been on my want to bake list for a very long time. In fact it was going to be my pick for our anniversary bread next month … until Aparna came up with it for January. There are many recipes for this bread out there but Aparna & I both picked the same one that appeared in Saveur.
First time bake for the grandkids with Taco cheese.
I can’t say enough good about this recipe: it’s very simple, easy to put together and since Aparna said that the Georgian police were being kept busy in Georgia and wouldn’t be watching to see if we followed every step of tradition, I think this makes for a wonderful opportunity to fill this with whatever floats you boat. I mean you’re going to be shaping it like a boat anyway.
I give this 5 stars because it’s easy, tastes good and because I found it to be a great fun factor for the grandkids. I baked this for the second time today just for adults. No more of that wimpy taco cheese for me. No way. My second bake used a beautiful goat cheese and a little beautiful pepperoni. Gorn & I both enjoyed these. You should feel free to shape them as big or small as you like. I still want to bake them with more tradition i.e. the egg in the middle, I do love me a runny egg yolk. To that end I will be mixing this again soon and doing a delayed rise in the refrigerator so that I can have these for breakfast.
Of course I added ground flax. The first time I baked this, I used all white whole wheat. The second bake, I used 1 cup bread flour and 1/2 cup white whole wheat. The all white whole wheat was a little denser but really the difference was minor and we liked them both.
I think this is a first rate recipe that opens all kinds of opportunities and fillings are endless.
Yes there is always drama. I turned around …
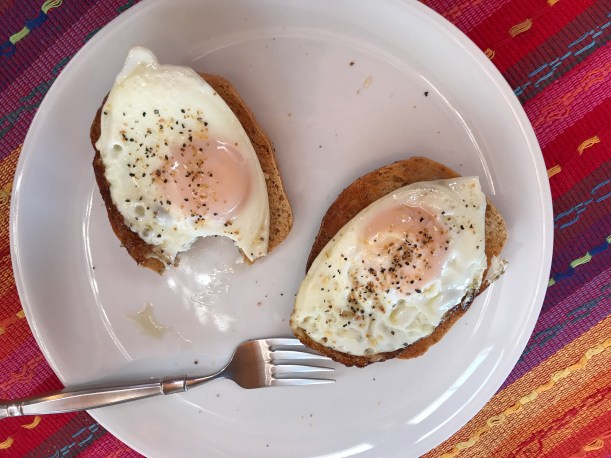
Acharuli/ Adjaruli Khachapuri ~ BBB
Recipe By: Aprana: Adapted from Saveur –
Serving Size: 6
For the Dough:
1 teaspoon instant yeast
1/2 teaspoon sugar, omitted
2/3 cup milk
1 tablespoon olive oil
1 egg (optional)*, omitted
1 1/2 cups flour, plus more for dusting
1 teaspoon salt
For the Filling:
1 1/2 cups grated/ shredded Mozzarella
1 1/2 cups crumbled feta cheese
2 eggs (or any other topping of choice – I used sliced tomatoes, pickled jalapenos and herbs)
For topping after baking:
4 tablespoons unsalted butter, cubed
1. I mixed all the dry ingredients … plus 2 tablespoons of ground flax seeds and then added the milk and oil.
Kneaded into a sticky dough ball.
Transfer the ball of dough to a well-oiled bowl, turning it so it is coated all over. Loosely cover and let it rise till double in volume – about 1 to 1 1/2 hours.
Place a pizza stone, or a baking sheet on a rack in lower third of oven. Preheat oven to 250C (500F).
2. Combine the cheeses in a bowl and set aside. Deflate the dough and divide it into two halves … or any number of your choice. I wanted small portions that the kids would eat without great waste the first time. My second bake I went for a little bigger because I was aiming for adult tastes and using goat cheese and I wanted to try baking with an egg. Working with one piece at a time, roll it out to a rectangle or oval about 10” and 1/8” thick on a piece of lightly floured parchment. This makes it easier to transfer the dough onto the baking stone.
Roll the long sides in a bit curving them inwards at the ends and seal well (with a little water) or the edges will open up during baking. Then bring the edges close and pinch together on both ends to form a “boat” like shape.
Again, make sure the ends are sealed well. Transfer the “boats” to the baking sheet, but if you’re going to bake them directly on the pizza stone just omit this step.
Dock the centre “well” area and fill with half of the cheese mixture so it is a little higher than the edges of the dough “boat”. Repeat with the other half of dough and bake them for about 12 to 15 minutes until the Khachapuri are golden brown.
3. Take the breads out of the oven and gently crack an egg on each bread without breaking the yolk (or add the sliced tomatoes, pickled jalapeños and herbs like I did) and return them to the oven. Bake for another 3 to 4 minutes till the egg is set.
Take the Adjaruli Khachapuri out, and place a couple of cubes (2tbsp) butter on each. Serve them hot. It helps to wait for about 10 minutes before eating them so you don’t burn your mouth!
I will leave all the history for you to find on Aparna’s site.
Really I can’t imagine you not wanting to bake this one.Bake this Acharuli/ Adjaruli Khachapuri according to the above recipe and post it on your blog before the 28th of this month. Please make sure you mention the Bread Baking Babes and link to Aprana’s post in your own blog post.
Then e-mail Aparna at aparna[AT]mydiversekitchen[DOT]com with your name, a 500px wide image of your bread and the link to your BBB post. I will then send you a BBB badge for this bread that you can then add to your post on your blog, and will also include your bread in a Buddy round-up at the end of this month.
This month’s bread is visually stunning, looks fancy and like it could be fussy. But it’s not … fussy that is.
Lien, our Kitchen of the Month for November, introduced this bread as savory. I changed around Lien’s suggested filling slightly but the lamb sounded good and I’m always in for savory. We really really enjoyed this over several days, for breakfast, brunch, lunch and dinner. I would absolutely bake this again just as I’ve written it below. I would absolutely recommend you get in the kitchen and bake it too.
DOUGH
350 grams bread flour
100 grams sprouted wheat flour
50 grams white whole wheat flour
7 grams dry instant yeast
20 grams ground flax seed
20 grams chia seeds
125 ml milk, lukewarm
125 yogurt
1 tablespoon sugar
1 teaspoon salt
1 egg
90 ml olive oil
GLAZE, I omitted this
1 TBsp milk
1 egg yolk
Equipment Needed
1 round cookie cutter 2 1/2 inches in diameter
large shallow pie dish 28 cm in diameter
My FILLING
450 grams lamb ground, sauted
½ red pepper, seeds removed, chopped fine
1 poblano chile, chopped fine
3 garlic clove, chopped
1 red onion, chopped fine
1 1/2 teaspoon cumin powder
½ teaspoon all spice
½ teaspoon black pepper
1 teaspoon smoked paprika powder
1 1/2 teaspoon dried oregano
1 teaspoon ground coriander seeds
80 grams grated smoked gruyere cheese, grated for topping/garnish
water, to give moisture or tomato sauce
1. DOUGH I omitted sugar called for in Lein’s recipe and mixed yeast and salt with the flours, flax and chia seeds. I mixed yogurt, egg and oil together. Then I mixed the dry ingredients with the wet. Knead into a supple dough.
2. Shape into a ball and let rest in a lightly greased bowl, covered with plastic foil. Let the dough rise for about an hour or until doubled.
3. FILLING I made this several days before baking.
Glaze the chopped onion and garlic in a frying pan. Leave to cool.
Mix the ingredients except the cheese for the filling well. Set aside.
4. SHAPE & FINAL RISE Lightly grease your pie dish.
Work with about ⅓ of the dough at the time. I didn’t read this and divided the dough in half; really divide in 3 parts would work much better.
Roll it out to a thickness of about 3 mm. Cut out rounds with a cookie cutter.
Place 1 tablespoon of filling on each round and sprinkle with some cheese. Fold the circle in half, and fold the two point together. It now looks like a petal.
Place in the pie dish, starting around the border with the point of the petal facing to the center. Repeat until there is just a little space left in the middle. Make three slightly smaller circles, fill and fold as the others and place them in the middle. Cover with lightly greased plastic or foil and leave to rest and rise for about 45 minutes.
5. BAKE Preheat the oven to 180ºC (356°F)
Whisk egg yolk and milk for the glaze and brush the bread with it. I sprayed mine with water.
Place the bread in the oven on a rack and bake for 25 minutes.
Lower the temperature to 170ºC (340°F) and bake for another 10-15 minutes until golden.
When the loaf is done, take it out of the oven and the tin, place on a wire rack and brush with some melted butter. Let cool or eat warm.
Notes:
Divide dough into three parts for easier handling.
Recipe makes enough dough for more than one 8 inch pie plate or perhaps I rolled my dough too thin.
Place small round baking dish in center if a dip is desired.
Sometimes stunning can seem like a limit. By that I mean, at least for me, when Lien introduced this as savory for some reason all I could think of was a meat filling (even though she suggested a bean filling as a meat substitute idea). Now, that I’ve baked this I’m struck with how fabulous these little pull apart bites are and how incredibly versatile this bread could be. Perhaps it started when Karen put up her Pizza Chrysanthemum Bread.
Now, I have a constant running loop of “fillings” for this bread and they are not all savory: Peanut Butter & Jelly; Garlic Butter; Pepperoni Pizza; Chicken Enchilada; Refried Black Bean & Salsa; Cinnamon Sugar; Chocolate Chip with Peanut Butter; … and with the holidays coming up how about some traditionals like Mince Meat; Pumpkin Pie; … well let’s just go with Pie as in Apple Pie … Are you catching my drift? This is a stunning shape for a bread. The small bite size makes it perfect for so many different meals and snacks, it’s absolutely a natural for a party of any sort.
Yes, we really did have it for breakfast. Much better than an egg mcmuffin.
Go BAKE, Be a BUDDY. Tell me you love me … well, just tell me you love BREAD will be good.
Our Kitchen of the Month is … Katie, in France, at Thyme for Cooking. She found our bread for October here.
This is a perfectly marvelous bread and I thank you Katie. I think you’ll find all sorts of variations from the Babes on this filling theme of caramelized onions. When I put all my caramelized onions down the middle of this loaf, it just didn’t look right so I used some of my red and yellow roasted bell peppers as well. The asiago cheese is the perfect taste for the roasted peppers, caramelized onions and Dijon mustard (mine made with horseradish).
Thy name is dilemma: Caramelized onions … without a stove top … there is a grill outside with a side burner … there is the electric panni grill … there is the slow cooker … did you know you can actually burn things in a slow cooker? Trust me you can but the second attempt to do the caramelized onions in the slow cooker worked like a charm.
Funny you can also roast sweet bell peppers in a slow cooker; I did a batch of those as well.
Karen told us there are cats that will eat caramelized onions. Who knew?
So now already you’ve learned two new things: cats will eat caramelized onions and you can burn onions in a slow cooker.
Now, there’s only one more thing you need to learn … just how good this loaf can be. In order to do that you will need to bake this loaf and then you might as well send Katie a link to your blog write up and become a Bread Baking Buddy so she can send you a badge and you can be part of the crowd eating just lovely devine bread. Click over to Katie’s web site here and she’ll give you the scoop.Caramelized Onion, Herb and Cheese Bread
Caramelized Onion and Asiago Cheese Braid
Recipe By: Katie (ThymeForCooking) adapted by me Originally from Canadian Living
1 teaspoon sugar, omitted
1/2 cup warm water – used skim milk
2 teaspoons active dry yeast, recipe called for 1 tablespoon, that always seems like too much to me
1/4 cup milk
2 eggs
2 egg yolks, omitted; just seemed rich enough without
1/4 cup vegetable oil
1 1/2 teaspoons salt
145 grams unbleached bread flour
131 grams whole wheat flour
170 grams white whole wheat flour
35 grams flax seed meal
1 teaspoon (.05oz/1.5gr) Herbes de Provence
Filling
1 tablespoon butter
1 tablespoon vegetable oil
3 cups sliced onions ( about 2 large)
1 teaspoon granulated sugar, omitted
1 teaspoon dried rosemary, my bad, I forgot it
1 tablespoon Dijon mustard – mine was made with horseradish
1 1/2 cups shredded asiago cheese
1 egg, lightly beaten
Directions:
Rolling, Rolling, Rolling …
1. Whisk together all the dry ingredients for the dough. Whisk together the milk, eggs, and oil.
Pour the liquid into the flour and mix with a wooden spoon to make soft dough.Turn out onto lightly floured surface; knead for several minutes to make a smooth and elastic dough. Place in greased bowl, turning to grease all over. Cover with plastic wrap; let rise in warm draft-free place for 1 hour or until doubled in bulk. Mine took an hour and a half.
Reducing the tablespoon of yeast here to 2 teaspoons slowed the rise down slightly which I think allows a little more flavor development. The rise I got was very good and with the temperature in the house at 66°, I think the 2 teaspoons yeast was more than adequate. If I were making this in a warmer time of the year, I’d cut it slightly more.
I have changed this step. I didn’t proof my yeast as the original recipe called for.
2. Filling: Meanwhile, in large skillet, heat butter with oil over high heat; cook onions, sugar and rosemary, stirring occasionally, for 5 minutes. Reduce heat to medium; cook, stirring and scraping up brown bits from bottom of pan, for 10 to 15 minutes or until onions are golden and very soft. Let cool to room temperature. It will work that way unless you, like me don’t have a stove top.
I oiled the inside of my slow cooker, filled it with sliced onions topped with a teaspoon of butter and let it cook on slow for 12 hours (20 hours will burn them). I stirred them twice during that time. I removed the lid and let them simmer on low for another 45 minutes.
The roasted bell peppers: I oiled the inside of the slow cooker and placed the seeded peppers cut into 6 sections into the slow cooker on high for about 8 hours. Once cooled, the skins released easily.
3. Punch down dough. Turn out onto lightly floured surface. Roll out into 14- x 12-inch (35 x 30 cm) rectangle.
Spread mustard lengthwise in 3-inch (8 cm) strip down centre of rectangle, leaving 1-inch (2.5 cm) border uncovered at short ends; top with onion mixture. Sprinkle with 1 cup (250 mL) of the cheese.
4. Using sharp knife and starting at 1 corner of dough, make diagonal cuts 1 inch (2.5 cm) apart almost to filling to form strips along 1 long side of dough. Repeat on other side, cutting diagonal strips in opposite direction. Alternating strips from each side, fold strips over filling to resemble braid, overlapping ends by 1 inch (2.5 cm) and brushing with some of the egg to seal.
Transfer to semolina dusted peel. Cover and let rise in warm place for 30 to 40 minutes or until doubled in bulk.5. Brush top with egg.
Bake in centre of 350°F (180°C) oven for 30 to 40 minutes or until puffed and golden.
I baked the loaf on a baking stone.
Sprinkle remaining cheese down centre of braid; return to oven for 10 minutes or until melted. Serve warm or let cool completely on rack. (Make-ahead: Wrap in plastic wrap and refrigerate for up to 1 day; rewarm in oven before serving.).
Notes:What do I think is the ideal filling for this?
I think this might best be filled with a great horseradish, sauerkraut, corned beef and cheese, although I’m sure a strong case could be made for a sausage or bacon with spinach and roasted butternut squash. You may have other ideas.
… half the mustard roll.
I had two little corners I trimmed at one end that didn’t fold into the braid right so I rolled that out and just spread mustard on it … That was genius! So genius that I had eaten most of it before I remembered to photo it.
Next week they start picking the apples here … can you think apple pie filling and cheese … ooowhee.
Lien at Notitie Van Lien our lovely Kitchen of the Month has brought Babes and Buddies just a wonderful new but old bread: Modern Lardy Cake … not don’t get up in arms, this is really not cake, it is bread. I will tell you it is a delight as a sweet dessert like bread (or cake if you like) after dinner and it is equally delightful at breakfast! Call it bread or call it cake or call it cake bread but I can tell you it’s so good. The bonus is it is Christmas Holiday perfect.
Thank you Lien in so many ways.
Among the Babes, we talked wildly and I think radically about lard, butter, goose fat, duck fat: as possibilities for use in this recipe. If I’d been in a full kitchen and been able to find fresh lard (not hydrogenated like the grocer tried to sell me) and duck fat, I’d be baking this with each. As things worked out all I could come up with for the fat was salted butter from my local dairy. I used all the salt called for in the recipe and the salted butter as Lien and several others thought it needed more. And I’d seek out a special dried cherry mix that Gorn really enjoys. Pick a dried fruit or dried fruit combo that you enjoy and this bread will be spectacular. I might even go really crazy and put in a few walnuts. You know I really enjoy savory but this is just the right sweet. We loved it.
Check out all the Babes, you’ll find all sorts of variety but I think you’ll find we all enjoyed this bread and you’ll want to get in the kitchen and bake!
Lien found this recipe in “Warm Bread and Honey Cake” by Gaitri Pagrach-Chandra. I have the book and it is everything you want in a warm baking kitchen.
Lardy Cake: Modern
Recipe By: Lien from “Warm Bread and Honey Cake” by Gaitri Pagrach-Chandra
Yield: 9 inch round springform
Lardy Bread Cake
Dough
375 grams strong white flour – bread flour, I used half white whole wheat/whole grain
20 grams flax seed meal
1 ½ teaspoons active dry yeast
1 tablespoon brown sugar
1/4 teaspoon salt
35 grams butter, melted and cooled
200 milliliters milk, warmed
I love this container. It’s so easy to tell when a dough has doubled in volume.
Filling
100 grams butter, softened
75 grams soft dark brown sugar
1/2 teaspoon ground cinnamon, I used 1 teaspoon
1/4 teaspoon freshly grated nutmeg
50-75 gram currants or raisins (or a mix), I’ll try closer to 100 grams next time
beaten egg, to glaze
1. Put all the dough ingredients in a large mixing bowl and knead (preferably with a dough hook in a heavy duty mixer) until smooth and supple. Bring the dough together in a ball and return to the bowl. Cover with clingfilm and leave to rise in a warm place until doubled in size. That heavy duty mixer … oops it’s still in it’s box. So I’m here to tell you “Don’t give a worry, you can do this without a mixer.” I did need to add a little more water than recipe called for. Toward the end of kneading I would dip my hands in a little water until I got a supple dough.
2. To make the filling, mix butter, sugar and spices together until creamy.
An easy mix when the butter is room temp.
3. Knock the risen dough back and re-knead it briefly. Roll it out to a rectangle about 50 x 25 cm (20 x 10 in). Spread the filling evenly over two-thirds of the dough sheet, leaving one outer third empty and about 4 cm (1 ½ inch) on all sides. If using, sprinkle the dried fruit over this and press down to embed. Fold the empty third over the middle third and the remaining third over this. Pinch all the edges well to seal the filling in. Cover with a sheet of clingfilm and leave to rest for about 5 minutes to relax.
4. Give the parcel a quarter turn and roll it into a rectangle about 30 x 15 cm (12 x 6 in). Fold into thirds again and leave to rest for 5 minutes. Repet this procedure three more times, turning the dough by a quarter turn and rolling and folding. If you find you are losing too much filling, omit the final turn.
5. This is a delicate, difficult and messy work as the filling oozes out in weak spots. You might want to read that again: This is a delicate, difficult and messy work as the filling oozes out in weak spots. Don’t get too caught up in leaks, just go with it.
Patch them up as good as you can and continue to work. All the oozing bits will caramelize nicely as the cake bakes. Oh my did we ever get some smart remarks on our bottoms! But you don’t want to lose too much filling as the laminating effect. Grease the tin and put the dough packet in it, then flatten it with your hand to fit it in as well as possible. Cover with clingfilm and leave it to rise until almost doubled.
6. Meanwhile preheat the oven to 180ºC (350ºF).
Who knows where the springform was, into the oven it goes.
7. Brush the dough with beaten egg, then lightly score a cross-hatched pattern onto the surface. Don’t cut into the filling. Bake for 25-30 minutesj or until brown. Remove from the oven, but leave in the tin for about 5 minutes. Carefully release the clip and turn the cake upside down on a wire rack. Remove the bottom of the tin, which will probably still be attached to it, and leave to cool further. Eat lukewarm or cold, cut into wedges or slices.
Bottoms up and out of the oven.
Don’t be shy … I know your busy but really this was very friendly dough and would make a treat for anyone special on your list at any time but probably most especially now. Tell us what your experiences were with this bread and send Lien (notitievanlien(at)gmail(dot)come) your details so she can include you in a round up. Deadline 29th of December.
Does it make good toast? Oh my heavens yes! Good for breakfast, afternoon snack and dinner treat! Now BAKE!
When you find a trusted source, you kept going back don’t you? Shoes you like, you’re likely to look for the brand again? A food blog you try a recipe from, you like, you’ll look to try another? For me there’s at least one site whose products I love and even order repeatedly from and use their recipes. For a bread lover, who do you think that might be? King Arthur Flour has proven itself over and over for me and these crackers are just another proof. This is a beautifully easy recipe to mix and bake but for me at least it’s glory lies in the topping possibilities and yes the use of a variety of flours.
Probably the most often spread we enjoy with these crackers is my spinach and artichoke, made with double spinach and given it’s own crunch with water chestnuts.
This recipe mimics an extra-crunchy, seed-topped whole-gain cracker you may find at your supermarket. These are great for spreads and dips of all kinds.
198 to 227g lukewarm water
170 g King Arthur White Whole Wheat Flour
120 g King Arthur Unbleached All-Purpose Flour
2 tablespoons non-diastatic malt powder or sugar – I used agave
1 teaspoon instant yeast
1 teaspoon salt
14 g whole milled flax or whole flax seed ground
14 g sesame seeds or whole flax seeds
*Substitute 28g golden flax seeds for the flax and sesame, if desired.
topping
71 g sunflower seeds, midget preferred*
28 g sesame seeds*
28 g whole flax seeds
sea salt or your favorite flavored salt, if desired
*Substitute 3/4 cup artisan bread topping + 1/4 cup whole flax seeds for the sunflower, sesame, and flax seeds, if desired.
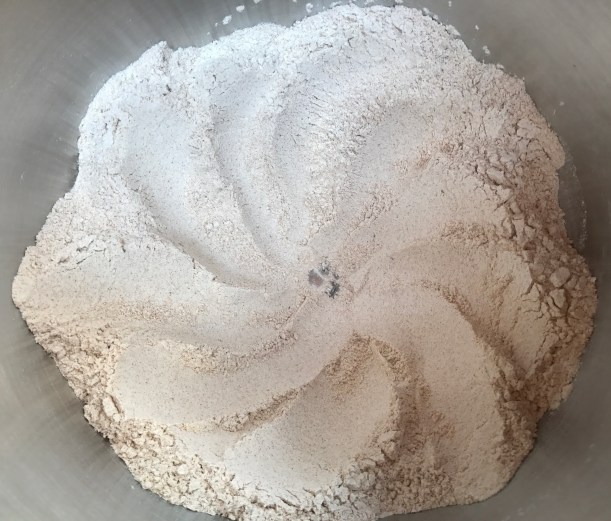
1. Mix and knead together all of the cracker ingredients (except the seeds) to a smooth, fairly stiff dough. Add 1-2 more tablespoons of water if the dough is dry.
I used the larger 227 ml of water and regardless of the flour type used, I have found this to be a sticky wet dough. I’ve played very loose with the white whole wheat flour called for in the recipe: on different occasions I’ve replaced part of it with barley flour, buckwheat flour, spelt and rye flours. Perhaps we enjoyed the buckwheat flour the most but all were terrific. Each time I’ve baked these I’ve added chopped walnuts but my Babes have show me I must expand my nut choices ~ think pecans, pine nuts …
2. Knead in the seeds.
You may do as I’ve done at this point and refrigerate the dough: if you do that, allow the dough 90 to 120 minutes to re-warm to room temp and expand slightly as in step 3 below.
3. Let the dough rise, covered, for 60 to 90 minutes, until it’s expanded a bit.
Don’t expect a large rise here. “Expand a bit” did not translate into doubling as you often expect with doughs.
4. Divide the dough in half. Working with one piece at a time, roll it into a rectangle approximately 14″ x 9″, a generous 1/8″ thick. This will probably require you to roll the dough until it fights back; give it a 10-minute rest, then come back and roll some more. It may need two rest periods to allow you to roll it thin enough.
Perhaps it’s because I’ve always played around using different flours or maybe it’s because I’ve always had that rest period in the refrigerator but I’ve never had this dough fight back, it’s always been easy to roll out.
I also use special rubber bands on my rolling pin to take the guess work out of how thick the dough rolls out. I’ve used the yellow bands in the past for the 1/8 inch but this time I went with the red 1/16. It worked just fine and gave me very thin crackers, crunchy!
5. For easiest handling, turn the dough onto a piece of parchment paper. Spritz the dough with water. Sprinkle with 1/4 of the topping seeds, lay a piece of parchment on top, and press the seeds in with a rolling pin. Turn the dough over, peel off the parchment, and repeat. Set the seeded crackers on a baking sheet, and repeat with the remaining piece of dough.
Play: these seeds are suggestions, what’s in your pantry, what do you like, what wildness can you come up with? Seeds are great but consider using your favorite nut here. I chopped seeds and nuts. Because there are only two of us on most occasions, I generally divide this dough into half or thirds and bake over several days.
6. If you don’t have parchment, roll on a rolling mat or on a very lightly floured or lightly greased work surface; and transfer the seeded crackers to a lightly greased baking sheet. Sprinkle each sheet of crackers with some sea salt or flavored salt, if desired. Crush the sea salt between your fingers or grind it in a salt mill if it’s very coarse.
7. Prick the dough over with a fork or one of these. I ruined many a cookie sheet using forks to prick cracker dough until I found one of these rollers …
and cut it into rectangles, whatever size you like. This seemed like an insane gadget to buy at the time but after using it repeatedly for crackers and biscuits, I’ve really come to wonder why I put off paying the $20 for so long. It expands to cut any width you like and locks in place. Initially I thought this would be a bugger to wash but I just open it up wide and give each roller blade a wipe, close it up and swish it in the water: clean!
Pull the crackers apart just a bit; you don’t need to separate them completely. Let the crackers rise for 30 to 45 minutes. while you preheat your oven to 350°F; they’ll get just a bit puffy.
8. Bake for 20 minutes, until the crackers are a medium brown. Turn off the heat, wait 15 minutes, then open the oven door a couple of inches and let the crackers cool completely in the turned-off oven. When they’re completely cool, break apart, if necessary, and store airtight.
Once again I am KOM … Kitchen of the Month! The Babes have really gone crackers with this one so be sure to check them all out. They’re on the side bar there. If you’d like to be a buddy with us this month, I will be delighted to have you in the Cracker round up to be posed on the 29th September. To be a Bread Baking Buddy, just make the crackers, take some photos, write up your post – tell us your experience with the dough – and send an email to ~ comments my kitchen at mac dot com ~ you know to take out all those spaces ~ PLEASE PUT “Cracker Buddy” as your subject line and get those mails to me by no later than the 28th. I’ll send you the buddy badge and get you in the round up.
See those fire crackers in our badge, thank you Lien! Now get cracken and BAKE!
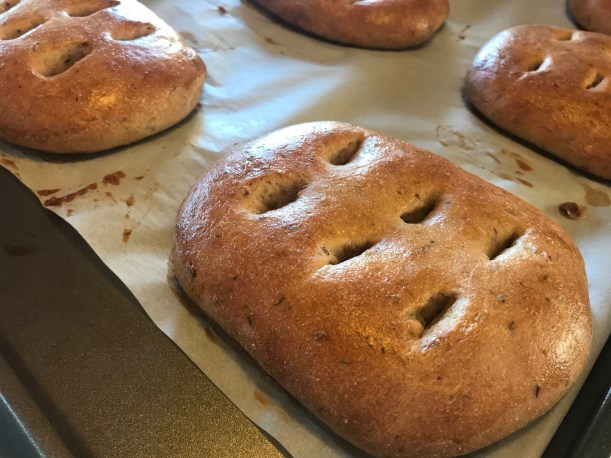
Flat, I’m flat, I’m flat as a pancake. Flat as a pancake, busy as a bee and happy as can be with Nan E Barbari!
Since I am so very late posting this month because the universe has chosen to bless me with a hail storm of crisis events – always loved that Morton salt girl with the huge umbrella in the downpour – when it rains it pours. I will do this very short with just a few notes of mine.
Notes: You really want to bake this: It’s drop dead easy and fast for yeasties.
My original goal was to have a lovely Persian dinner with this like lamb meatballs … but I never got that past the idea stage and instead we used half of a loaf for toast and the rest for glorious sandwiches! When we get to Michigan, this is going to be high on my list for a BBQ nite.
based on Lida’s recipe for Barbari Bread at 1001recipe.com
Nan e Barbari (Persian flatbread)
dough
5 gm (~1.5 tsp) active dry yeast
360 gm (1.5 c) water, at 90F (32C) ¹
60 gm (~0.5 c) 100% whole wheat flour
360 gm (~2.75 c) unbleached all purpose flour (100 grams of this was spelt)
2 gm (~0.5 tsp) baking powder
6 gm (1 tsp) salt
30 gm ground flax seed
nigella seeds (or black sesame, poppy, sesame seeds)
sauce
1 teaspoon flour
1 teaspoon baking soda
160 gm (2/3 c) water
Directions:
1. In a large bowl, mix the flours, baking powder, yeast and salt and whisk together. with a wooden spoon until the dough pulls away from the sides of the bowl. (Doesn’t that give you pause … baking powder, yeast. Well, it did me but I blindly followed along.) Add water and mix with wooden spoon or your hands until it clears the sides of the bowl.
This resulted in flatter loaf.
2. Kneading: Turn the dough out onto an UNfloured board. Now Elizabeth has a fetish about washing and drying her bowl … I don’t. Please do not be tempted to skip this step. I did … ship it. Using both hands on either side of the dough and thumbs resting on the top in the center, lift it up and flip it over in the air before plopping it back down on the board. Considering all that hail storm, my plopping was more like whack and bam but boy that was just terrific. Fold the dough in half away from you as you plop the dough down. Keep repeating until the dough is smooth. Every so often, use the dough scraper to clean the board. Stretching the dough is desired on the turns. But this won’t start happening right away. When the dough is smooth, place it in the clean mixing bowl (there is no need to oil the bowl).
3. I placed the dough ball in my rising bucket and put the lid on. Allowed to double.
4. Prepare the sauce: Whisk flour, baking soda and water in a small pot. Bring it to a boil. Remove from heat and set aside to cool.
5. Pre-shaping: Line a cookie sheet with parchment paper. Scatter a light dusting of flour on the board and gently remove the risen dough onto it. Don’t worry that the dough is quite slack. Cut the dough in half. Form each piece into a ball and place well apart on the cookie sheet.
Loaf came out with most loft using this method.
6. I covered this with a large plastic box and allow to rise to double in a draft-free area. (about an hour)
Final rise after shaping.
7. Final Shaping: Brush each round with the sauce. Dip your fingers in the sauce and dimple the rounds down to form two ovals with lengthwise furrows. Brush ovals with the sauce once more and sprinkle with nigella seeds. Allow the ovals to stand for about 30 min. Elizabeth has terrific links for videos, very worth while, I just don’t have time to include today.
8. Baking: Baking: If you do not have a barbecue, this bread can be baked in a conventional oven. Lida suggests baking it in a preheated 375F (190C) oven for about 30 minutes until golden brown.
Grand color!
Serve the bread warm. And if cools completely all is not lost because …
Can you have better at a picnic!?
You can still have glory!
Are you drooling now … Get thee to the kitchen and BAKE!
Thank You Elizabeth for a great bread, please for give the speed post. Some times life just throws such incredible curves.


 Here I am Kitchen of the Month, we’re on a cross country road trip and the mission today was to spread some of Dad’s ashes.

 Next time I will divide into 16 balls because we enjoyed the rolls smaller.