I’ve baked bread and I’ve baked BREAD and then I’ve baked BREAD and then some. But, I’ve never gotten tired of baking bread. Karen from Karen’s Kitchen Stories suggested the Babes bake Dollywood Cinnamon Bread. It’s bread but it’s also Cinnamon Bread but then it’s Cinnamon Bread like you’ve knot known it before. Oh and it’s not a knot! It’s more pull apart log but different even so.
Karen found this recipe in a beautiful new book – and yes I succumbed and now have a copy in my library. I love all the stories Anne Byrn has, one for each recipe. And I’ve bookmarked too many to ever get them all baked but life should be full of challenges one chooses!
I used two rolling pins about the same size so I could cut without going through to the bottom.
Ready to slice …
The slice in allows all the goo …
To filter down and permeate the loaf … I will confess, the two best slices are the ends…heaven.
I did observe the overnight rest in the fridge. I will make it again with double the topping and open those slices more to allow that topping further in if that’s at all possible.
Karen’s got her adaption of Anne Byrn’s recipe on her site but I’d encourage you to check out the book and the other Babes baking this month.
Our host kitchen of the month is Judy at Judy’s Gross Eats. She can tell you about this bread taking the internet by storm. I’m going to tell you about how this is simply amazing. Our son and his three kids raved about the milk bread they baked all during the pandemic. They loved how you could squeeze it and it came back. They just really loved it. Whole grains…ha, those were awful tasting things that ruined any bread. This was all white. This was real bread. I loved watching their productions, the photos and the movies and what they put on their slices. But white bread just isn’t my thing. I didn’t try it.
Then here comes Judy with this milk bread. AND here’s a friend with a birthday. Wow! Great opportunity to bake a spectacular white bread that I can give away. So I baked white bread…I was taking it to the party…there was wind and rain…party got canceled…didn’t give away bread…Gorn loved it.
Truly, this makes for spectacular baking but in my mind, on my taste buds, white bread even with the fillings I used (and they were really really good) I just find white flour bread bland. I feel sure there will soon be a time I bake this again and make it with some character flours.
The magic of three basic ingredients always blows my mind. With this bread, it is a technique and shaping that bring it into the realm of the GLORIOUS. Technique is cooking the flour into a paste, the tangzhong, and adding that to the dough. Shaping adds the final magic. I’m astounded by breads that look spectacular and difficult…then turn out to me relatively simple to execute, and this definitely fits in that category.
My fillings. Well, this recipe called for dividing the dough into five pieces. That gives you the opportunity to use five different fillings all in the same loaf. I used Biscoff Crunchy Cookie Butter, peanut butter, brown sugar & cinnamon, chocolate and left the last plain. Not surprisingly I liked the Biscoff and the peanut butter the best. Fillings can be sweet or savory and my mind swims with the possibilities.
I lost track of width I should have made the five rolls and ended up with misfit. Judy’s misfit I think was stunning, mine not so much but it still worked. I did like the idea of different fillings. Fermenting in my mind, you could make these five rolls smaller and make more pieces and create many surprise flavors. That might make more work but it sounds interesting.
Japanese Milk Bread from King Arthur Baking Company
1. To make the tangzhong: Combine all of the ingredients in a small saucepan, and whisk until no lumps remain.
2. Place the saucepan over low heat and cook the mixture, whisking constantly, until thick and the whisk leaves lines on the bottom of the pan, about 3 to 5 minutes.
Three minutes.
3. Transfer the tangzhong to a small mixing bowl or measuring cup and let it cool to lukewarm.
4. To make the dough: Weigh your flour; or measure it by gently spooning it into a cup, then sweeping off any excess. Combine the tangzhong with the remaining dough ingredients, then mix and knead — by mixer or bread machine — until a smooth, elastic dough forms; this could take almost 15 minutes in a stand mixer. I started doing this by hand as I like that best BUT I quickly felt I would get a much better result with the kitchen aid AND I got the smoothest dough ball ever.
Baby smooth bottom! Twelve minutes in the KitchenAid.
5. Shape the dough into a ball, and let it rest in a lightly greased bowl, covered, for 60 to 90 minutes, until puffy but not necessarily doubled in bulk.
6. Dough shaping: Divide the dough into 5 pieces. Roll each piece into a thin, oblong shape, then, using a sharp object (I used my 6 inch bench scraper), start about 2/3s from the designated top and make 1/8” to ¼” cuts.
This is almost five minutes long I’m sorry, I have to learn some editing 😌 Yes, we have pesky fruit flies in the film. Please excuse the straw like grey hair that gets in the way.Continue reading →
Since I have a good friend who was 2 weeks past her second vaccine and I was a month past my second vaccine, we baked together in my kitchen. It was a celebration! We didn’t wear a mask but I did let my HEPA air filter run. Originally I was going to do this sourdough, Karen gave us permission – like a Babe would need permission. Since I planned to do this with my friend Mary, I felt it would be easier for her if we did a biga with the yeast. I’ll try the sourdough at a later date. We started with an Olive Oil tasting. Just three so it was mini but still fun and instructive.
Our Mini- Olive Oil Tasting
I did a search for the best baking Olive oil and Monini came up, I ordered it from Amazon. From the local small Montegue Foods store, I picked up Lucini on a whim. A few days earlier, we were in Muskegon and we stopped in at the Cheese Lady. Had there been no pandemic, I would have tasted a batch of their many olive oils. The Hojiblanca was recommended as between mild and robust, so I tried that one. We both found the Monini robust, bitter, and spicy at the end. We liked it. The Lcini would have been our second choice; it had a strong olive oil flavor and was spicy especially at the back of the tongue at the end. The Hojblanca we felt was so mild it wouldn’t have added anything to the bread flavor. We went with the Monini: Mary’s son described the bread tasting robust, a little bitterness and spicy at the end! Wow, I felt that was nice confirmation of our choice. Karen recommended a hearty fruity flavored extra virgin olive oil. I will return to the Cheese Lady shop and request a more robust olive oil to try next. I love her cheeses!
Olive Oil Wreath
Recipe By: Karen from Karen’s Kitchen Stories adapted the recipe from the book Della Fatoria Bread by Kathleen Weber Yield: 1 loaf
Biga 125 grams AP flour, (3/4 cup plus 2 1/2 tablespoons) 1/2 teaspoon instant yeast 83 grams water, 75 to 80 degrees F (1/4 cup plus 1 1/2 tablespoons) Olive Oil Wreath 100 grams of the biga, (1/4 cup plus 3 1/2 tablespoons) 285 grams 75 to 80 degree F water, (1 cup plus 3 1/2 tablespoons) 60 grams extra virgin olive oil, (1/4 cup plus 2 teaspoons) 10 grams instant yeast, (1 tablespoon) 500 grams all purpose flour, (3 1/2 cups plus 1 tablespoon) 2 1/2 teaspoons salt
Directions:
BIGA: Mix the biga ingredients until combined. It will be sticky. Place it into a lightly oiled bowl, cover, and let sit for 10 to 18 hours.
Leftover biga can be refrigerated for up to 3 days to make more loaves. Or if you bake with a friend, divide in half and you each have a loaf!
FINAL WREATH DOUGH In the bowl, add the biga, water, olive oil, and yeast and mix until the biga is broken up.
In a medium bowl, whisk the flour and salt together. Add it to biga mix until moist, then knead about 5 minutes.
Turn the dough out onto a floured work surface and briefly knead by hand. Place it into an oiled bowl our dough rising bucket and cover with oiled plastic wrap. Let rise in a warm spot to proof for 1 1/2 to 2 1/2 hours until really puffy, more than doubled.
Turn the dough back out onto a floured work surface and deflate the dough. Gather up the edges and preshape the dough into a ball. Flip the ball and place it seam side down on the work surface. Push the dough against the work surface in a circular motion to tighten the top. Pull the dough toward you to elongate the dough into an oval and let rest for 10 minutes.
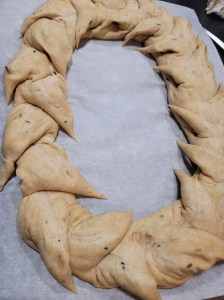
Shape the dough into a 1 1/2 inch by 42 inch long piece. To do this, turn the dough over, seam side up and pull the dough into a rectangle shape. Wrap the longer sides over each other like an envelope. Gently rock the dough with your hands to elongate the dough. Let it rest for about 10 minutes if the dough resists.
I used parchment and a peel anticipating sliding the formed loaf onto a hot baking stone.
We put Mary’s on parchment and in a box to keep cold air drafts off as she was transporting her ring in the car to bake in her oven at home.
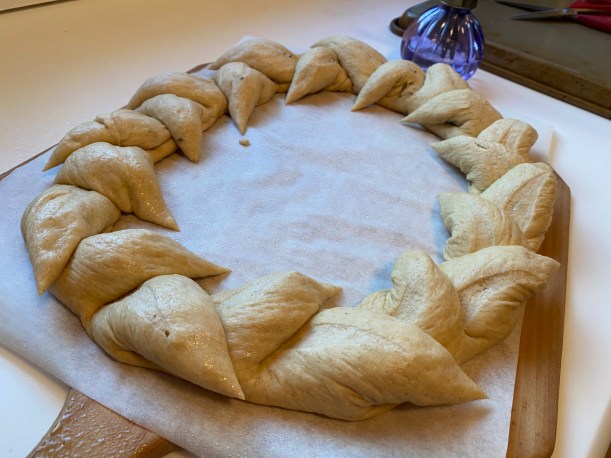
Gently place the dough on the pan or parchment and form it into a circle, overlapping the ends. Cover loosely with oiled plastic wrap and set the dough in a warm spot and let rise for 1 to 1 1/2 hours.
In the meantime, heat your oven, with a rack on the lowest level with a steam pan, and a rack in the middle above the steam pan and fitted with a baking stone. OR what I did was mist the oven before and 2 minutes after the loaf went into the oven.
Heat the oven to 450 degrees F.
Using scissors, cut partially through the dough at a 45 degree angle from the top and move the cut dough to one side. Cut almost but not all of the way through. Continue to make more cuts, every 3 inches, and move the cut dough pieces to alternating sides until you go around the wreath. Don’t cut from the sides, cut from the top. 3 inches is arbitrary to some extent, closer or farther apart will give you smaller or larger pieces to pull apart.
Mary’s perfect epi cuts!
Place the pan or parchment (using a peel) with the shaped dough onto the stone and add 1 cup of ice cubes to the steamer pan. Immediately close the oven door and reduce the heat to 400 degrees F.
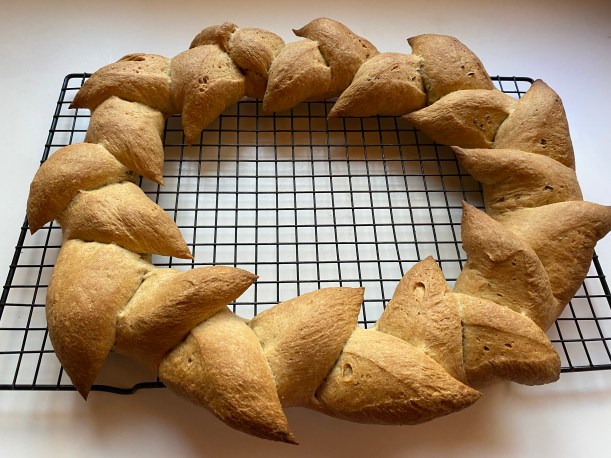
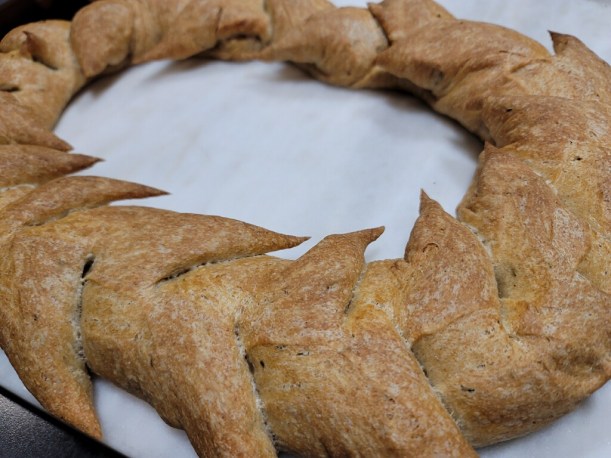
Bake for 30 to 35 minutes, until golden brown.
Transfer the loaf to a cooling rack and let cool completely.
I am super proud to say both Mary and I got beautiful bakes. While the dough rested and rose, we went for a beautiful walk in the woods. I was getting late in the day so she took both her loaves home to bake in her oven. (The second loaf we each bake was the BeeKeeper’s Pain De Mie).
I hope you’re planning to bake with us. This is simply a perfect celebration bread ~ surely you have something to celebrate: It’s Friday – the sun is shining – it’s raining so the spring flowers will bloom – heck celebrate Great Olive Oil Wreath! This is certainly one to bake.
The Crumb
Scale it!
I was going to keep the pandemic ponytail but … nope it’s gone.
Begs to be pulled apart…
For complete details about this month’s recipe, the BBB and how to become a BBBuddy, please read:
Wild … BBB … Award for most Wayward Babe! That’s me I do believe.
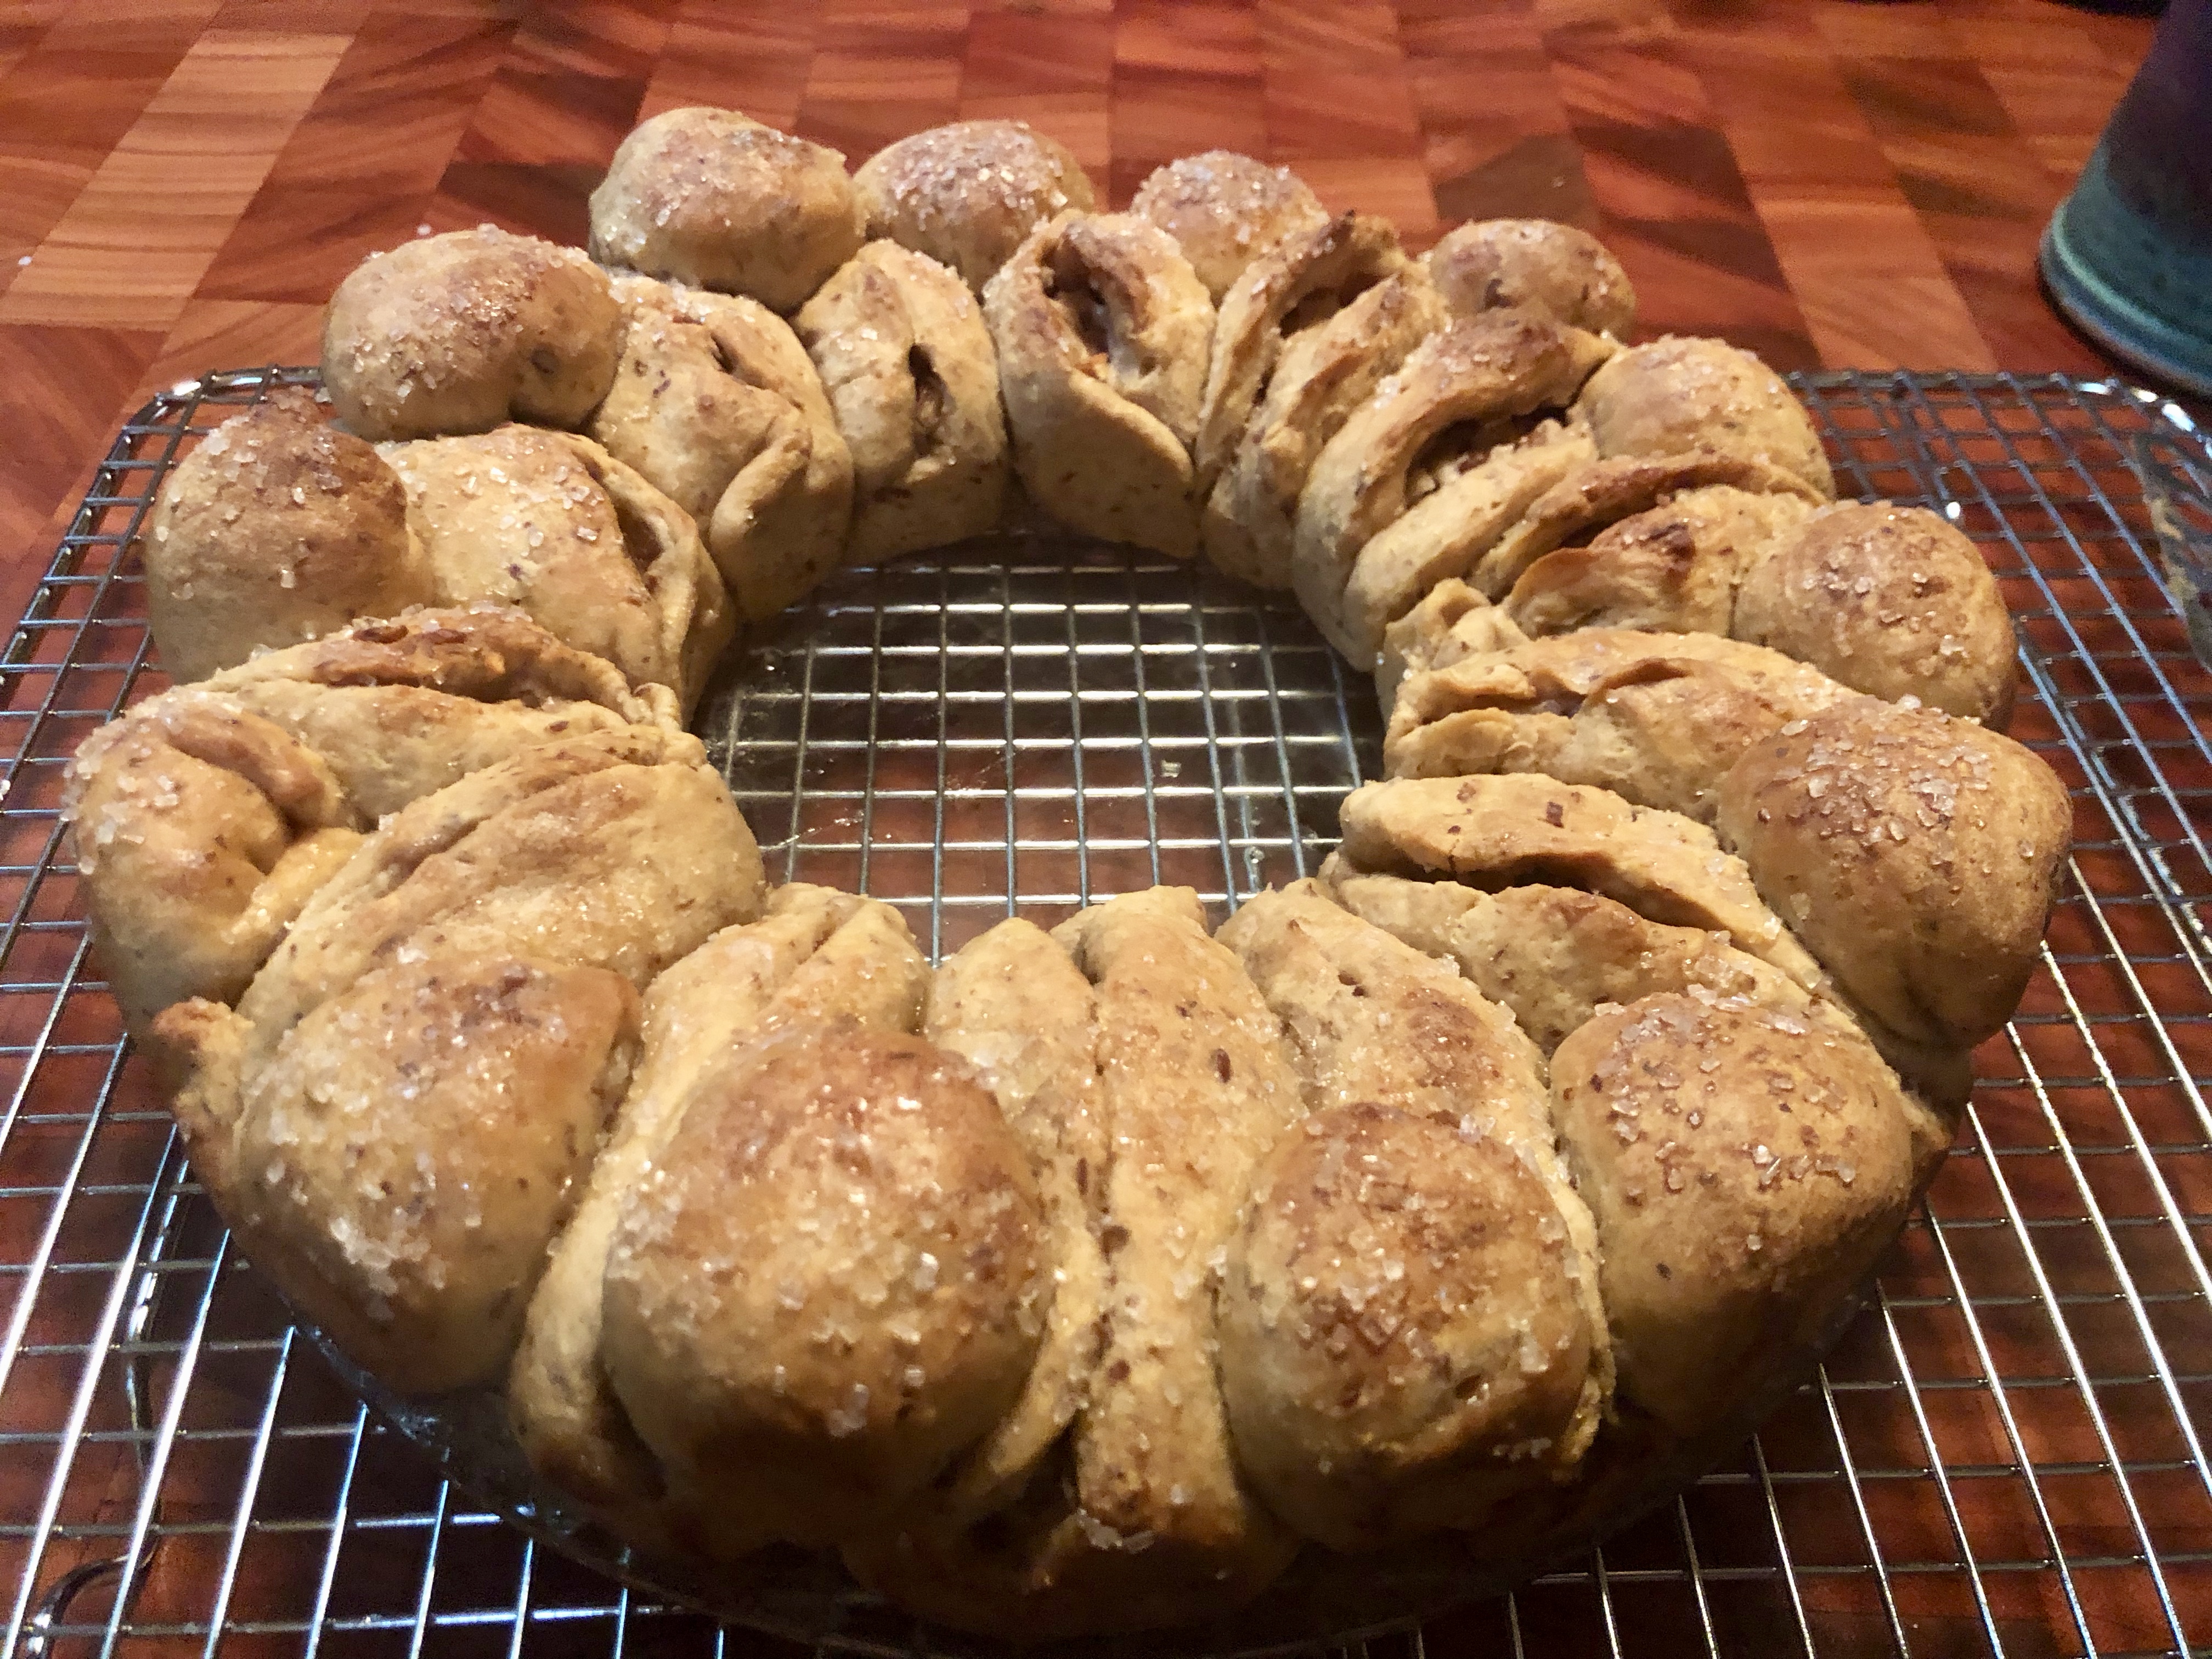
Elizabeth, our kitchen of the month, titled this Wild Pull Apart. Little did she know just how wild I would take this and commit murder in the process. Actually I know she meant Wild Yeast but since …
I got a fairly decent starter going last month. Baked with it twice. And then … I left it out and was gone three days … perhaps I can plead just accidental yeast slaughter instead of murder.
With no starter, Elizabeth’s recipe for sourdough this month was out. So I needed a pull apart bread recipe with instant yeast and I wanted one with whole wheat flour.
What’s a common recipe that’s sort of pull apart?
What came to my mind was cinnamon rolls.
Looking for whole grain, I went to Peter Reinhart’s Bread Revolution. I was not disappointed.
Sprouted wheat cinnamon rolls gave me my basic dough recipe that I cut in half and only slightly altered.
In retrospect, the filling should have been … well less filling in volume but my brain had latched onto Sonya apples that we’d had the week before. The sweetest juiciest I think I’ve ever had.
While this was not the shape Elizabeth ask us for, this is a great whole grain recipe and a wow flavor combination. I will be doing this again.
Because the filling puffed out each circle, I was left with gaps around the outside of the pan. I didn’t think rising and baking would fill that so I made up balls of dough with filling.
When I do this again, I plan to make this as a monkey bread using balls with the filling and roll them in butter. I mixed the dough with the honey but the only sugar I used was the sparkling sugar on the top. These apples made for a wonderful sweetness.
Elizabeth’s shape would be perfect for savory garlic bread which I will be trying soon.
BBB Wild Pull Apart
Recipe: Adapted from Peter Reinhardt’s Bread Revolution
Serving Size: 8
– Dough:
– 255 grams half & half
– 2 teaspoons instant yeast
– 42 grams melted butter
– 35 grams honey
– 340 grams sprouted wheat
– 1 teaspoon salt
– Filling:
– 2 Sonya apples, chopped
4 oz honeyed goat cheese
2 handfuls pecans, chopped
– Dusting of cinnamon on apples
– Sparkling sugar for topping
Whisk all dry ingredients together.
Melt butter (could use olive oil or part of both) may be enough to warm the milk. Mix with honey.
Mix wet and dry together.
Dough will be soft and sticky. Bring together into ball. Allow to rest for 15 minutes.
Stretch and fold every 25 minutes 4 times.
Refrigerate overnight.
Allow to come to room temp next morning. I left mine out 2 hours. Shape and fill. Allow to rise. Bake at 325° convection for 20 minutes. Bake conventional 15 minutes at 350° until golden. Brush with butter.
Notes:Used springform pan … put a pan underneath it! This recipe made the ring and a small loaf.
This was perfect for coffee with a friend … and then for our brunch! Totally, I’ll be making this again.
You love bread! Why else would you be reading a bread blog … Here’s how to join us:
You have until the 29th to bake the bread and post about it on your blog (we love to see how it turned out AND hear what you think about the bread) with a link to the Kitchen of the Month’s post about the bread.
E-mail the Kitchen of the Month with your name and a link to your post OR leave a comment on the Kitchen of the Month’s blog that you have baked the bread and a link back to your post. Kitchen of the Month this month.
The Kitchen of the Month will post a round-up of our Bread Baking Buddies at the end of the week and send you a BBB badge for that month’s bread.
No blog, No problem – just e-mail the Kitchen of the Month with a photo and brief description of the bread you baked and you’ll be included in the round-up.