
This month’s BBB Bread Kitchen of the Month, Elle from Feeding My Enthusiasms, is a monthly reminder of why I don’t seem to be able to tire of baking bread. You think you’ve seen and done it all? HaHaHa, Oh no you have not. Grandchildren are now another reason I won’t be tiring of baking bread.

Cinnamon rolls are always nice but with brioche dough they pass into heavenly!
Our Kitchen of the Month found this recipe in Beard on Bread; published in 1973. I believe I bought my copy in 1975. It was my first and only bread book for several years. I think I’ve added several bread books to my collection recently … and how classic an understatement is that.
Yield: 2 loaves
2 packages active dry yeast, used scant tablespoon not the 2 tablespoons in a package
1/2 cup warm water (100 – 115 degrees F), used 1/2 cup skim milk instead of water; would use potato water if available
1/8 cup brown sugar, cut the 1/4 cup in half
1/2 cup warm skim milk
1 stick butter
2 teaspoons salt, used 1/2 teaspoon and salted butter
3 eggs
3 1/2 cups all-purpose flour and 1/2 cup more kneading, used: 1 cup bread flour, 1 cup spelt, 1 cup whole wheat, 1/2 cup white whole wheat.
More flour for the tea towel
1. Rinse a 4-quart mixing bowl with warm water. Dry thoroughly. Put in the yeast, the 1/2 cup warm water(skim milk or potato water), and teaspoon brown sugar, and stir until the yeast dissolves. Allow to proof for 5 minutes.
Heat the milk with the butter and 1/4 cup sugar until lukewarm, then add to the yeast mixture. Add the salt and stir to blend well. Add the eggs, one at a time, and again blend thoroughly.

How to stir it up.
Then stir in 3 cups of flour, 1 cup at a time, to make what will probably be a very wet and sticky dough. Stir quite vigorously. Spread out the dough on a working surface – a table, a piece of marble, or a board – sprinkled with the additional 1/2 cup flour.
Use a baker’s scraper or large spatula to work in this last portion of flour and make the dough firmer. Scrape under the flour and the dough, lifting and folding inward. Repeat until the flour is well incorporated.

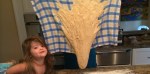
Lots of help with stirring.

Yep, it sank.
4. Submerge this packet in a large bowl filled with warm water (about 100 – 115 degrees F, approximately). It will sink. Submerge: you don’t really have to do anything it just sinks.
5. Let sit for about 35 to 40 minutes, or until it rises sufficiently to float on top of the water. … and it does float to the top.
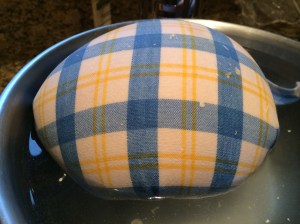
Floats to the top.
6. Lift the dough from the water and let the excess water drip off. Un-wrap and turn out on a lightly floured surface. A rubber/plastic/soft bench scrapper is very helpful peeling it off the towel.

New meaning for the word CLING!
You will have good results getting the towel clean IF you immediately put it to soak in COLD water.
Again it will be quite sticky, so scrape off any dough that adheres to the towel. Knead and shape into two loaves, using both dough scraper and your hands.
7. Thoroughly butter two 9 x 5 x 3-inch loaf pans and place one loaf in each pan. Cover, put in a warm, draft-free place, and let the dough rise slightly above the tops of the pans, or until almost doubled in bulk.

2nd rise.
8. Meanwhile preheat the oven to 375 degrees F. Brush the dough with cold water, and, if you like, make a slash in each loaf with a sharp knife. Place on the middle rack of the oven and bake for about 30 – 35 minutes, or until the loaves sound hollow when rapped with the knuckles, top and bottom. When done, place the loaves directly on the oven rack, without their pans, to brown the bottom a little more and crisp the crusts. Cool on racks.

Notes:
You should have good results getting the towel clean IF you immediately put it to soak in COLD water. By the time you’ve shaped the dough for the final rise, the towel should be ready to rinse out a couple of time, be dough free and ready for the wash.
This is a beautiful bread; made fabulous French toast and regular toast. Thanks Pat for a great bread and a totally new and unique technique in bread making.

The Slice & Crumb!
My Comments on BEARD ON BREAD: Wednesday, February 4, 2009
This maybe considered out dated by some but I think more would consider it a classic as I do. Most of the recipes are simple perhaps but they give you great bread and an excellent feel for good bread. The recipes are varied and have helpful illustrations. I’ve never missed that there are no photos in this book. Recipe directions are clear and concise, giving simple but good descriptions of what the dough should feel like during the kneading and shaping. I can recommend this book to beginner and experienced alike.
About the only thing I do differently & consistently is reduce the amount of yeast called for in these recipes. For whatever reason, most all recipes I find written in books from the 1950s through the 1970s call for much more yeast than they need and it can leave a stronger yeast flavor than I’m looking for in bread. Too much yeast also results in an overly fast rise that prevents the flour flavor to develop.
Breads Baked
Buttermilk White Bread – made excellent hamburger buns
Jane Grigson’s Walnut Bread from Southern Burgundy – baked 34 loaves of this GREAT bread for my Greenhill Parent’s Association Board in 1991
Cornmeal Bread – baked with Jason’s 4th grade class for Thanksgiving Feast & Play
Cheese Bread – great sandwich bread
Pizza Caccia Nanza – wonderful
Italian Feather Bread
Norwegian Whole-Wheat Bread – great bread, usually make 1/2 recipe
Whole-Meal Bread with Potatoes – potatoes, it’s great
Cracked-Wheat Bread – excellent
Marnetta’s Oatmeal Bread
Oatmeal Bread with Cooked Oatmeal – this is the basis for my oatmeal breads today, almost cake like depending on the sugar used, makes excellent cinnamon rolls & bread
Monkey Bread – amazing
Challah
Irish Whole-Wheat Soda Bread – tradition with us for St Patty’s Day
Helen Evans Brown’s Corn Chili Bread – adapted over the years
Clay’s Cornsticks – oh the crunch and joy
Carl Gohs’ Zucchini Bread
Armenian Thin Bread became Gorn’s Flat Bread
Every recipe from this book I’ve ever tried has been wonderful.
Updated 17 May 2010: I was unsuccessful with the Salt-Rising Bread recipe.
