MyKitchenInHalfCups

Once Upon a time: Cooking … Baking … Traveling … Laughing …


10 Comments

BBB ~ Kürtőskalács or Chimney Cakes

These Hungarian hollow Chimney Cakes or Funnel Cakes are graciously brought to our kitchens by Aparna from My Diverse Kitchen.  These are famously known to be Hungary’s oldest pastry.  Aparna has all the history about these on her site.
I liked the idea of filling these with whipped cream and a dribble of thick chunky cherry compote but realistically I couldn’t bring myself to heap that on these. They were perfect “plain” with our coffee.
IMG_1579

My army of sugar ice cream cones covered in foil stabilized on popover pan.

Yield: 10-12 cakes

140 grams all-purpose flour
245 grams white whole wheat flour, next time reverse these amounts
20 grams flax meal
1 1/4 teaspoons instant yeast
20 grams sugar
1 egg
1 teaspoon salt
70 grams melted butter
250 grams lukewarm milk, try to use all with white whole wheat
Melted butter for brushing, and more sugar for sprinkling
Powdered cinnamon or anything else you would like to flavour your Chimney Cakes with.
Moulds to shape the chimney cakes

I mixed and kneaded this by hand. Easy. My mistake was not listening to “soft, smooth and elastic”. I started with half the warm milk and it all went together. Then even though I recognized it needed ALL the milk, the dough was fighting me to add more.

Shape into a ball and place in a well-oiled bowl, turning it to coat on all sides. Cover loosely and let it rise for about 2 hours until it is double in size.

Lightly knead the dough and divide into two. Work with one portion at a time. Lightly dust your working surface with flour. Roll the dough out into a rectangle just under 1/2 cm thick. Cut into 1 cm wide strips lengthwise.

IMG_0494

I used large sugar cones wrapped in foil for the form.
Tightly wrap the dough strips around the mould without gaps between strips, slightly stretching the dough to keep it thin. This is fiddly but not difficult.
Lightly roll the wrapped mould on the counter and press the dough on the mould.

IMG_0501

Brush the shaped mould lightly with melted butter. Dredge with sugar or cinnamon sugar to coat completely. Place upright on a baking tray.

IMG_1607

Bake them at 190C (375F) for about 20 minutes till done, golden brown and sugar has caramelized. Take out of the oven and let it sit for 5 minutes. Using the blunt edge of a knife, slide the pastry off the mould. Let it cool.
Repeat with remaining dough. The pastry should be crunchy on the caramelized sugar outside and soft on the inside. Serve warm with coffee, tea or hot chocolate.

These are fun to crunch. Because I didn’t get all the liquid kneaded in, I didn’t get any soft bread texture. They were still fun and excellent with morning coffee!

Be sure to check out Aparna’s site. I love the pull apart “spring” photo she got!


8 Comments

BBB ~ Apple Bread with Cider and Calvados

What are the things in your kitchen that you’d say are super time savers and so become a favorite thing.  When I baked this bread I put myself in a tight place by not cooking the apples when the dough was shaped and on it’s final rise. Suddenly I needed to shape the bread and hadn’t chopped the apples yet .  My original plan was to use the grandmother’s  apple peeler, corer, slicer and then chop the slices … Or I would get out the big real mandoline and slice the apple … my timing was off, I didn’t want to go through all that … what to do?

Enter the Adjust-A-Slice and Julienne Mandoline. I saw this about a year ago on Amazon, it was getting rave reviews and my kitchen was still not together. As I remember it was under $20, now I think its gone up slightly and is under $24. But I still buy it for gifts because it is a wonder tool and now one of my favorite things. I use it to chip my chocolate (1 teaspoon chips into my morning coffee ~ it’s medicinal you know), I use it to julienne carrots, radishes, zucchini you name it and throw them into salads.  I used my corer which sits next to this simple mandoline in a drawer to core the apple and made short work of chopping the julienne sticks; the plate went into the freezer for a quick chill and I was ready to go!

Our kitchen of the month is Kelly at A Messy Kitchen. She’s got the original recipe and a great alteration for making just one loaf on her site.


Apple Bread with Cider and Calvados (makes 2 loaves)

Poolish:

¾ tsp yeast

500 grams apple cider

160 grams bread flour

200 King Arthur Irish Whole Meal flour

Final Dough:

1 tsp yeast

300 grams apple cider

200 grams bread flour

200 Irish Whole Meal flour

100 grams coarse rye flour

3¾ tsp sea salt

Add-ins:

200 grams Granny Smith

20 grams butter

1 tablespoon demerara sugar

50 grams boiled cider

Poolish:  Whisk flours and yeast.  Add cider and mix well.  Cover with shower cap and leave to rise for at least 4 hours at room temperature or overnight in the fridge.  The poolish is ready when a cavity has formed in the middle.

Kneading:

Whisk flours and yeast, add poolish and apple cider (if this is apple bread, I decided apple cider was better than water).  Knead well; about 10 minutes by hand.  Add the salt; I sprinkled it on the counter much like I would have if I’d needed to add flour to the dough.  Knead until very elastic .

Place dough in a lightly oiled lidded plastic container and leave for 90 minutes.

Add-ins:

Peel and dice the apple(s).  Melt butter and sugar in a frying pan; add the chopped apple and fry until golden brown.  Add apple cider (the calvados, I do love it but there was none to be found here) and boil until the mixture is dry.  Leave to cool.

Press the mixture into the risen dough.  Divide into two and form oblong loaves without first making a ball. Place on a tea-towel dusted with flour and pull the cloth up between the breads.

I covered the loaves with bowls and allowed to rise until doubled in size, about 75 minutes.

Preheat the oven with baking stone to 475ºF.

Place the loaves directly on the stone and mist with water.

Lower the temperature to 400ºF after 5 minutes.  Open the oven door after another 10 minutes to let some air in. Nice oven spring.

My loaves baked for 60 minutes and reached 207°F.  Even though I made smaller loaves (I had three) because I used so much whole grain, I knew this would take longer than the original recipe. Photos look really dark but they did not burn.

Take out the loaves, I brushed with butter and allowed to cool on a wire rack.

m%tJW4eURCyMBeTEOCUM5Q

We would love for you to try out this flavorful and seasonal recipe and join in as a buddy baker this month!  You don’t have to have a blog to participate, a picture will do. Just send a picture or your post of your finished loaf to me at eleyana (AT) aol (DOT) com by the 31st of this month. Be sure to put BBBuddy in the subject line. You will receive a Bread Baking Buddy graphic to keep or add to your post, and be included in our Buddy round up at the end of the month.  New recipes are posted every month on the 16th. Check out our Facebook group to see the participants’ baking results during that time.


8 Comments

BBB ~ Wild Pull Apart Bread

Wild … BBB … Award for most Wayward Babe! That’s me I do believe. 

Elizabeth, our kitchen of the month, titled this Wild Pull Apart. Little did she know just how wild I would take this and commit murder in the process. Actually I know she meant Wild Yeast but since …

I got a fairly decent starter going last month. Baked with it twice. And then … I left it out and was gone three days … perhaps I can plead just accidental yeast slaughter instead of murder. 

With no starter, Elizabeth’s recipe for sourdough this month was out. So I needed a pull apart bread recipe with instant yeast and I wanted one with whole wheat flour. 

What’s a common recipe that’s sort of pull apart?

What came to my mind was cinnamon rolls.

Looking for whole grain, I went to Peter Reinhart’s Bread Revolution. I was not disappointed.

Sprouted wheat cinnamon rolls gave me my basic dough recipe that I cut in half and only slightly altered.

In retrospect, the filling should have been … well less filling in volume but my brain had latched onto Sonya apples that we’d had the week before. The sweetest juiciest I think I’ve ever had. 

While this was not the shape Elizabeth ask us for, this is a great whole grain recipe and a wow flavor combination. I will be doing this again. 

Because the filling puffed out each circle, I was left with gaps around the outside of the pan. I didn’t think rising and baking would fill that so I made up balls of dough with filling.

When I do this again, I plan to make this as a monkey bread using balls with the filling and roll them in butter. I mixed the dough with the honey but the only sugar I used was the sparkling sugar on the top. These apples made for a wonderful sweetness.

Elizabeth’s shape would be perfect for savory garlic bread which I will be trying soon.

BBB Wild Pull Apart

Recipe: Adapted from Peter Reinhardt’s Bread Revolution

Serving Size: 8

– Dough: 

– 255 grams half & half 

– 2 teaspoons instant yeast 

– 42 grams melted butter 

– 35 grams honey 

– 340 grams sprouted wheat 

– 1 teaspoon salt 

– Filling: 

– 2 Sonya apples, chopped 

  • 4 oz honeyed goat cheese 
  • 2 handfuls pecans, chopped

– Dusting of cinnamon on apples 

– Sparkling sugar for topping 


Whisk all dry ingredients together. 

Melt butter (could use olive oil or part of both) may be enough to warm the milk. Mix with honey. 

Mix wet and dry together. 

Dough will be soft and sticky. Bring together into ball. Allow to rest for 15 minutes. 

Stretch and fold every 25 minutes 4 times. 

Refrigerate overnight. 

Allow to come to room temp next morning. I left mine out 2 hours. Shape and fill. Allow to rise. Bake at 325° convection for 20 minutes. Bake conventional 15 minutes at 350° until golden. Brush with butter. 

Notes: Used springform pan … put a pan underneath it! This recipe made the ring and a small loaf.

fullsizeoutput_93a3

This was perfect for coffee with a friend … and then for our brunch! Totally, I’ll be making this again.fullsizeoutput_93a9

  • You love bread! Why else would you be reading a bread blog … Here’s how to join us:
  • You have until the 29th to bake the bread and post about it on your blog (we love to see how it turned out AND hear what you think about the bread) with a link to the Kitchen of the Month’s post about the bread.
  • E-mail the Kitchen of the Month with your name and a link to your post OR leave a comment on the Kitchen of the Month’s blog that you have baked the bread and a link back to your post. Kitchen of the Month this month.
  • The Kitchen of the Month will post a round-up of our Bread Baking Buddies at the end of the week and send you a BBB badge for that month’s bread.
  • No blog, No problem – just e-mail the Kitchen of the Month with a photo and brief description of the bread you baked and you’ll be included in the round-up.


9 Comments

BBB ~ Ciambella Mandorlata (An Italian Easter Bread)

Totally an Awesome bread, just slightly sweet.  Thank you Aparna!
History and origin may call this an Easter bread but I say it’s nice just about anytime. It makes terrific toast with tea or coffee, morning, noon or night.
Two cautions:
I got a nice oven rise with this but with all bread flour I think it might have been truly huge and so … as Aparna did, placing a ramikin or ring in the middle might be a good idea to keep a hole open in the middle of the ring.
Aparna saw no reason to toast the almonds before baking and neither did I: this is baked with the almonds on top at 400°…how are they not going to toast? As Karen said, watch this and cover with foil so that it doesn’t get too dark.

Aparna Balasubramanian April 2019 from Ultimate Bread Eric Treuille & Ursula Ferrigno
Yield: one round

This slideshow requires JavaScript.

DOUGH:
2 teaspoons dry yeast
1/2 cup lukewarm milk
430 grams 1/2 bread flour; 1/2 AP

35 grams ground flax seeds
2 teaspoons salt
3 tablespoons maple sugar
grated zest of 3 lemons
113 grams unsalted butter, softened
3 eggs, beaten
1/2 cup water
TOPPING:
4 teaspoons ground cinnamon
3 tablespoons maple sugar
1 cup blanched almonds, roughly chopped
1 egg yolk

1. Mix the flour, yeast, salt, sugar, and lemon zest in a large bowl. Make a well in the center of the mixture and add the butter, eggs, and milk.
I’m trying to use up what is on hand and only had 1/2 the bread flour called for so used AP.

2. Mix in the flour from the sides of the well. Add the water 1 tablespoon at a time, as needed, to form a soft, sticky dough.
I used all the water called for.

3. Turn the dough out onto a lightly floured work surface. Knead until smooth, springy, and elastic, about 10 minutes.

4. Put the dough in a clean bowl and cover with a dish towel. Let the dough rise until doubled in size, about 4 hours. Punch down the dough, then let rest, covered with a dish towel, for about 10 minutes.

5. Divide the dough into two equal pieces and roll each piece into a 16-inch-long rope. Twist the two dough ropes together.

swzxv4NETdC24fYskKVUoA
6. Place the dough rope on a buttered baking sheet. As you might see here, I used a skillet. Shape it into a ring by bringing the two ends of the rope together. Pinch them to seal and cover with a dish towel. Proof until doubled in size, about 11 ⁄2 hours.

7. To make the topping mix the cinnamon, sugar, almonds, and egg yolk in a bowl. I used my hands to spread the mixture as evenly as possible over the top of the ring.

8. Bake at 200C (400F) in the preheated oven for 45 minutes, until golden -cover with foil to prevent it getting to dark- and hollow sounding when tapped underneath. Cool on a wire rack.

We would love for you to try out this recipe and join in as a buddy baker this month!  This is a wonderful bread to quickly bake. You don’t have to have a blog to participate, a picture will do.  Just send a picture or your post of your finished bread to comments my kitchen at mac dot com, along with a photo and your baking experience by April. 30 and be sure to put BBBuddy in the subject line. You will receive a Bread Baking Buddy graphic to keep or add to your post, and be included in our Buddy round up at the end of the month. New recipes are posted every month on the 16th. Check out our Facebook group to see the participants’ baking results during that time.
Enjoy the BAKE!


8 Comments

BBB ~ Chelsea Bun Valentine

Chelsea Bun Valentine
LOF54gPWS1+o5aWQVjHCjg

I can’t imagine where eleven years have come and gone baking bread after bread with Babes. Somehow, here we are on our eleventh anniversary.  Simple, complex, straight or sour dough, I never tire of flour and yeast. I never seem to see a bread coming either. Although there are breads I have sort of in a reserve place that I think the Babes must bake one day. One that comes to mind is salt rising bread. I’ve tired it twice and it’s good but not for the faint of heart.
Recently I got hooked on The Great British Baking Show. Obsession doesn’t come close to how much I was watching. And when it came to the breads, I watched many of them over again immediately. In late December, I watched one where they baked Chelsea Bun Christmas Trees. It some how caught me that the bread and the bun were basic but the shape and the filling should be the challenge that suited a February Valentine. I had some really fancy ideas in the beginning but when it came to execution, simple took over and Gorn was won with a very simple heart … I think it had something to do with the some what cherry pie like filling I came up with.  Cherries will win him over any day, even in a bun.

Ordinarily I would have added walnuts to buns but I was with grandkids and was told they wouldn’t eat them.
GNGAfLi%RsmyFrtLObg
Find the Original Recipe here.
Serving Size: 15

Dough
400 grams bread flour, plus extra for dusting
400 grams white whole wheat flour
1 tablespoon salt
15 grams sachet fast-acting yeast
400 ml milk
60 grams unsalted butter, plus extra for greasing
2 free-range eggs
Filling
You make it up!

5MXLtQmkQBm7YoomspYXNg

“I won’t eat raisins” “There are no raisins” “Cherries”

Place the flour into a large mixing bowl, add the salt to one side and the yeast to the other side.  (That’s how the cutie Paul Hollywood does it.)

Warm the milk and butter in a small saucepan until the butter is melted and the mixture is lukewarm.

Pour into the flour mixture, add the eggs and stir thoroughly until the contents of the bowl come together as a soft dough. The dough will be sticky.

Tip the dough onto a lightly floured work surface and knead well for 5 minutes, until the dough is smooth and elastic. Alternatively this can be done in a stand mixer using a dough hook. I found this to be an easy dough to do by hand.

Place the dough into an oiled bowl and leave to rise, covered with a shower cap, for one hour or until doubled in size.

Mix the filling. I used a cherry preserve that was cherry pie like filling and added some dried cherries to that.  I also sprinkled my dough with some brown sugar for that extra.

Tip the dough out onto a lightly floured work surface. Roll out dough into a rectangle about 20in x 14in.

Tack down the long side of the dough rectangle nearest to you by pressing it down onto the work surface with your thumb. Brush all over with the melted butter. Then spread the your filling over the dough leaving a 2cm boarder. Roll the opposite long side of the dough towards you quite tightly, until the roll is complete and tight. Trim the ends to neaten.

With a sharp knife cut into 15 thick rounds – about 1.5in.

Line a very large baking tray or use the grill tray from your oven with baking parchment.

Arrange rolls on the prepared tray, cut side up, in heart shape: I just drew a heart on parchment paper and filled it in. You want the buns to be close enough so that when they rise further and then bake; they will bake with their sides touching. They can then be pulled apart and you get a lovely soft edge.

Cover loosely and let rise for 30 – 45 minutes.

Preheat oven to 350F.

When the buns are ready, put them in the oven and bake for 20-25 minutes until golden-brown.

Check after 15 minutes or so and cover the buns with foil if they are getting too brown. Mine needed no foil.

Remove the buns from the oven and let them cool slightly before transferring them from the tin to a cooling rack.

Melt the additional preserves in a small saucepan with a splash of water until smooth. Brush the jam over the buns to glaze and allow to cool.


It’s sort of a heart … it went fast enough that the shape didn’t really matter.

Valentine’s Day maybe over but there’s always desire for sweet hearts and bread. Be a buddy, bake a heart overflowing with love, we’d love to see what you’d fill your heart with on top of all that love. I know the Babes will change things up, so don’t miss all their hearts.  Send me your post with photo before February 28, I’ll do a round-up post and add you in as well as send you a cool Buddy badge.


9 Comments

BBB ~ Baked Cherry Doughnuts

These were fun and easy to put together. We enjoyed them, friends thought they were excellent. The sugar is perfect in these, not over the top sweet but still a treat.

Pat from “Feeding My Enthusiasms” found and adapted this from a recipe by Robert Jorin, of the Culinary Institute of America at Hyde Park, NY
The spice is perfect and the cherries were excellent. The grandkids would think these were fabulous and they could participate.
For my part, this is not the way I would want to use my sugar calories so I probably won’t make them again. Besides, since I grew up with my Dad’s fresh fried yeast doughnuts, not much else comes even remotely close.  I am glad to have baked them so I thank you Pat.

fullsizeoutput_89d1

BBB ~ Baked Cherry Doughnuts
1 cup dried Michigan cherries
1 quarter oz. (1/4 ounce) packet active dry yeast
2 tablespoons warm water
1/4 cups brown sugar
3 cups all-purpose flour (I added about another 1/2 cup in 1 tablespoon increments)
I had no AP flour so used: 130 grams bread flour, 250 grams whole wheat pastry flour + extra bread flour about 1/2 cups
3/4 teaspoon freshly grated nutmeg
1/4 teaspoon ground cinnamon
3/4 cup milk all I had was buttermilk, warmed
1 large egg plus 1 large egg yolk
113 grams unsalted butter, softened, plus 4 tablespoons melted butter
2 teaspoons kosher salt
parchment paper

CQRW2dcGQCSrnRMzHSysOQ

1. In a medium bowl, cover currants – or diced dried fruit of your choice – with hot water and let stand until softened, 20 minutes.

2. Meanwhile, in a small bowl, stir yeast with 2 tablespoons warm water and a pinch of sugar and let stand until foamy, 5 minutes.
I have not done this for years. I simply add the yeast to the flour and the liquid all at once.

3. In bowl of a stand mixer fitted with dough hook, combine flour, nutmeg, and cinnamon with 1/4 cup of sugar. Add milk, egg, egg yolk and half of softened butter; beat at low speed for 3 minutes. Beat in yeast mixture, then add salt. Beat dough at medium speed until soft and silky, about 8 minutes; the dough should pull cleanly away from bowl.
My KitchenAid mixer is still packed and I believe in the shed. I didn’t really have any problem mixing this by hand. I did add extra flour before it became a silken dough.

4. With machine on, add remaining softened butter to dough in walnut-sized lumps, beating at low speed between additions until incorporated.

5. Drain Michigan dried cherries in my case, pressing out any excess water. Add to dough and beat in at low speed.

6. Transfer dough to a greased bowl, turn to coat dough with grease. Cover and let stand in a warm place until doubled in bulk, 1 hour. Punch dough down, form into a ball, and return to bowl. Cover and let stand until billowy, 1 hour.

7. Grease two large baking sheets. (Or line with parchment or foil.) Turn dough out onto lightly floured work surface & cut it into 12 equal pieces. Pinch each piece into a ball and arrange six balls on each prepared baking sheet, smooth side up. Cover with plastic wrap and let stand for 10 minutes.

8. Using lightly floured hands, press each ball into a flat 4-inch disc. Using a 1 1/4-inch round cutter stamp out center of each disc. Return holes to baking sheets. There will be six donuts and six donut holes on each sheet. Cover loosely with plastic wrap and let stand for 1 hour, until risen slightly.

CBcxxMw8QmSRhZMsGkxtvwCBcxxMw8QmSRhZMsGkxtvw
9. Preheat oven to 400 degrees F. Position racks in upper and lower thirds. Bake donuts and holes for 25 minutes, shifting pans from top to bottom and front to back halfway through baking time. Donuts are done when they are golden and puffy and when the internal temperature at thickest part registers 200 degrees F.

10. Spread sugar in a shallow bowl. Brush hot donuts and holes on both sides with melted butter and dredge them in sugar. Transfer to a serving dish and serve at once.

fullsizeoutput_89d2

And yes I used the crunchy sparkling sugar! that is worth the WOW.

Hope that you enjoy these between now and December 29th…which will get here sooner than you think. If you do, send Pat an email at plachman at sonic dot net along with a photo and your baking experience and she’ll include you in the Buddy post, plus send you a gorgeous Buddy Badge designed by Elizabeth.


15 Comments

BBB ~ Filipino Spanish Bread Rolls

Filipino Spanish Bread Rolls

This slideshow requires JavaScript.


I confess. These didn’t immediately excite me but they are bread and a Babe should bake. 
And then for me the magic took over.  I just do enjoy the magic of the yeast and flour and water.
My intent when I divided the dough was to shape half in traditional fashion as a log and half as crescents … but the crescent was so easy I did them all that way.  In retrospect, I think I might have enjoyed them more as a log: the outside would have gotten a uniform coating and maybe been more enjoyable with my coffee BUT these were marvelous even as crescents!
Aparna, I thank you.  These were really no trouble to make.  The dough easy to work.  Flexible enough to do well with a long rest in the fridge. 
I think they would do equally well perhaps shaped and rested in the fridge overnight and then go into a hot oven in the morning.  They would be company show stoppers for sure at any time.
And for the drama through poor reading … yes, I still have issues with reading. 
aGWySUn%RM2vmVkE6h74AA
Right well the best I can say is the smell communicated better than the reading and I was able to blow most of it off the brown sugar before I’d mixed it in.  Aren’t we lucky to have … smell! 

Filipino Spanish Bread Rolls
Recipe By: Aparna Balasubramanian
Yield: 16-24 rolls
For the Dough :
2 teaspoons active dried yeast
1/4 cup warm water
1 teaspoon sugar
426 grams white whole wheat flour
75 grams Kumet flour
20 grams flax meal
1 tablespoon brown sugar
1 teaspoon salt
1/2 cup milk
1/2 cup unsalted butter, melted
2 eggs
For the Filling :
1/4 cup unsalted butter, melted
1/2 cup breadcrumbs
1/3 cup brown sugar
2 teaspoons cinnamon powder (optional)
For Coating :
A little milk
1 cup bread crumbs
1/3 cup brown sugar

Whisk together the flours, flax, yeast, sugar and salt.
Mix the milk, melted butter and eggs.
Mix the dry and wet together.
Then knead until you have a smooth and elastic dough. I found this easy to knead by hand. Firm dough.

Cover loosely and let the dough rest for about 2 to 3 hours or till it has doubled in volume.
It became obvious to me that life was not cooperating with these directions and the dough went into the fridge overnight.

I took the bowl out as soon as I was in the kitchen fixing coffee in the morning.  That allowed the dough to warm up and it was ready to work 2 hours later.  Press down the dough gently and divide the dough into two equal parts.

There are two ways of shaping Filipino Spanish Bread. One is to roll out each portion into a round and spread the filling over it.

Spread the filling before cutting.

Then cut each into 8 triangles like you would a pizza. Each triangle can then be rolled up croissant style.

The more traditional way is to shape each half of dough into a log and divide into eight equal parts. Roll each piece into roughly a 3- by 5-inch rectangle. Brush with melted butter, sprinkle with breadcrumbs and sugar (or cinnamon sugar if you prefer). Roll the piece like you would a jelly roll, starting from one corner and rolling towards the opposite corner.

One dough ball gave me 10 rolls, the other gave me 12.  I did like the smaller size and would make smaller regardless of shape.

Alternately, roll each half the dough into a largish rectangle about 10” x 10”.  Then brush the surface generously and completely with melted butter. Sprinkle half the breadcrums and the cinnamon and sugar mixture over this evenly. Now cut the dough into half from top to bottom. Again cut each half into 4 left to right. You will have 8 rectangles about 5″ x 3.3″

Which ever way you shape your Filipino Spanish Bread, place the pieces seam side down on a lined or greased baking sheet. Let the shaped rolls rise for 30 minutes.

Brush them with a little milk and sprinkle with more breadcrumbs and sugar. You can also roll the shaped dough in the breadcrumbs and sugar if you like.

Bake until golden brown at 190C (375 F) for about 15 to 20 minutes. Because I made the rolls with all whole wheat, they took 22 minutes to bake.
Cool on a rack.

We’d love for you to bake with us as a Bread Baking Buddy. Here’s how it works.

Bake this month’s bread using Aparna’s recipe and post it on your blog before the 28th of this month. Mention the Bread Baking Babes and link to her BBB post in your own post. Then e-mail her at aparna[AT]mydiversekitchen[DOT]com with your name and the link to the post, or leave a comment on her blog post with this information. She will include your bread in the Buddy round-up at the end of this month.


14 Comments

BBB ~ Sprouted Wheat Sweet Potato Cherry Brioche Coffee Cake

BBB ~ Sprouted Wheat Sweet Potato Cherry Brioche Coffee Cake

W8p4Qx5QSN6RbWXp5oRc8w

Recipe By: Inspired by Judy’s (Gross Eats) recipe for Blueberry Brioche Coffee Cake

I do love combinations … but one should be much more careful when combining two recipes OR one should engage the brain much more than I did. 
I aimed for whole grain and I got that by using a recipe I found in Peter Reinhart’s Bread Revolution.  Sprouted Wheat Sweet Potato Brioche!  Please be aware that the amounts and directions are my own.  You will need to take a look at his book “Bread Revolution” for his recipe.  

I should have known I was working with whole grains AND adding sweet potato was going to make this extra. BUT when I went to look for the baking time I looked at Judy’s  recipe that used white flour … and went my merry way.  It was way under-baked and still this was spectacular.

I’m going to let you check out Judy’s web site for the recipe she brought to us but I’ll show you the recipe as I did it here.

Since Gorn is an all time cherry lover, I made my filling cherry jam!  I really cut the sugar. The Cherry Jam was so successful, I had to make it again the next day to put on the plain Brioche and just simple toast when the Brioche ran out.

My Cherry Brioche Coffee Cake

Brioche Dough
650 grams sprouted whole wheat flour
20 grams brown sugar
12 grams salt
18 grams yeast
50  grams 1 egg
72 grams 4 egg yolks
150 grams sweet potato puree
190 grams half & half
300 grams butter unsalted at room temperature
Cherry Jam
30 ounces frozen sweet cherries, 3 bags
1/3 cup brown sugar
lemon  , zest and juice
Streusel Topping
1/3 cup oat bran, heaping
1/2 cup chopped walnuts, my addition
1/3 cup brown sugar, short
1 teaspoon cinnamon
Pinch salt
2 tablespoons unsalted butter, softened

1. Whisk together the dry ingredients: flour, brown sugar, salt and yeast.
Mix together the egg, egg yolks, sweet potato puree and the milk forming a soft dough.
I used my Dad’s old KitchenAid.
Use the dough hook and mix on medium low until the dough pulls from the sides of the bowl.

2. Cut the butter in 4 to 8 pieces.  Add one at a time mixing on medium low speed.  Watch for each piece to be fully incorporated before adding more.
The dough should now feel soft, tacky and supple. It should feel bouncy when patted.  If very sticky add a little more flour.

3. Using a bowl scraper, transfer the dough to an oiled work counter.
Stretch and fold the dough over itself four times: once each from the top, bottom and each side.

4. Either oil the bowl to place the dough into or oil your hands and pat the dough all over and place it in a large bowl.
Allow the dough to rest on the counter 30 minutes covered (I use a shower cap).

5. 12 hours/overnight in the refigerator. After resting at room temperature for 30 minutes, place the bowl covered in the refrigerator for at least 12 hours.  The dough is best baked within two days because of the high yeast content.

6. Remove the dough for some time before you bake. Time in the refrigerator allows the whole grain to fully hydrate and cooling all that butter makes it easier to handle.
fullsizeoutput_8863
7. Coffee Cake shaping This was a trick for me.  I had no spring form pan.  The closest I could even remotely come to was an angle food cake pan.  Somehow I managed to line the outer side of the pan with several pieces of parchment paper and anchored them with the removable bottom.

fullsizeoutput_8864
I used about 2/3 of my total dough for the coffee cake and made a small plain loaf with the remaining 1/3.

fullsizeoutput_8866
The coffee cake dough I divided into three approximately equal pieces, rolled each into a circle to fit the pan, gently poked and then stretched a hole in the middle and dropped it over the middle tube put cherry jam on that, two more layers of dough with cherry jam between each layer of dough.

8. Cover the pan with shower cap and allow to rise 90 to 120 minutes.  Mine took the 120 minutes.

nbTW4AYdT8+hNX0p6U3Ynw

You love cherries! This is the one.

9. Reinhart says to bake loaves at 400° for 50 to 60 minutes.
I baked mine at 375° for 50 minutes.  It was under-baked.  I think next time I’d bake at 380° for 60 to 65 minutes, ideally I’d have my thermometer and look for an internal temp of 195°.  The jam may make an accurate measurement difficult.

Notes:

This was so wonderful.  Thank you Judy!

If you would like to bake along with us as a Buddy, send Judy a description of what you did and some photographs by August 29th, and it will publish in the Buddy Roundup and you’ll receive a Buddy Badge.  Email is jahunt22 at gmail.com.


10 Comments

BBB Champagne Baba ~ Bread Baking Babe’s Bundt Babas

Our indomitable Lien is Kitchen of the Month and she brought us a wonderful not to sweet festive holiday bread.  Thank you a BBBBB times over!

BBBBB … Yes, that would be Bread Baking Babe’s Bundt Babas! And these are simple (just go step by step), fun (when is it not fun to poke, poke and poke your food) and visually festive!

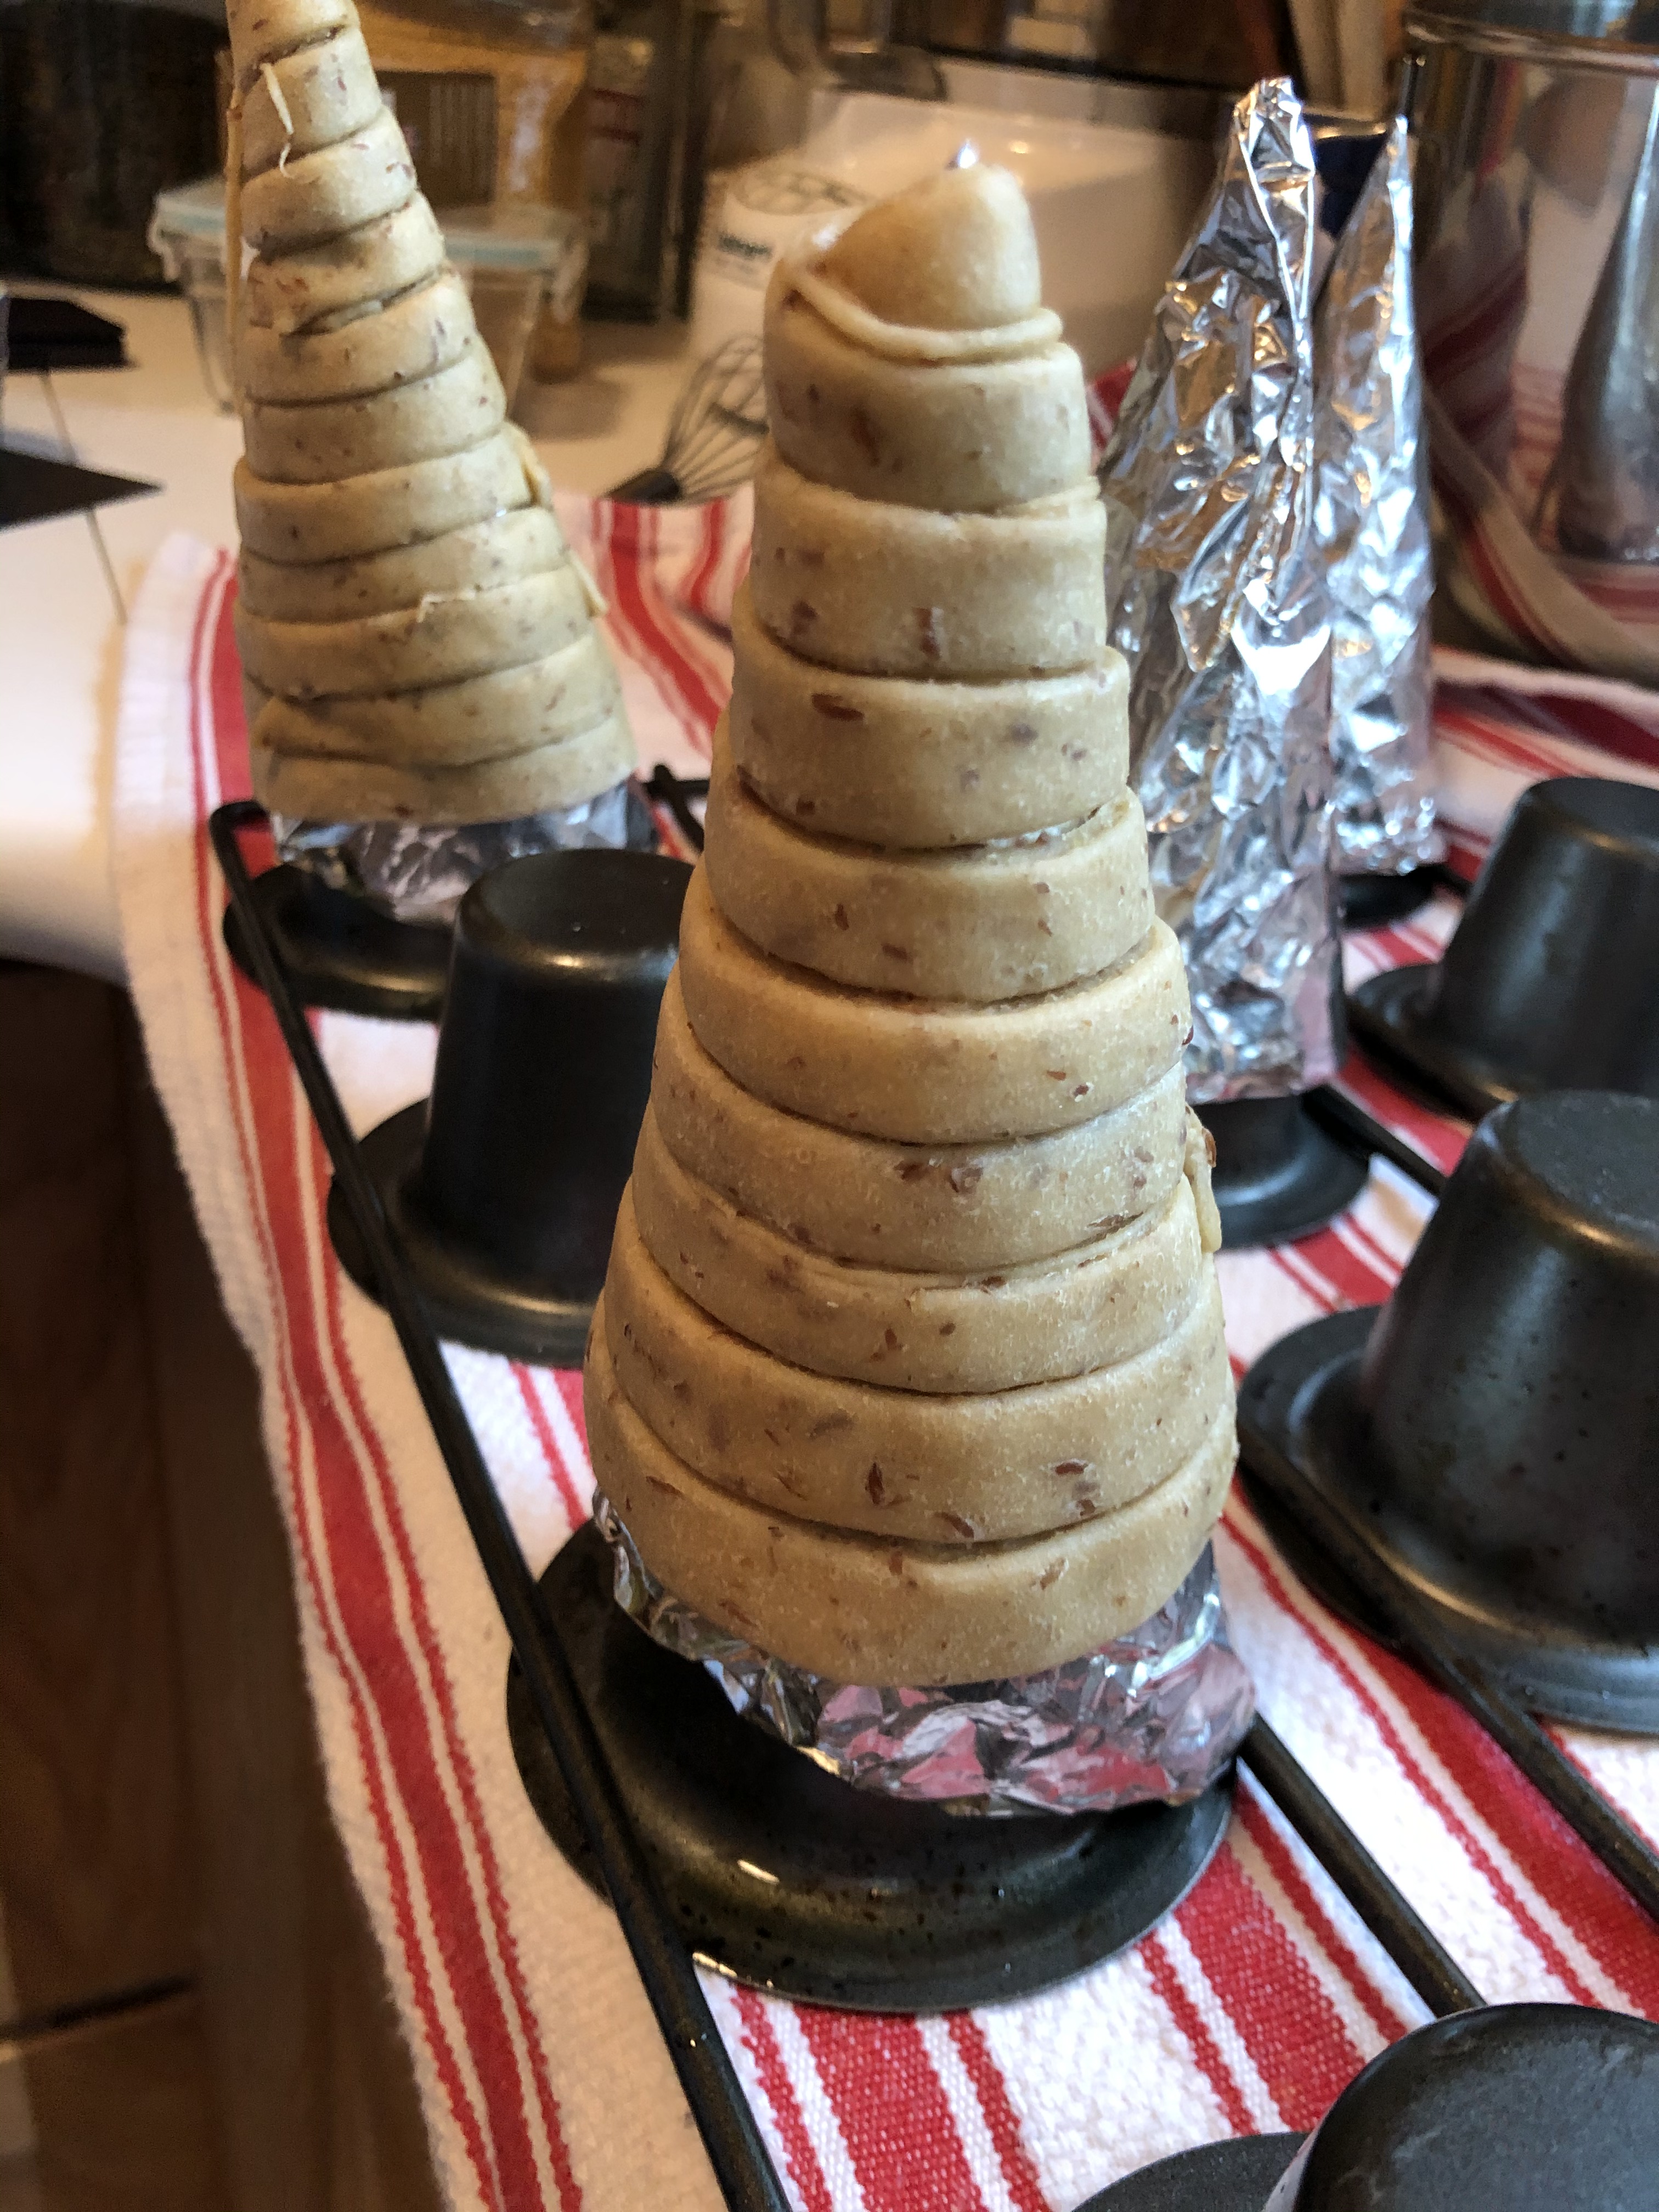
Why did these take me so long to actually get to baking?  A pan, what pan could I find to bake them in? Yes, I know a loaf pan would have served perfectly well but that’s not really special.

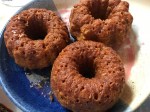
I think most of the Babes like these best small and I would love to try little small ones but who knows where my pans might be packed. Small ones just couldn’t happen this time for me.
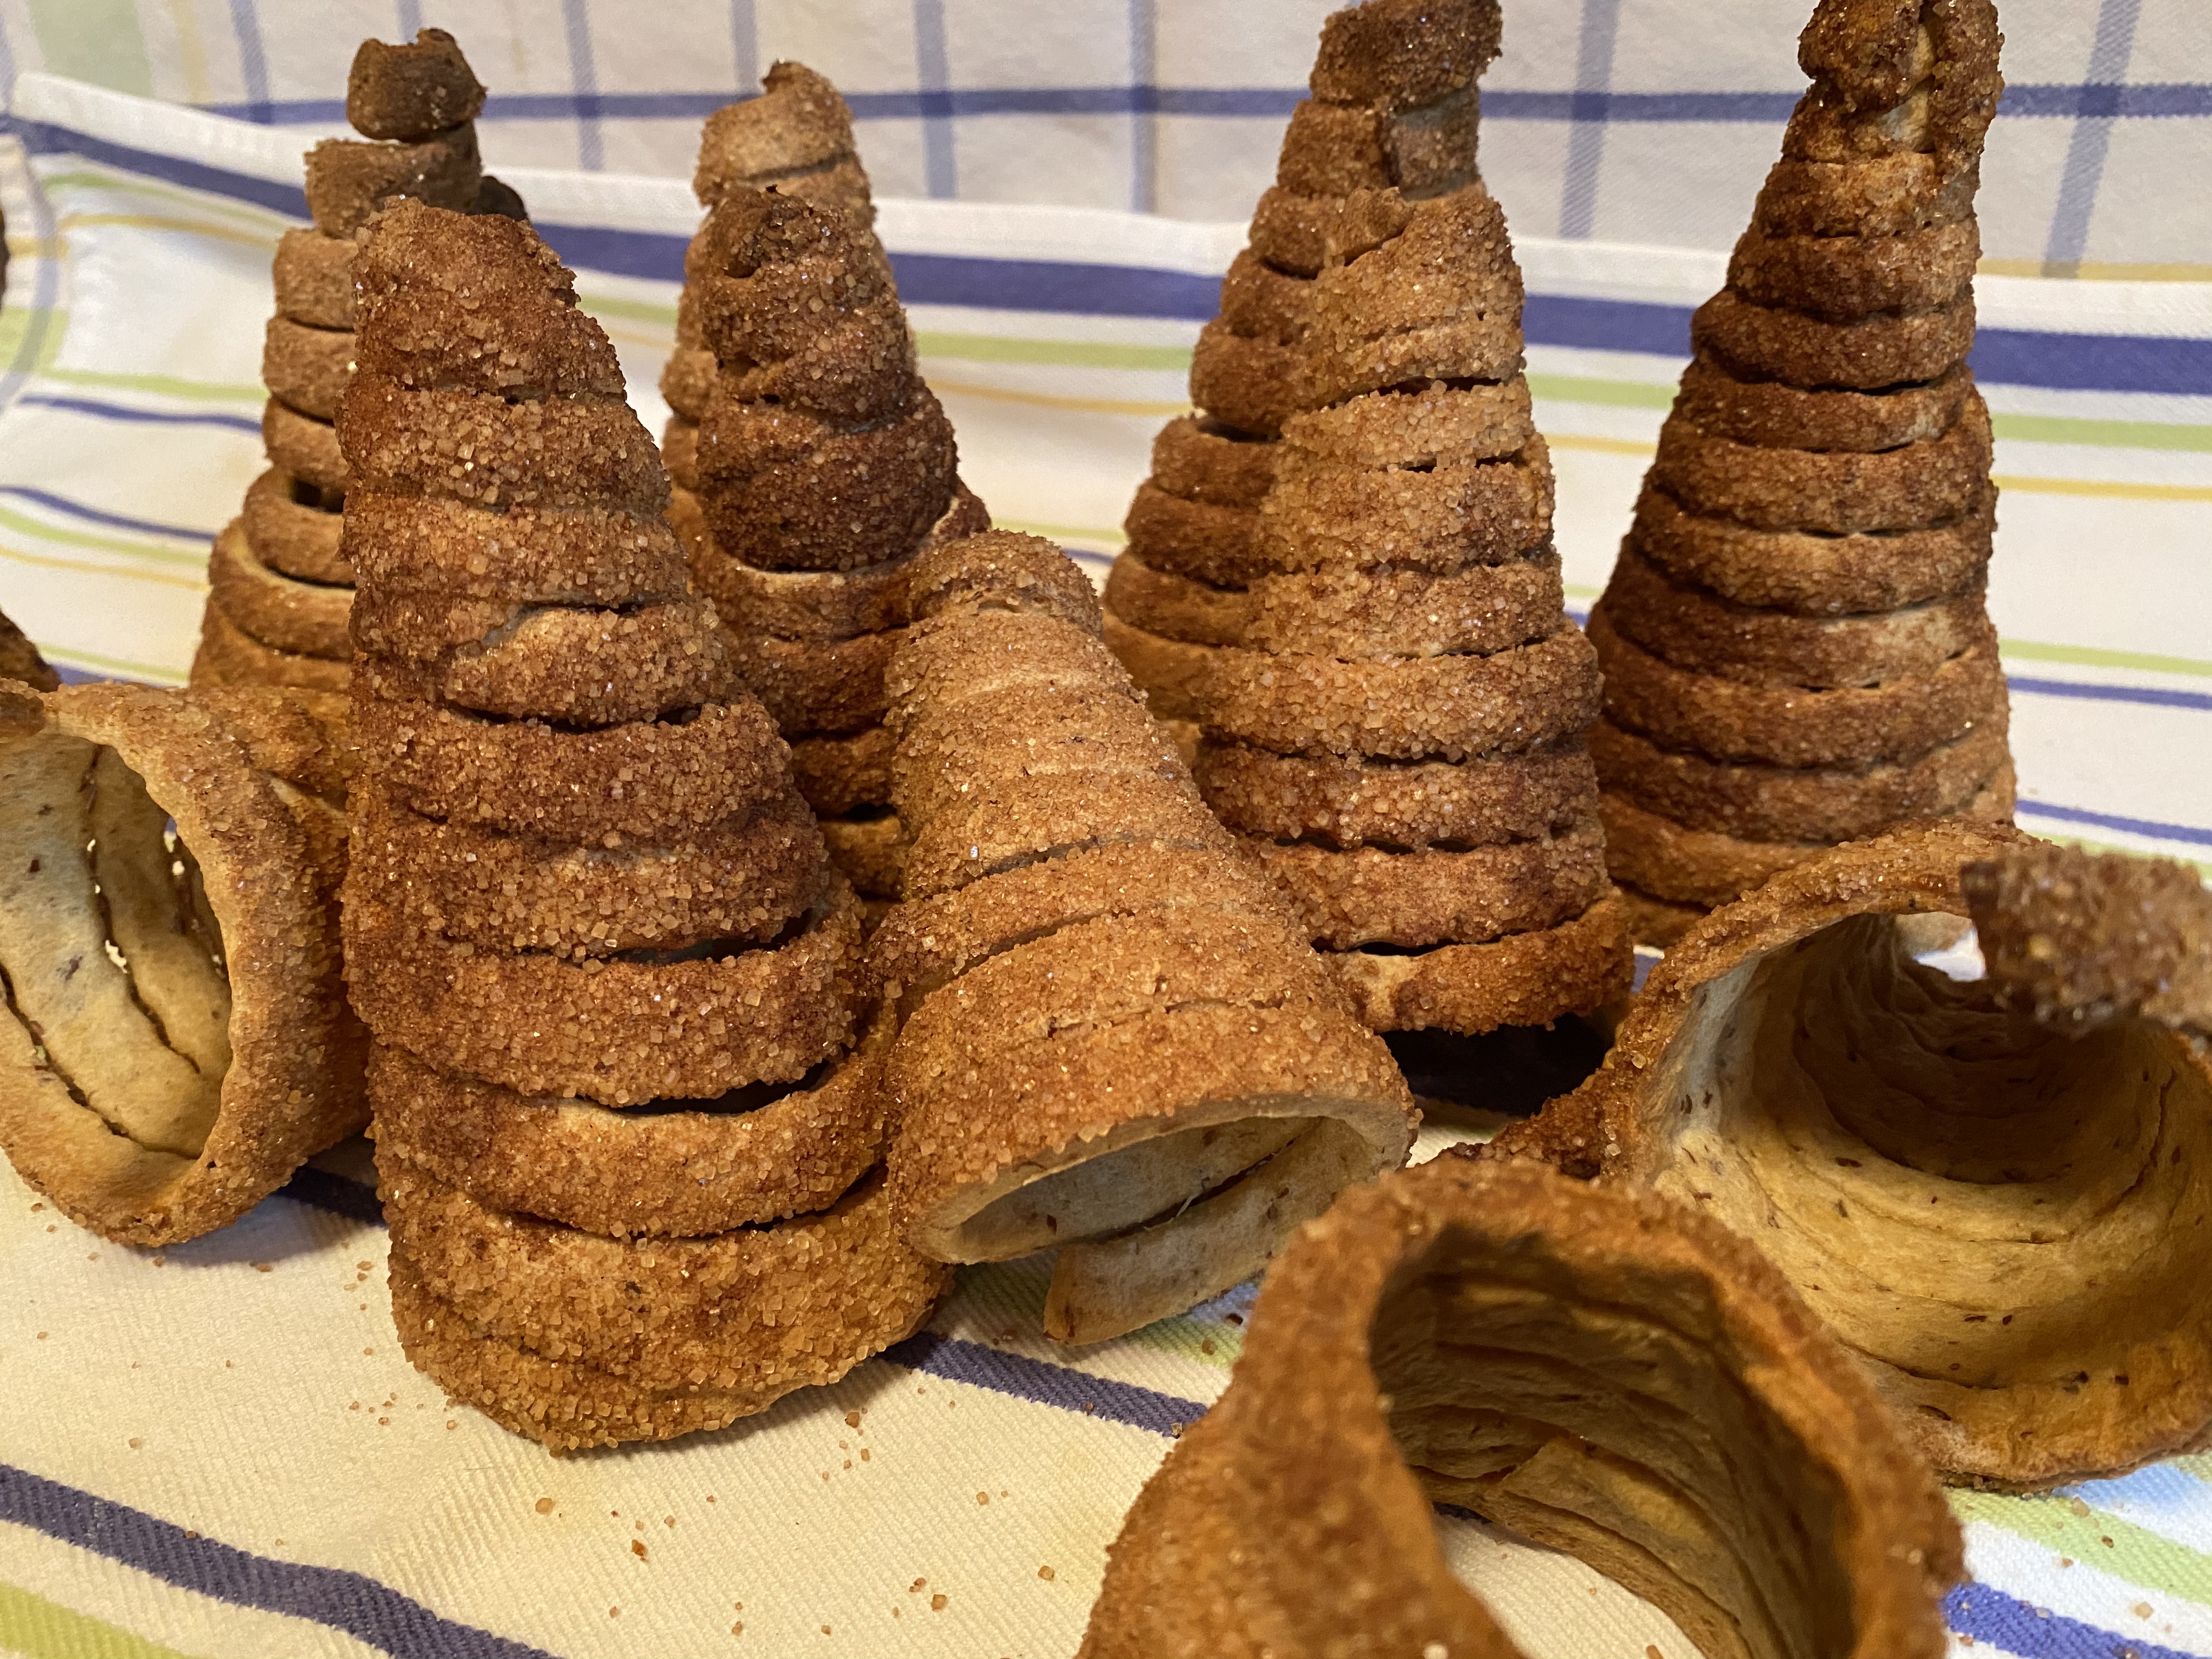
I think these are great for the holidays. I baked them twice today and they made welcome little gifts especially as small bundts!

Lots of ways to change these around flavor, fruit jam wise and liquid wise.  They are so worth it.

Champagne Baba

This slideshow requires JavaScript.


sponge:
100 grams water
1 teaspoon instant dry yeast
1 tablespoon sugar, omitted
100 grams bread flour
dough:
180 grams bread flour
½ teaspoon fine salt
¼ teaspoon instant dry yeast
1,5 teaspoon vanilla sugar, teaspoon vanilla
3 large eggs
90 grams melted butter
soaking syrup:
150 grams sugar
177 grams water
120 grams champagne (or Asti Spumante or fruit juice)
200 grams apricot jam (or use a sugar glaze)

Directions:

1. Mix all the ingredients for the sponge together in a large bowl (the one you’ll be kneading the dough in). Now sprinkle 180 g bread flour over the sponge, so it is covered and leave to rest for about 1 hour.

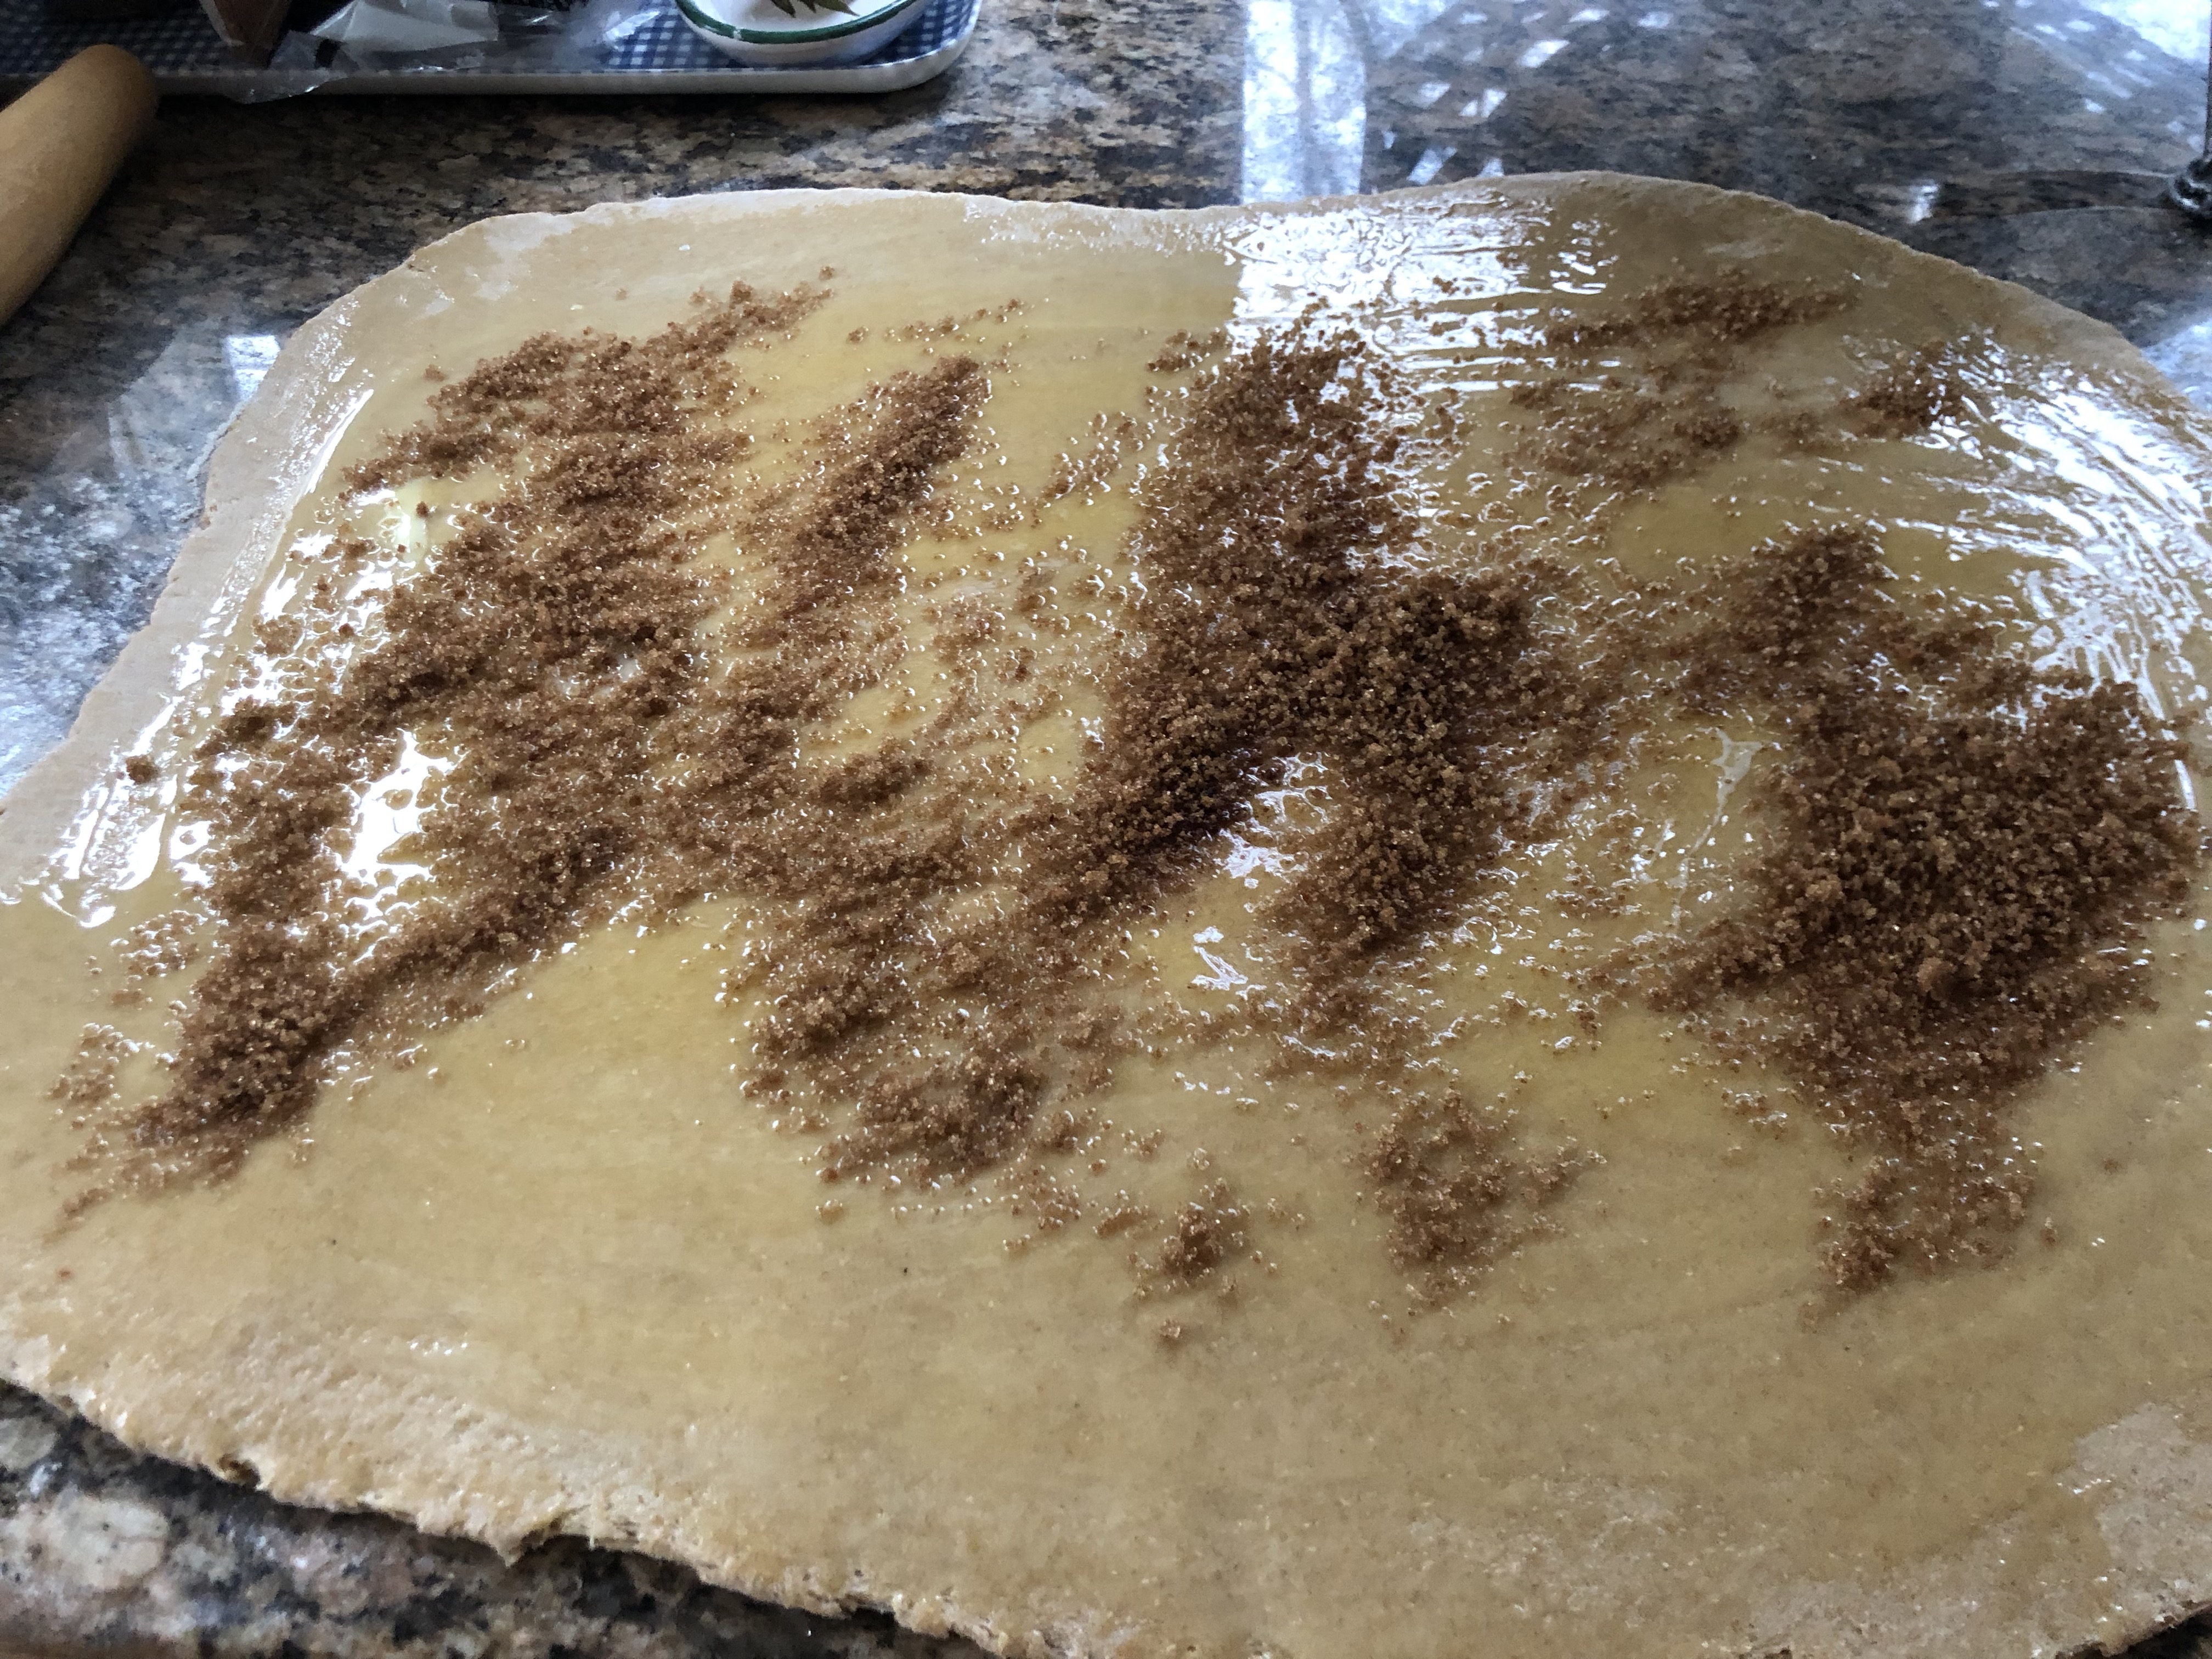
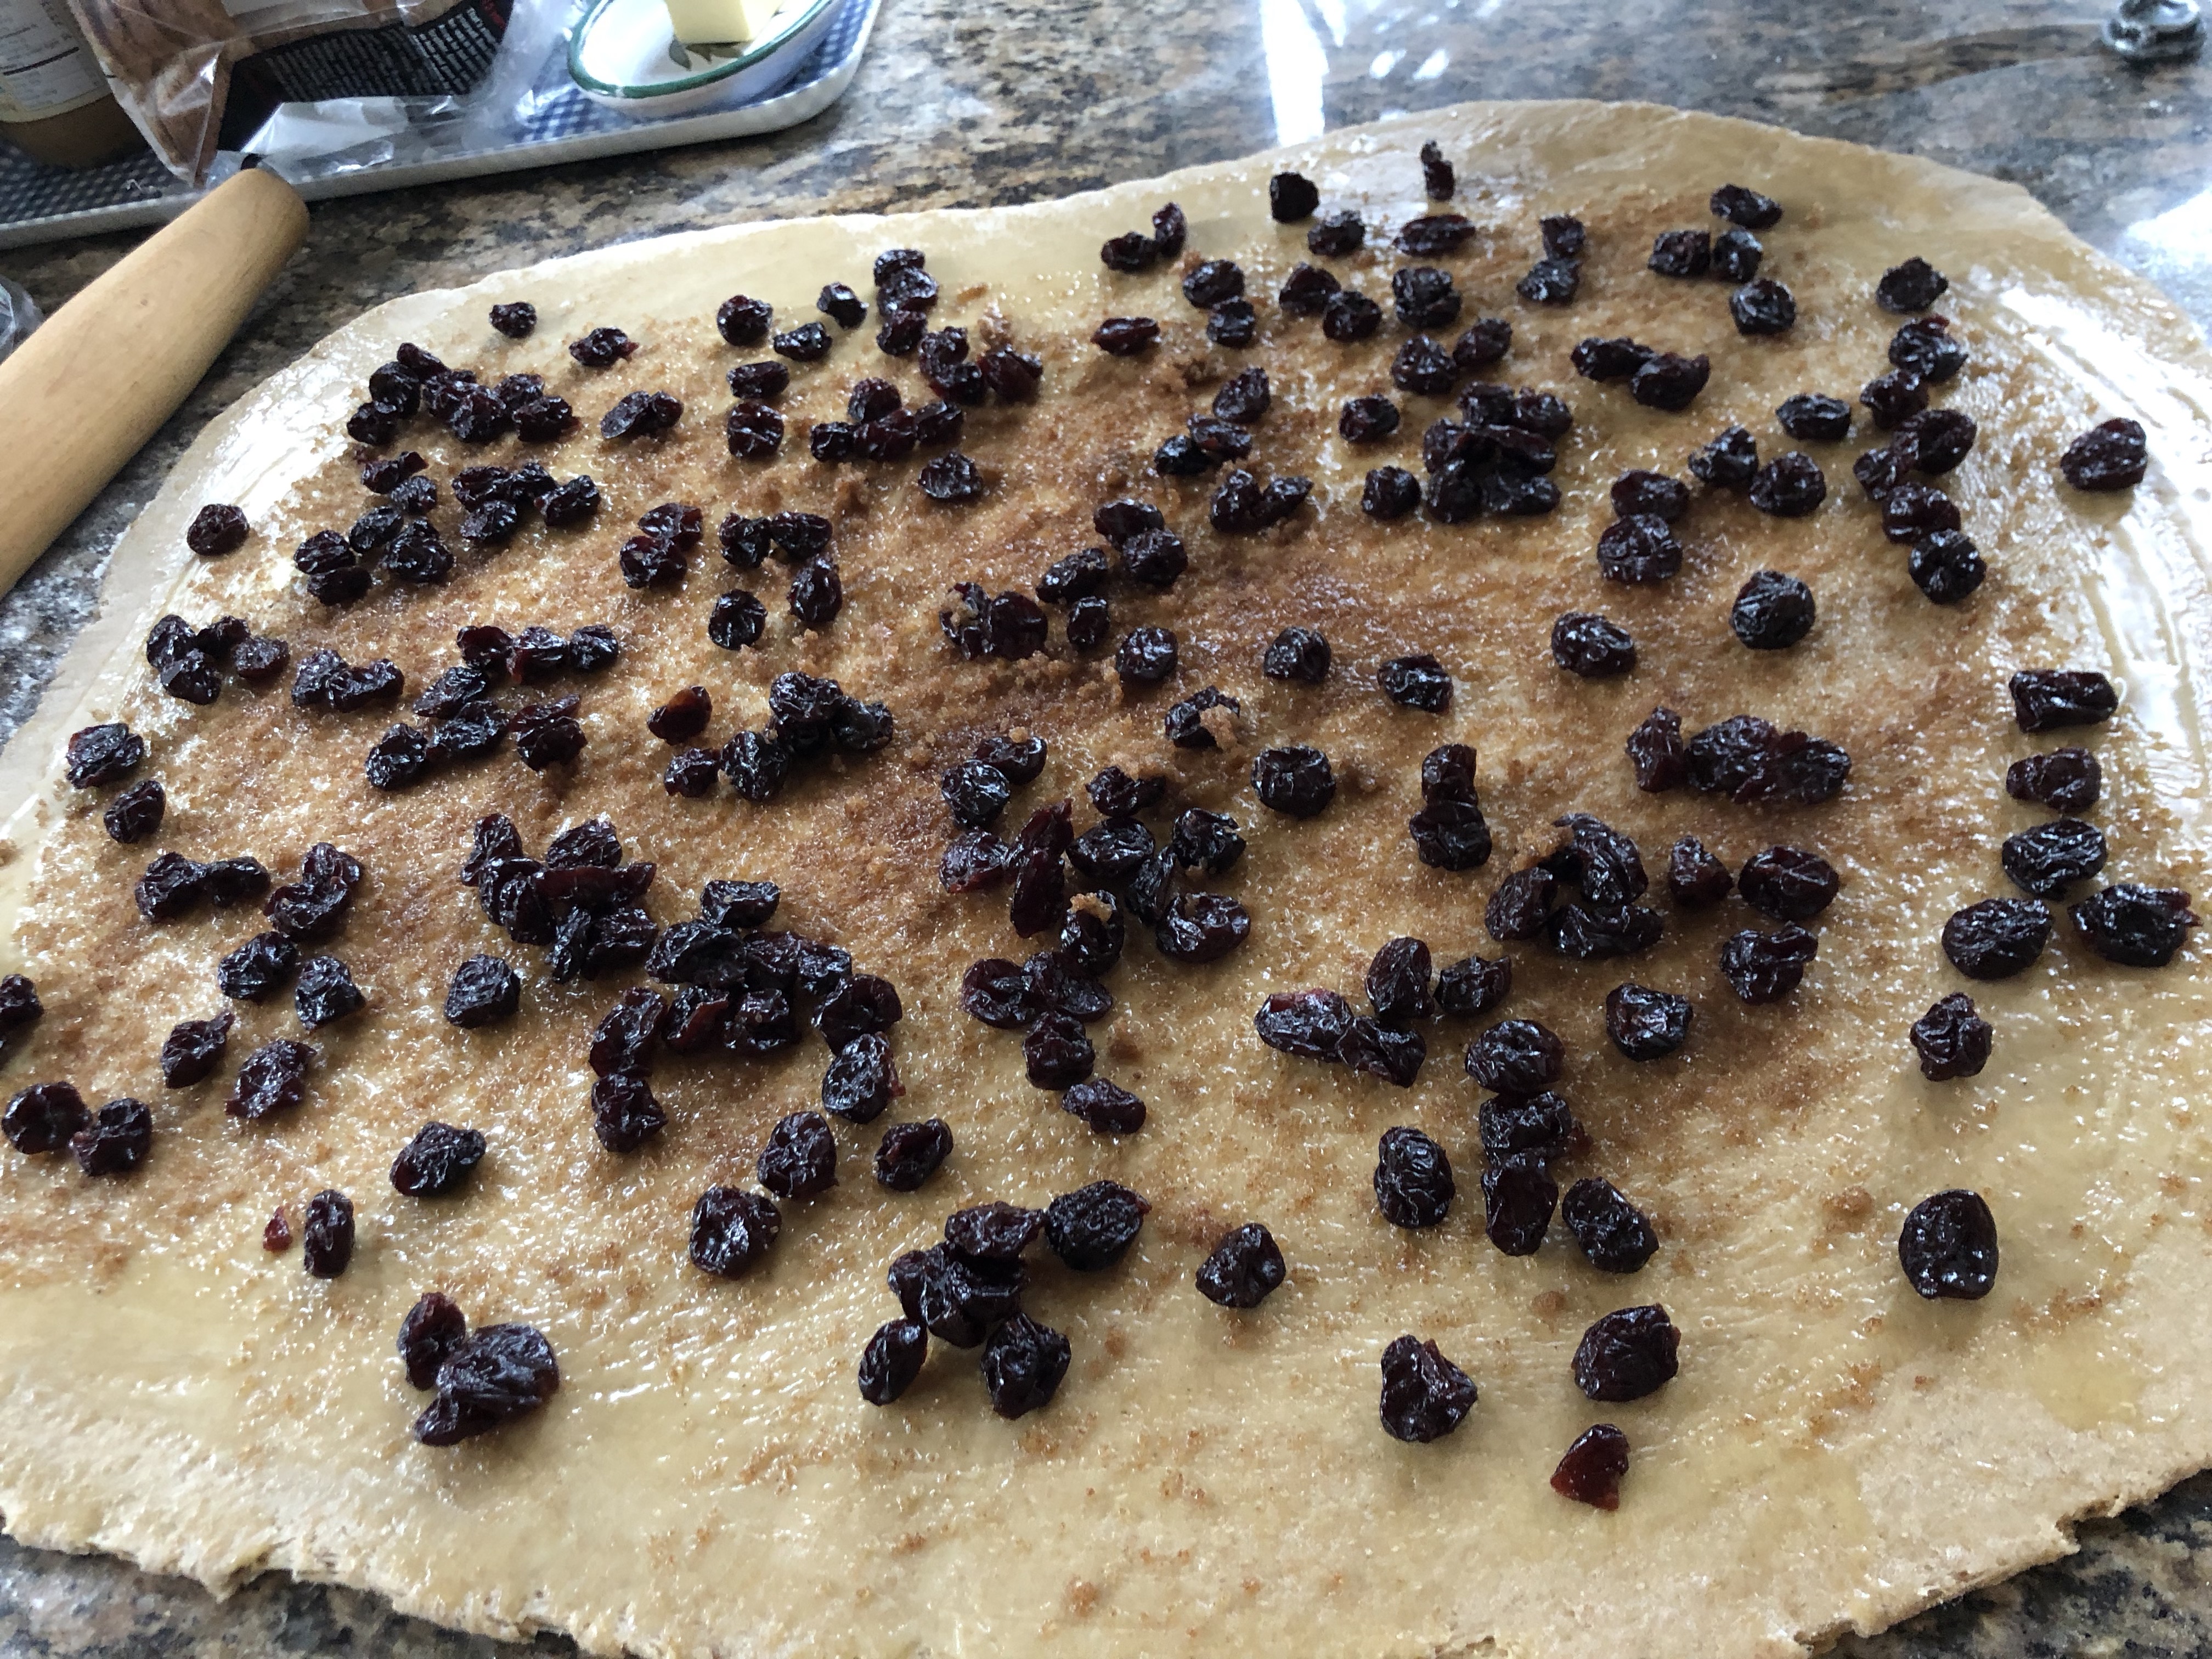
2. Now add the salt, ¼ tsp dry yeast, vanilla sugar and eggs. Start to mix this. If using a stand mixer, use the paddle attachment. When it comes together after a few minutes, add the melted (and slightly cooled) butter and keep working it. The dough is a bit batter like, but be sure to get some gluten developed.

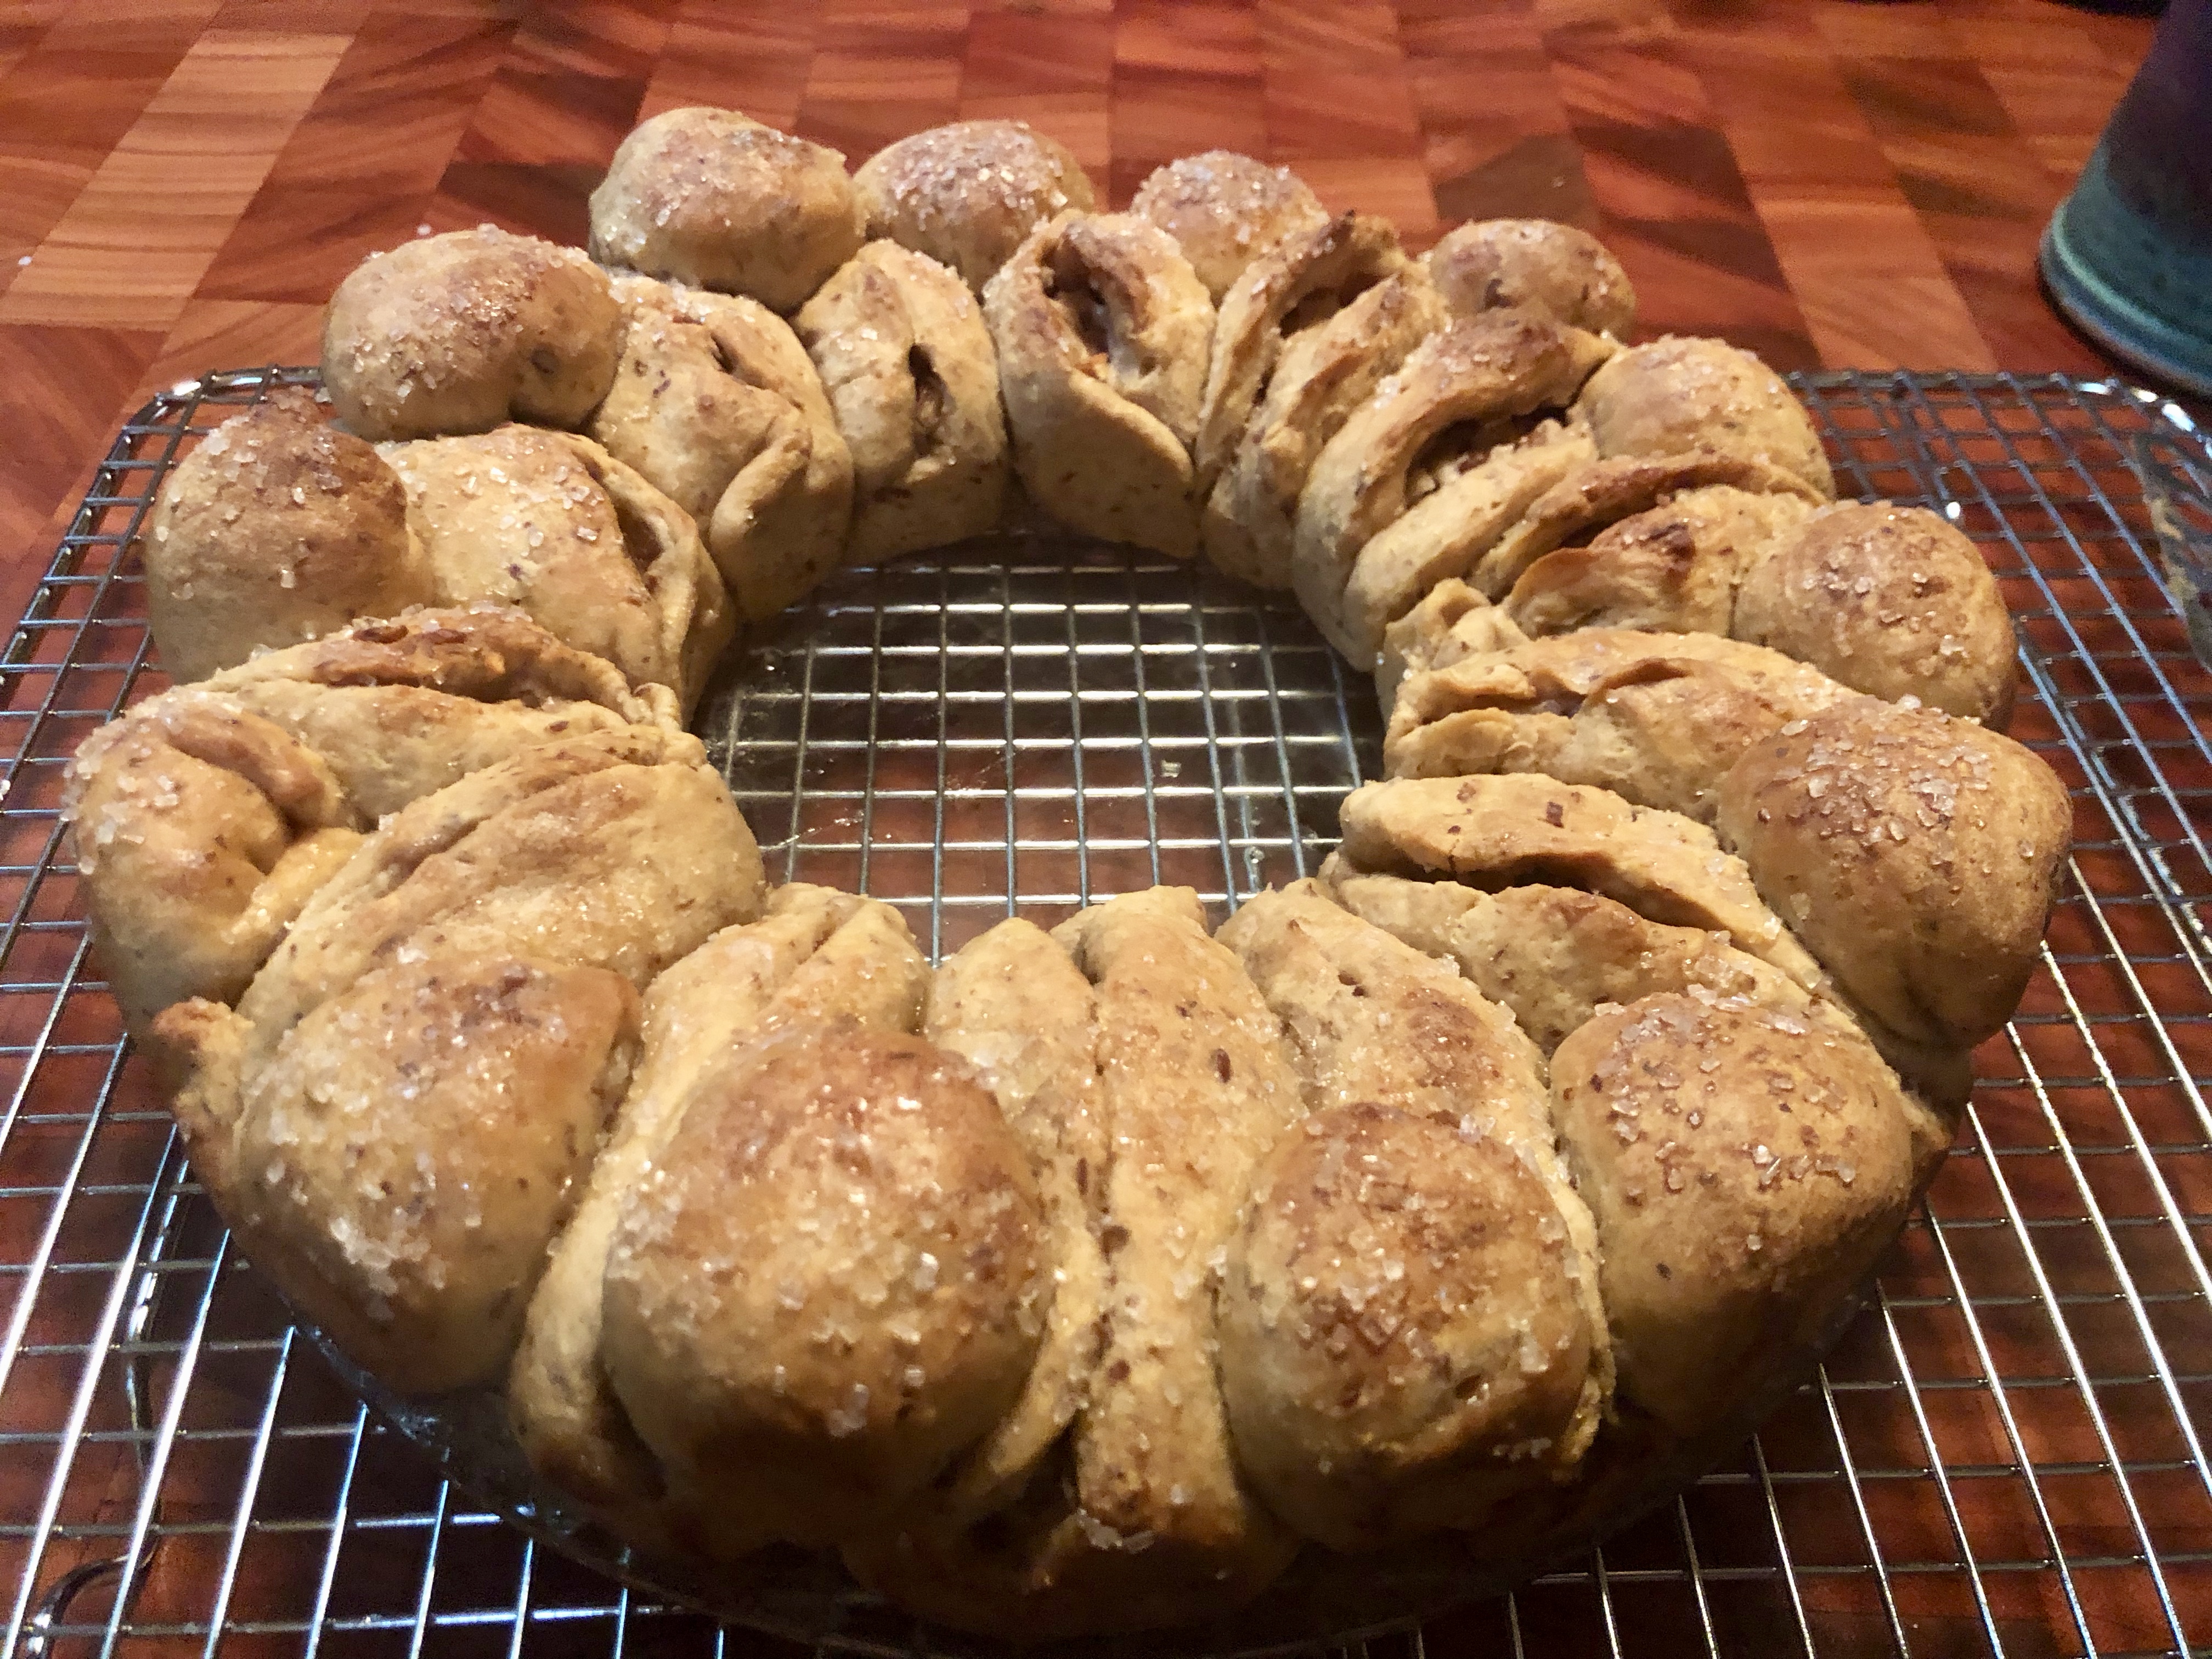
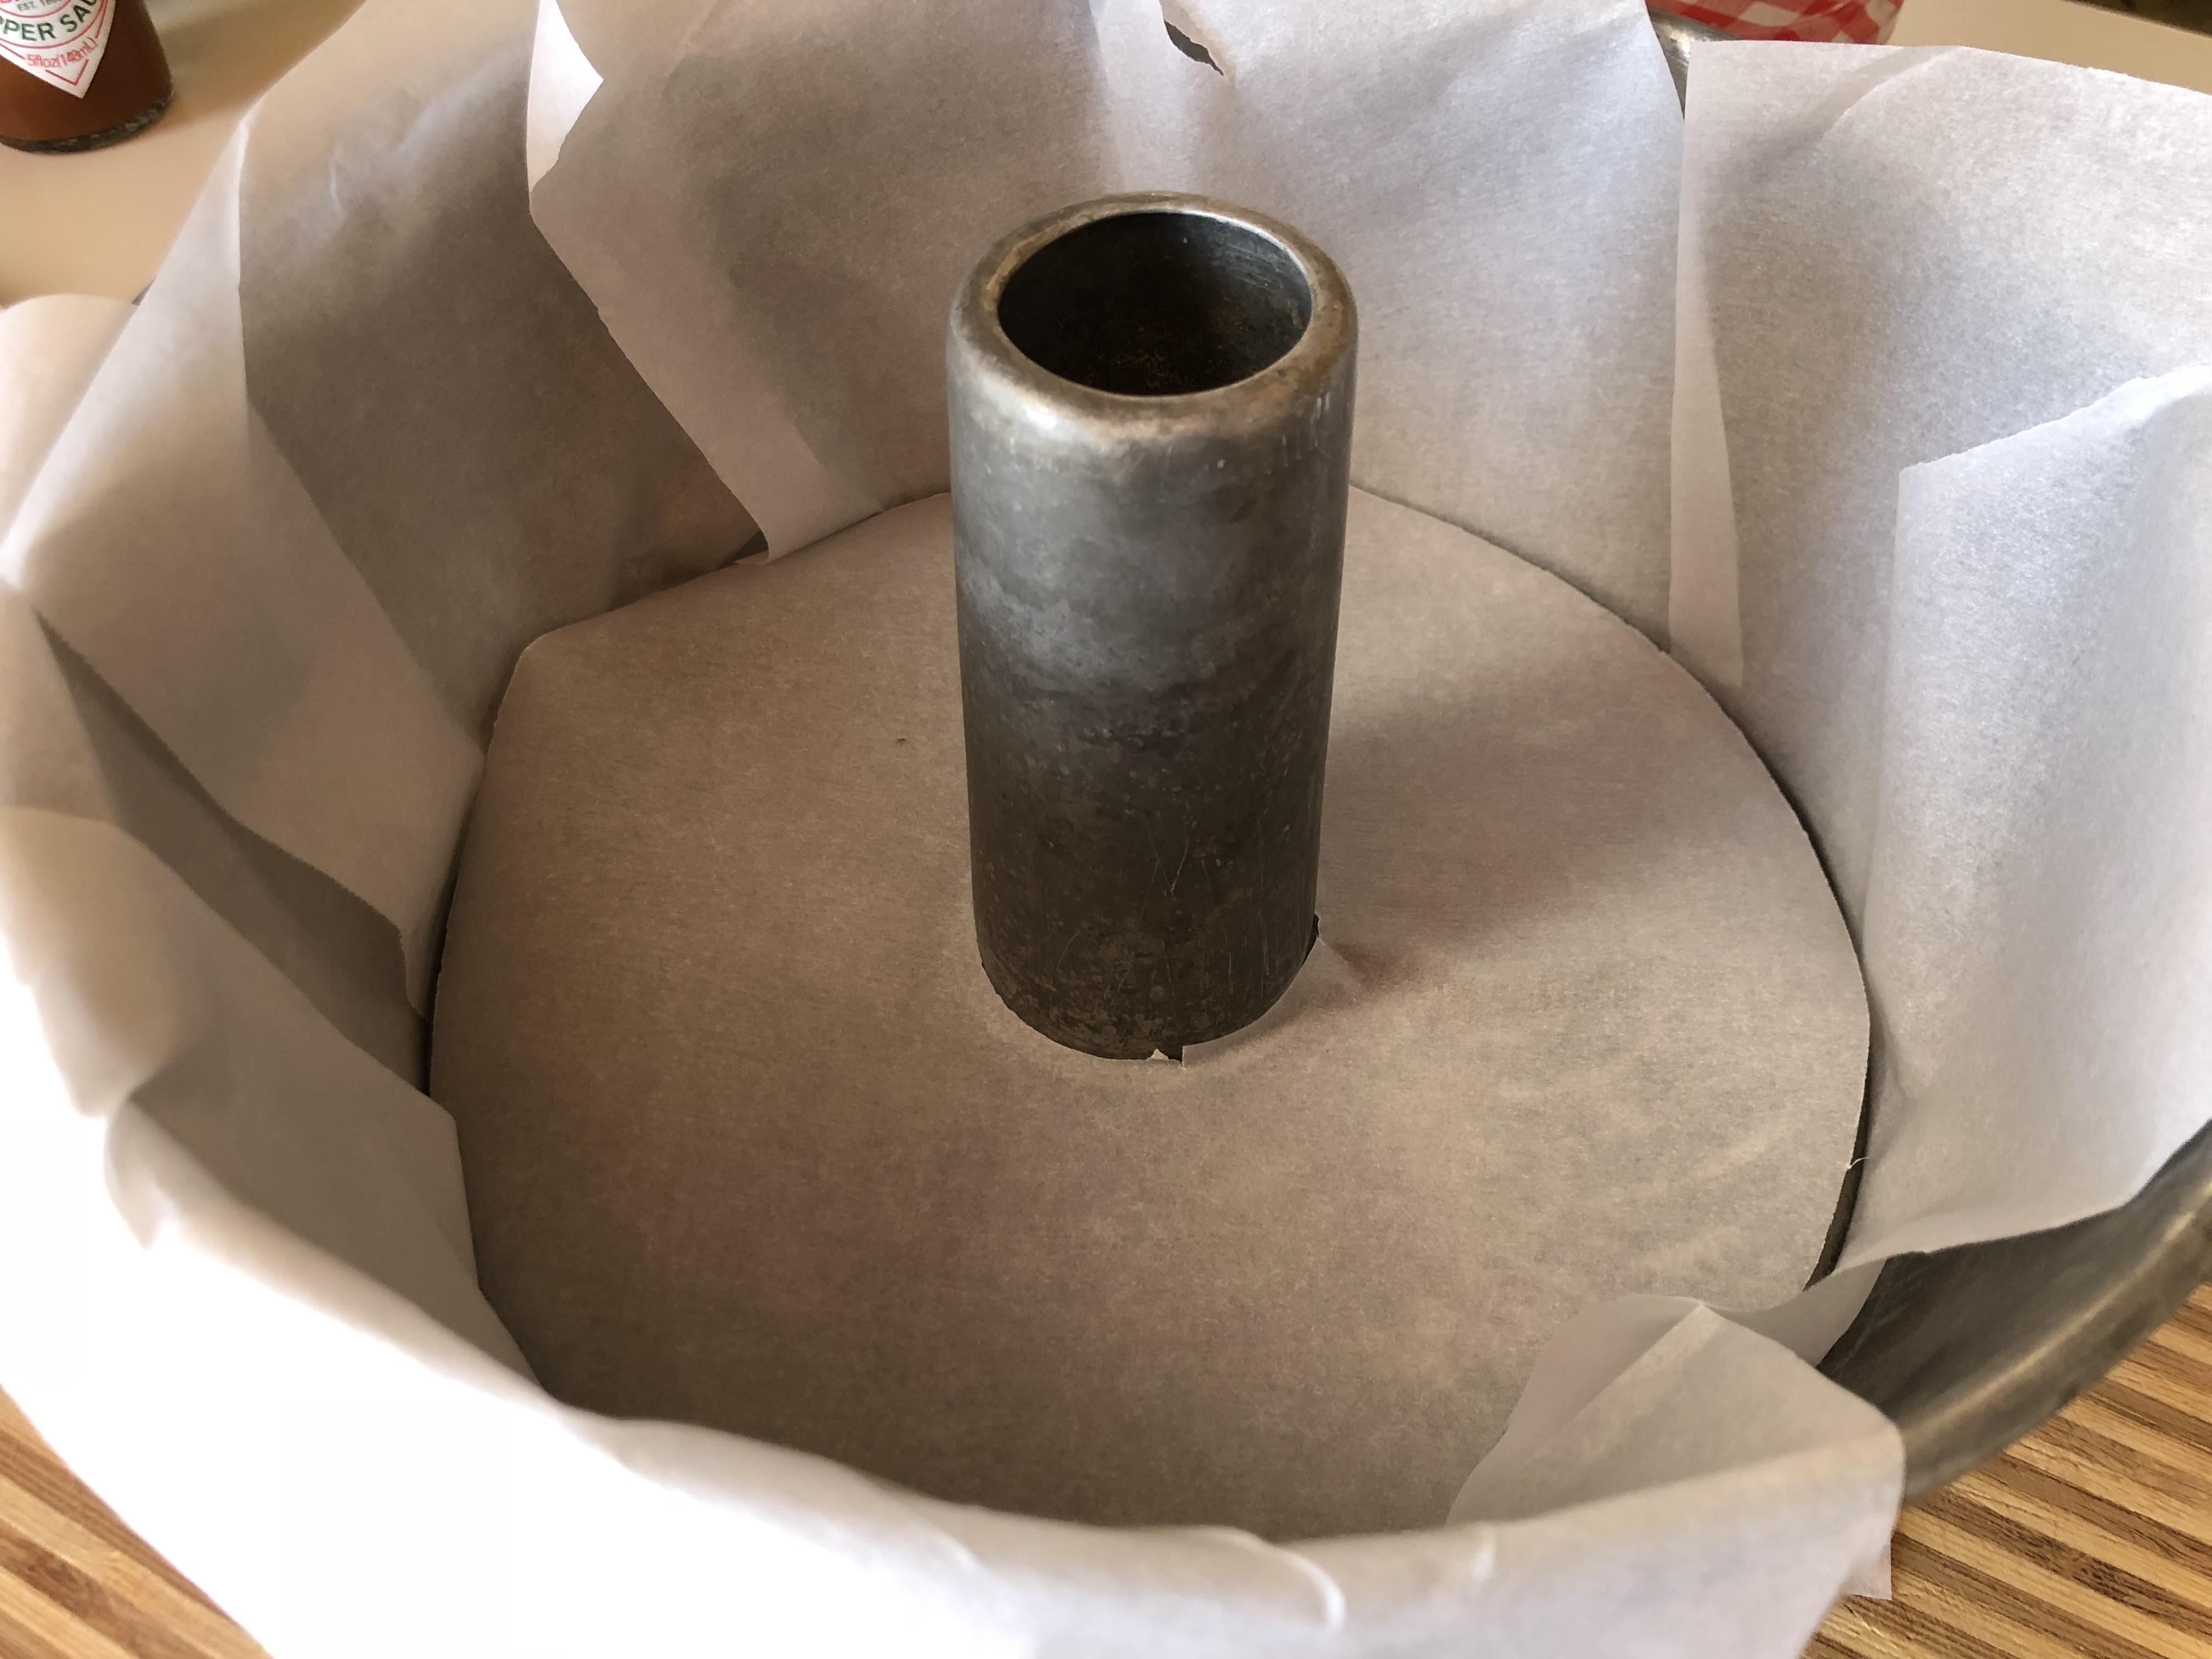
3. Place it in the moulds. You can use a loaf tin or a round baking form (I used 3 mini bundt pans), filled about half way up. Cover with plastic and leave to rise until 2-3 cm under the rim of the mould. Mine took about 90 minutes in warm spot.

fullsizeoutput_7e5e
4. Don’t forget to preheat the oven to 180ºC (350-360ºF).

a%Ily5uERbaIsO%3tdbocw
5. Heat and stir the champagne/Spumante until the sugar dissolves and thickens slightly.

6. Bake for about 45-55 minutes, until golden brown on top. If the bread gets too dark too soon, protect the top with a sheet of tin foil. Check the temperature in the bread with a thermometer, it should be about 93ºC.
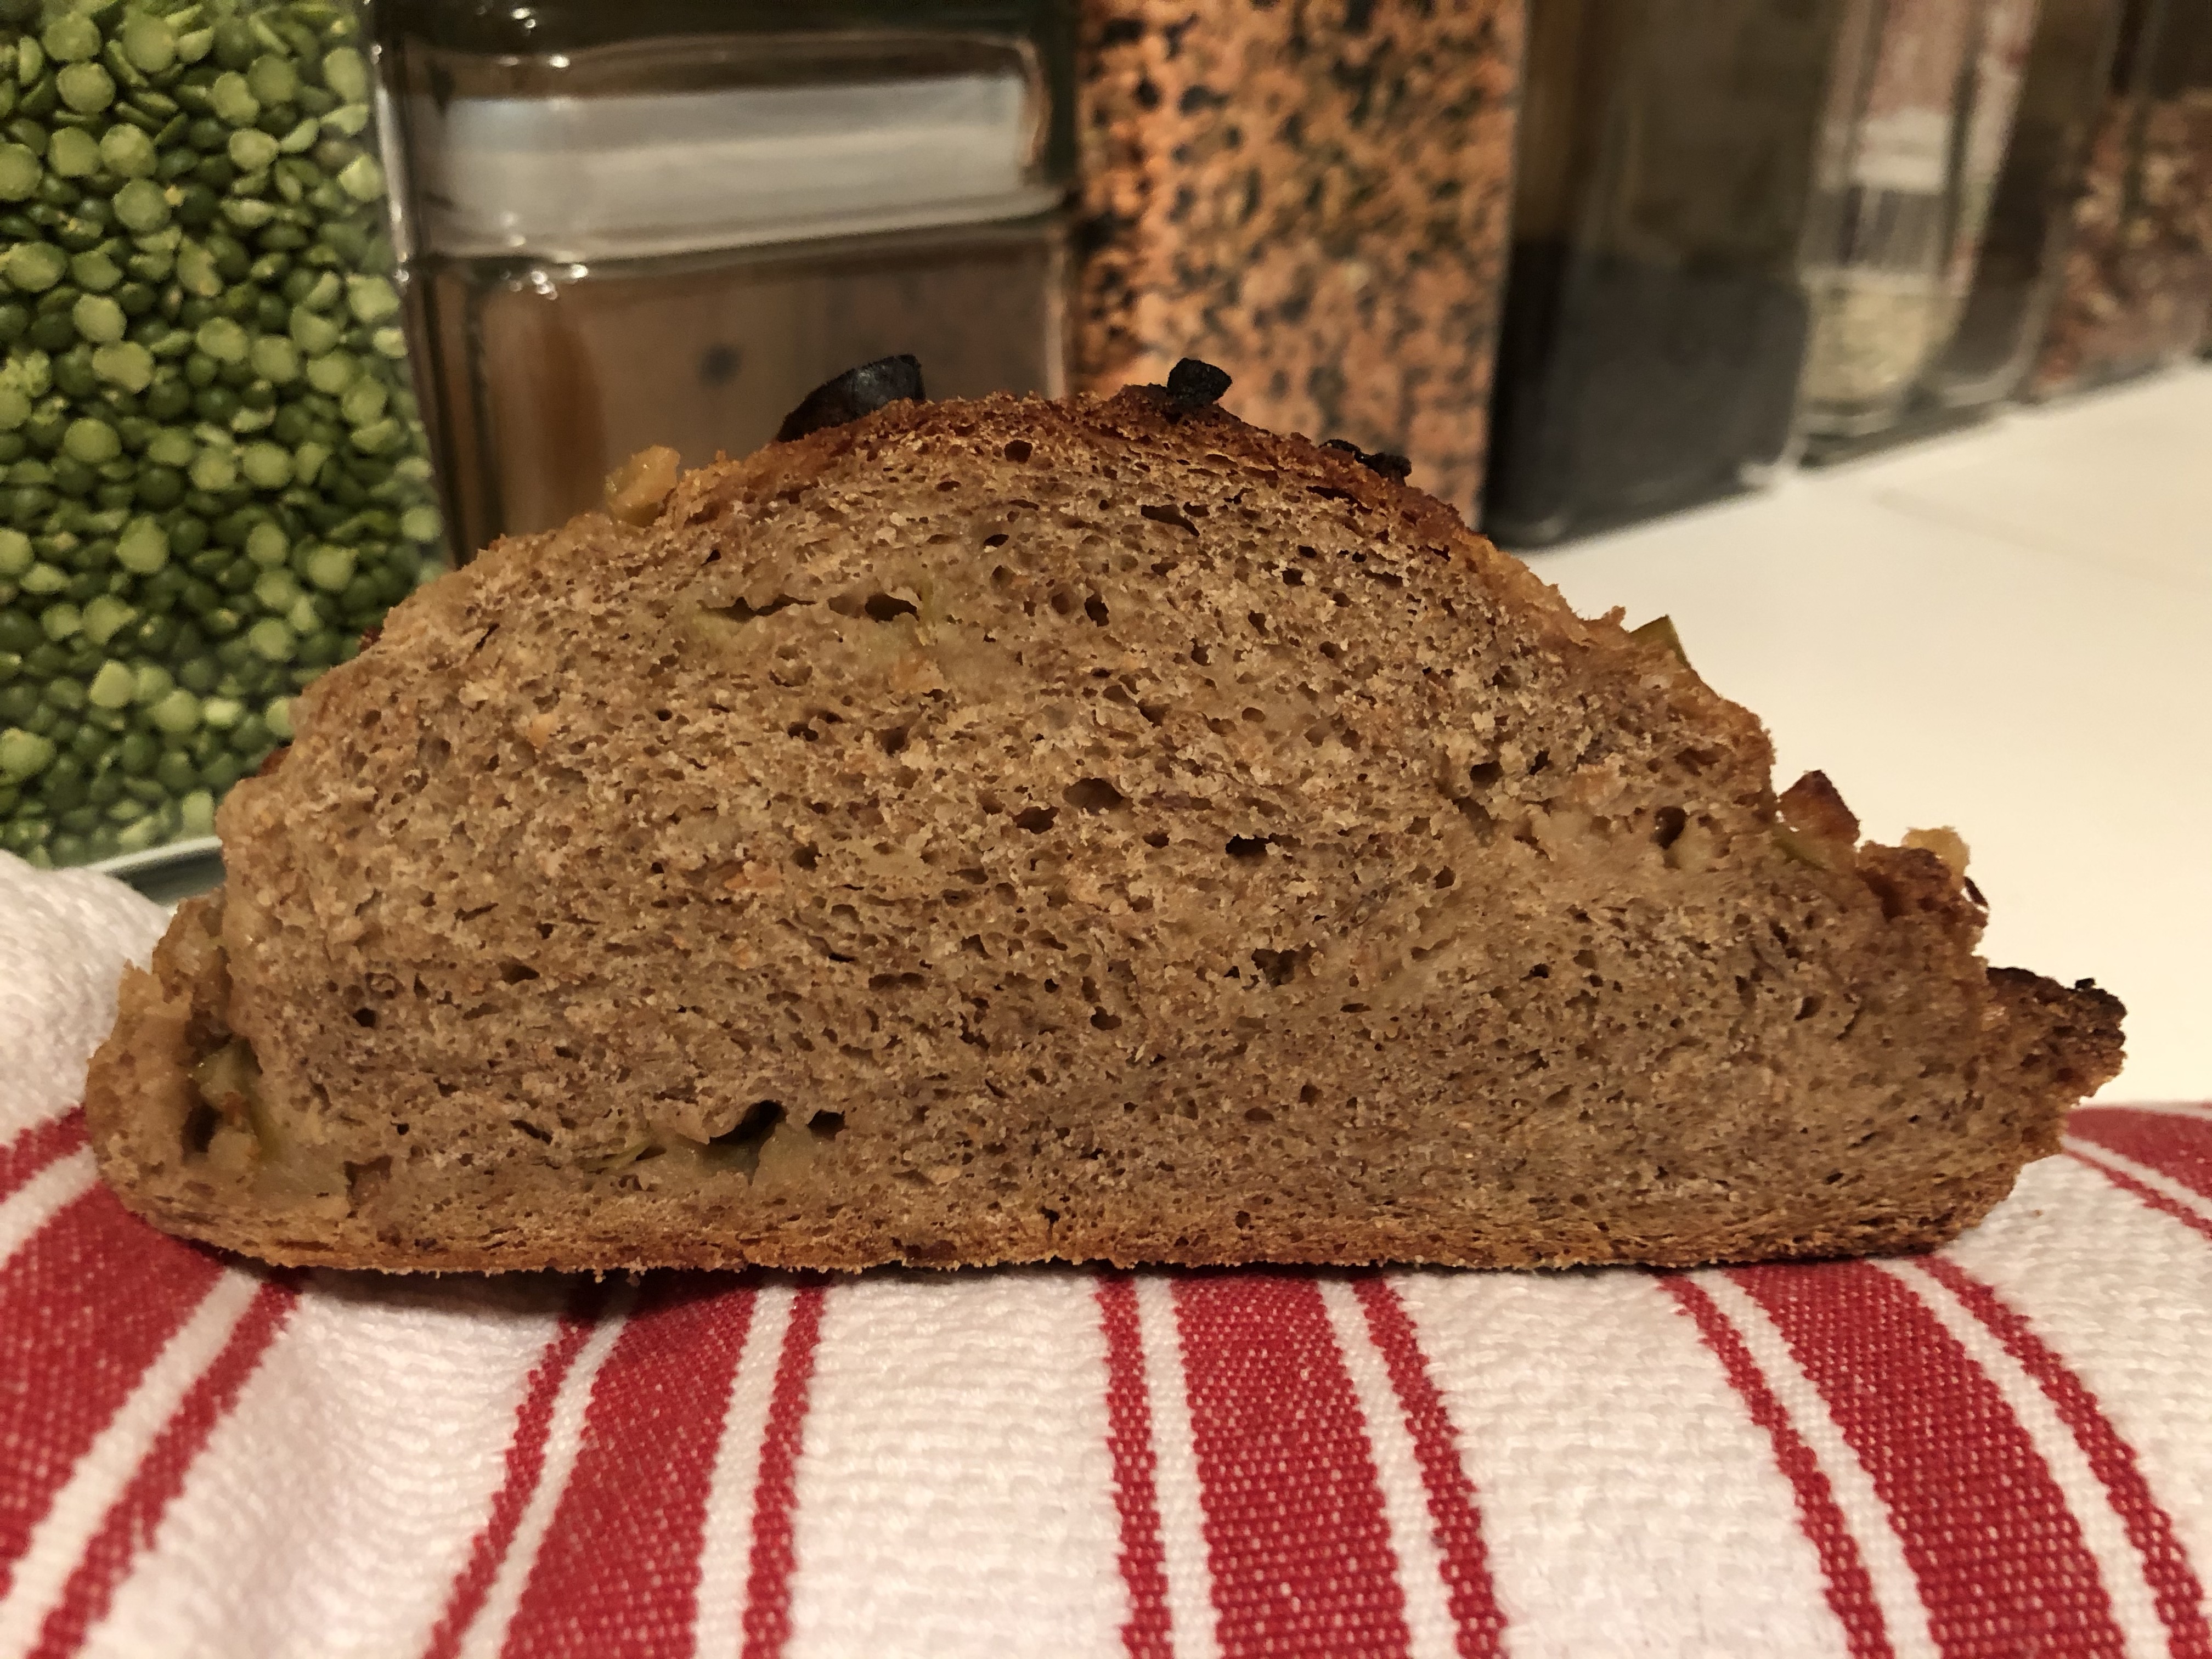
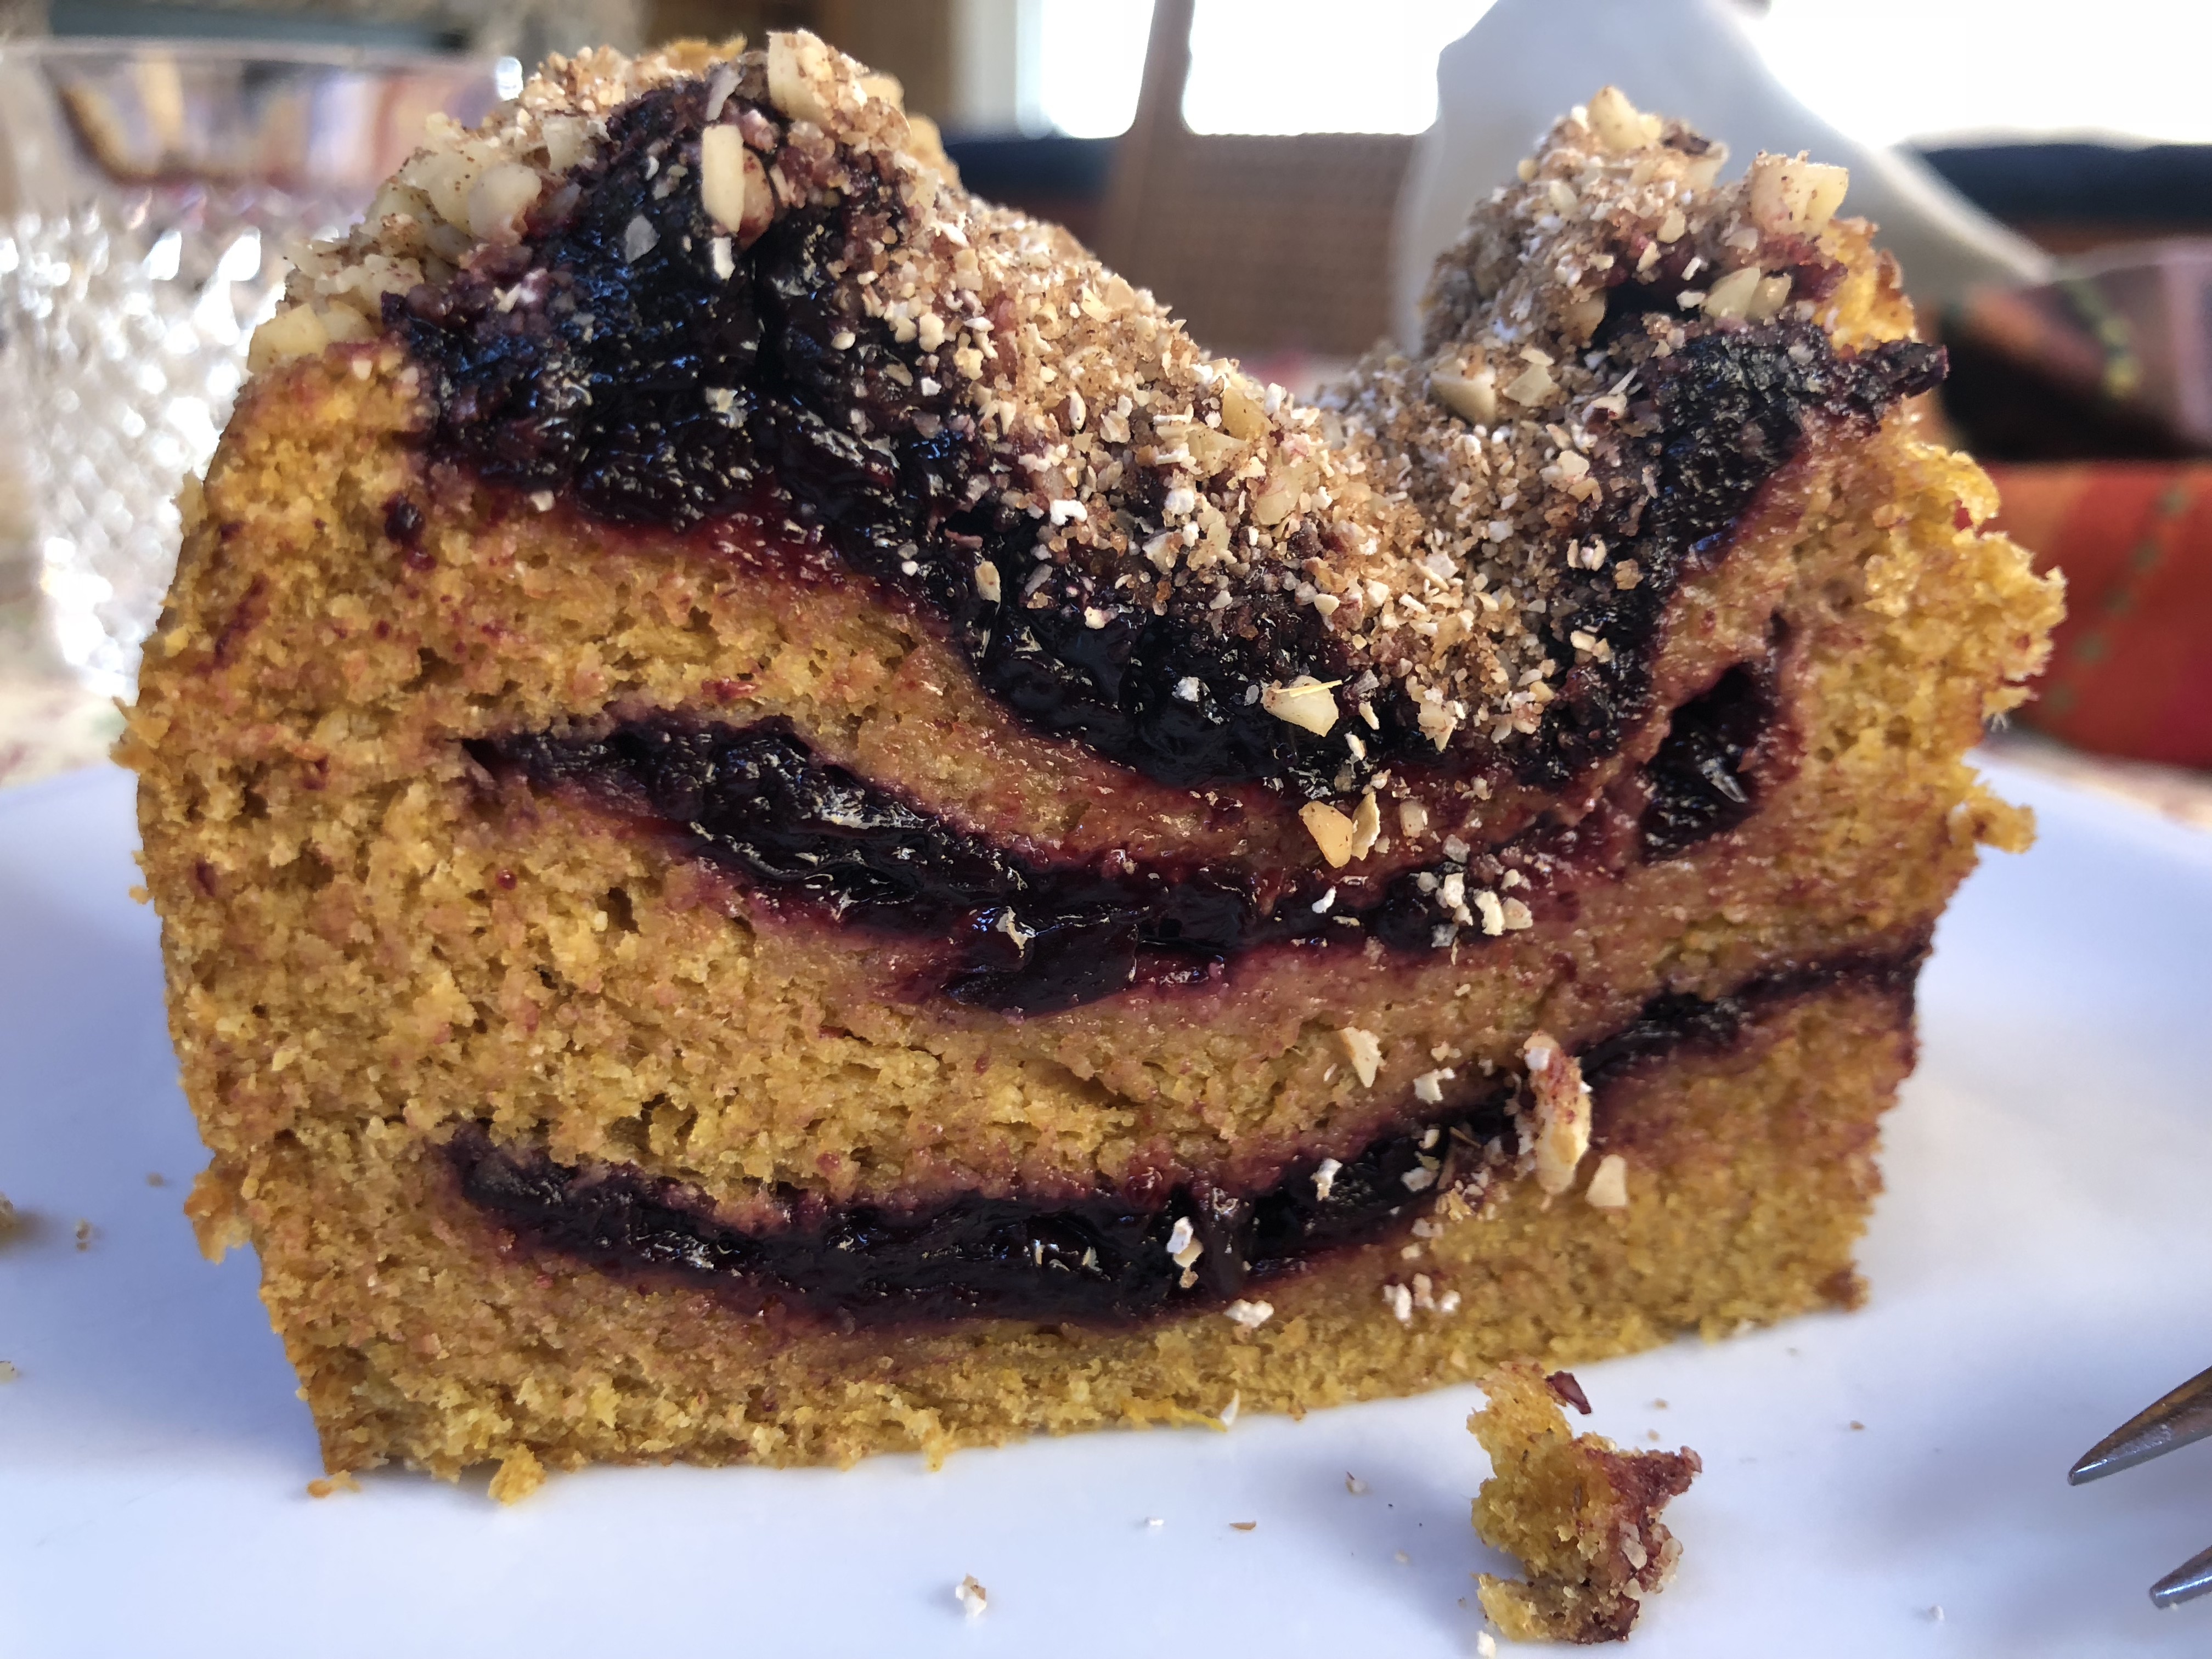
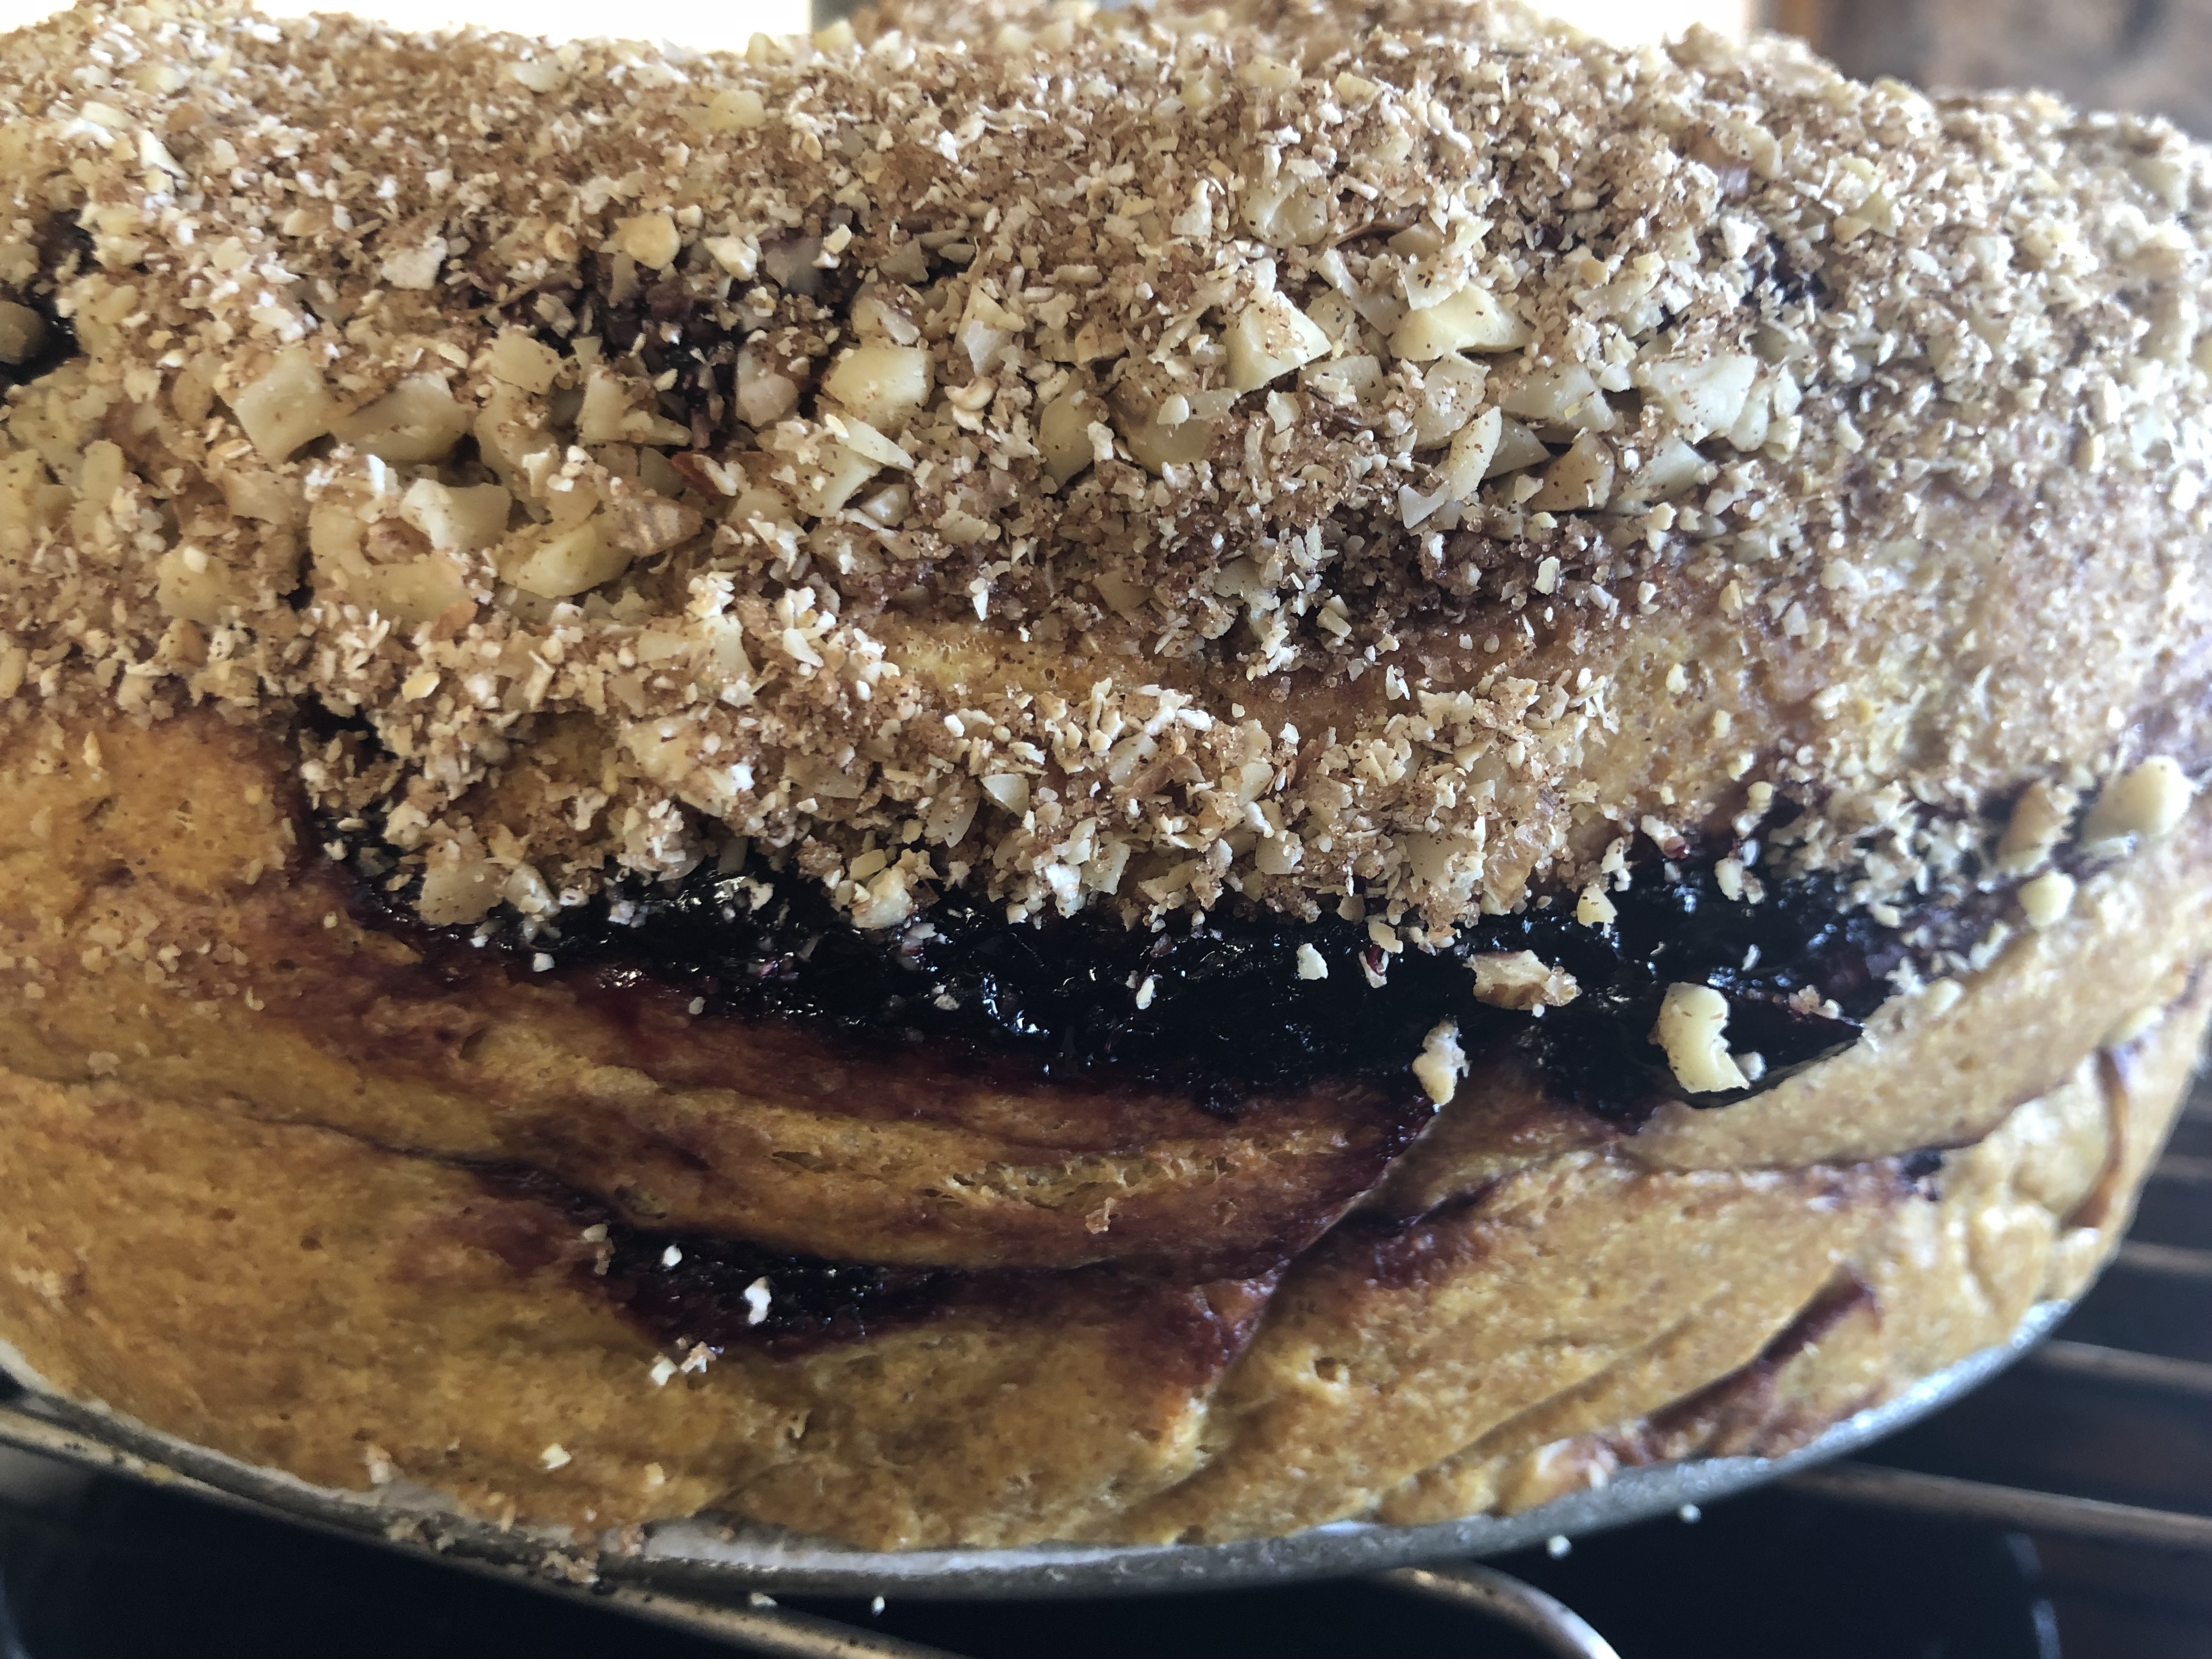
Take out of the oven and the tin and place on a deep dish. Poke the bread with a long wooden skewer from top to bottom. Brush the syrup all over it, and get as much as possible inside the bread, so take your time. Collect the syrup from the plate and keep pouring and brushing it, until all in absorbed in the bread.
Now heat the apricot jam in a small pan and let it boil, add a little water if it is too thick. Brush or pour it over the top. You can also opt for a simple sugar glaze. This topping keeps the moisture in.

qpWgEy8DSzeeMdu9aHGA2g
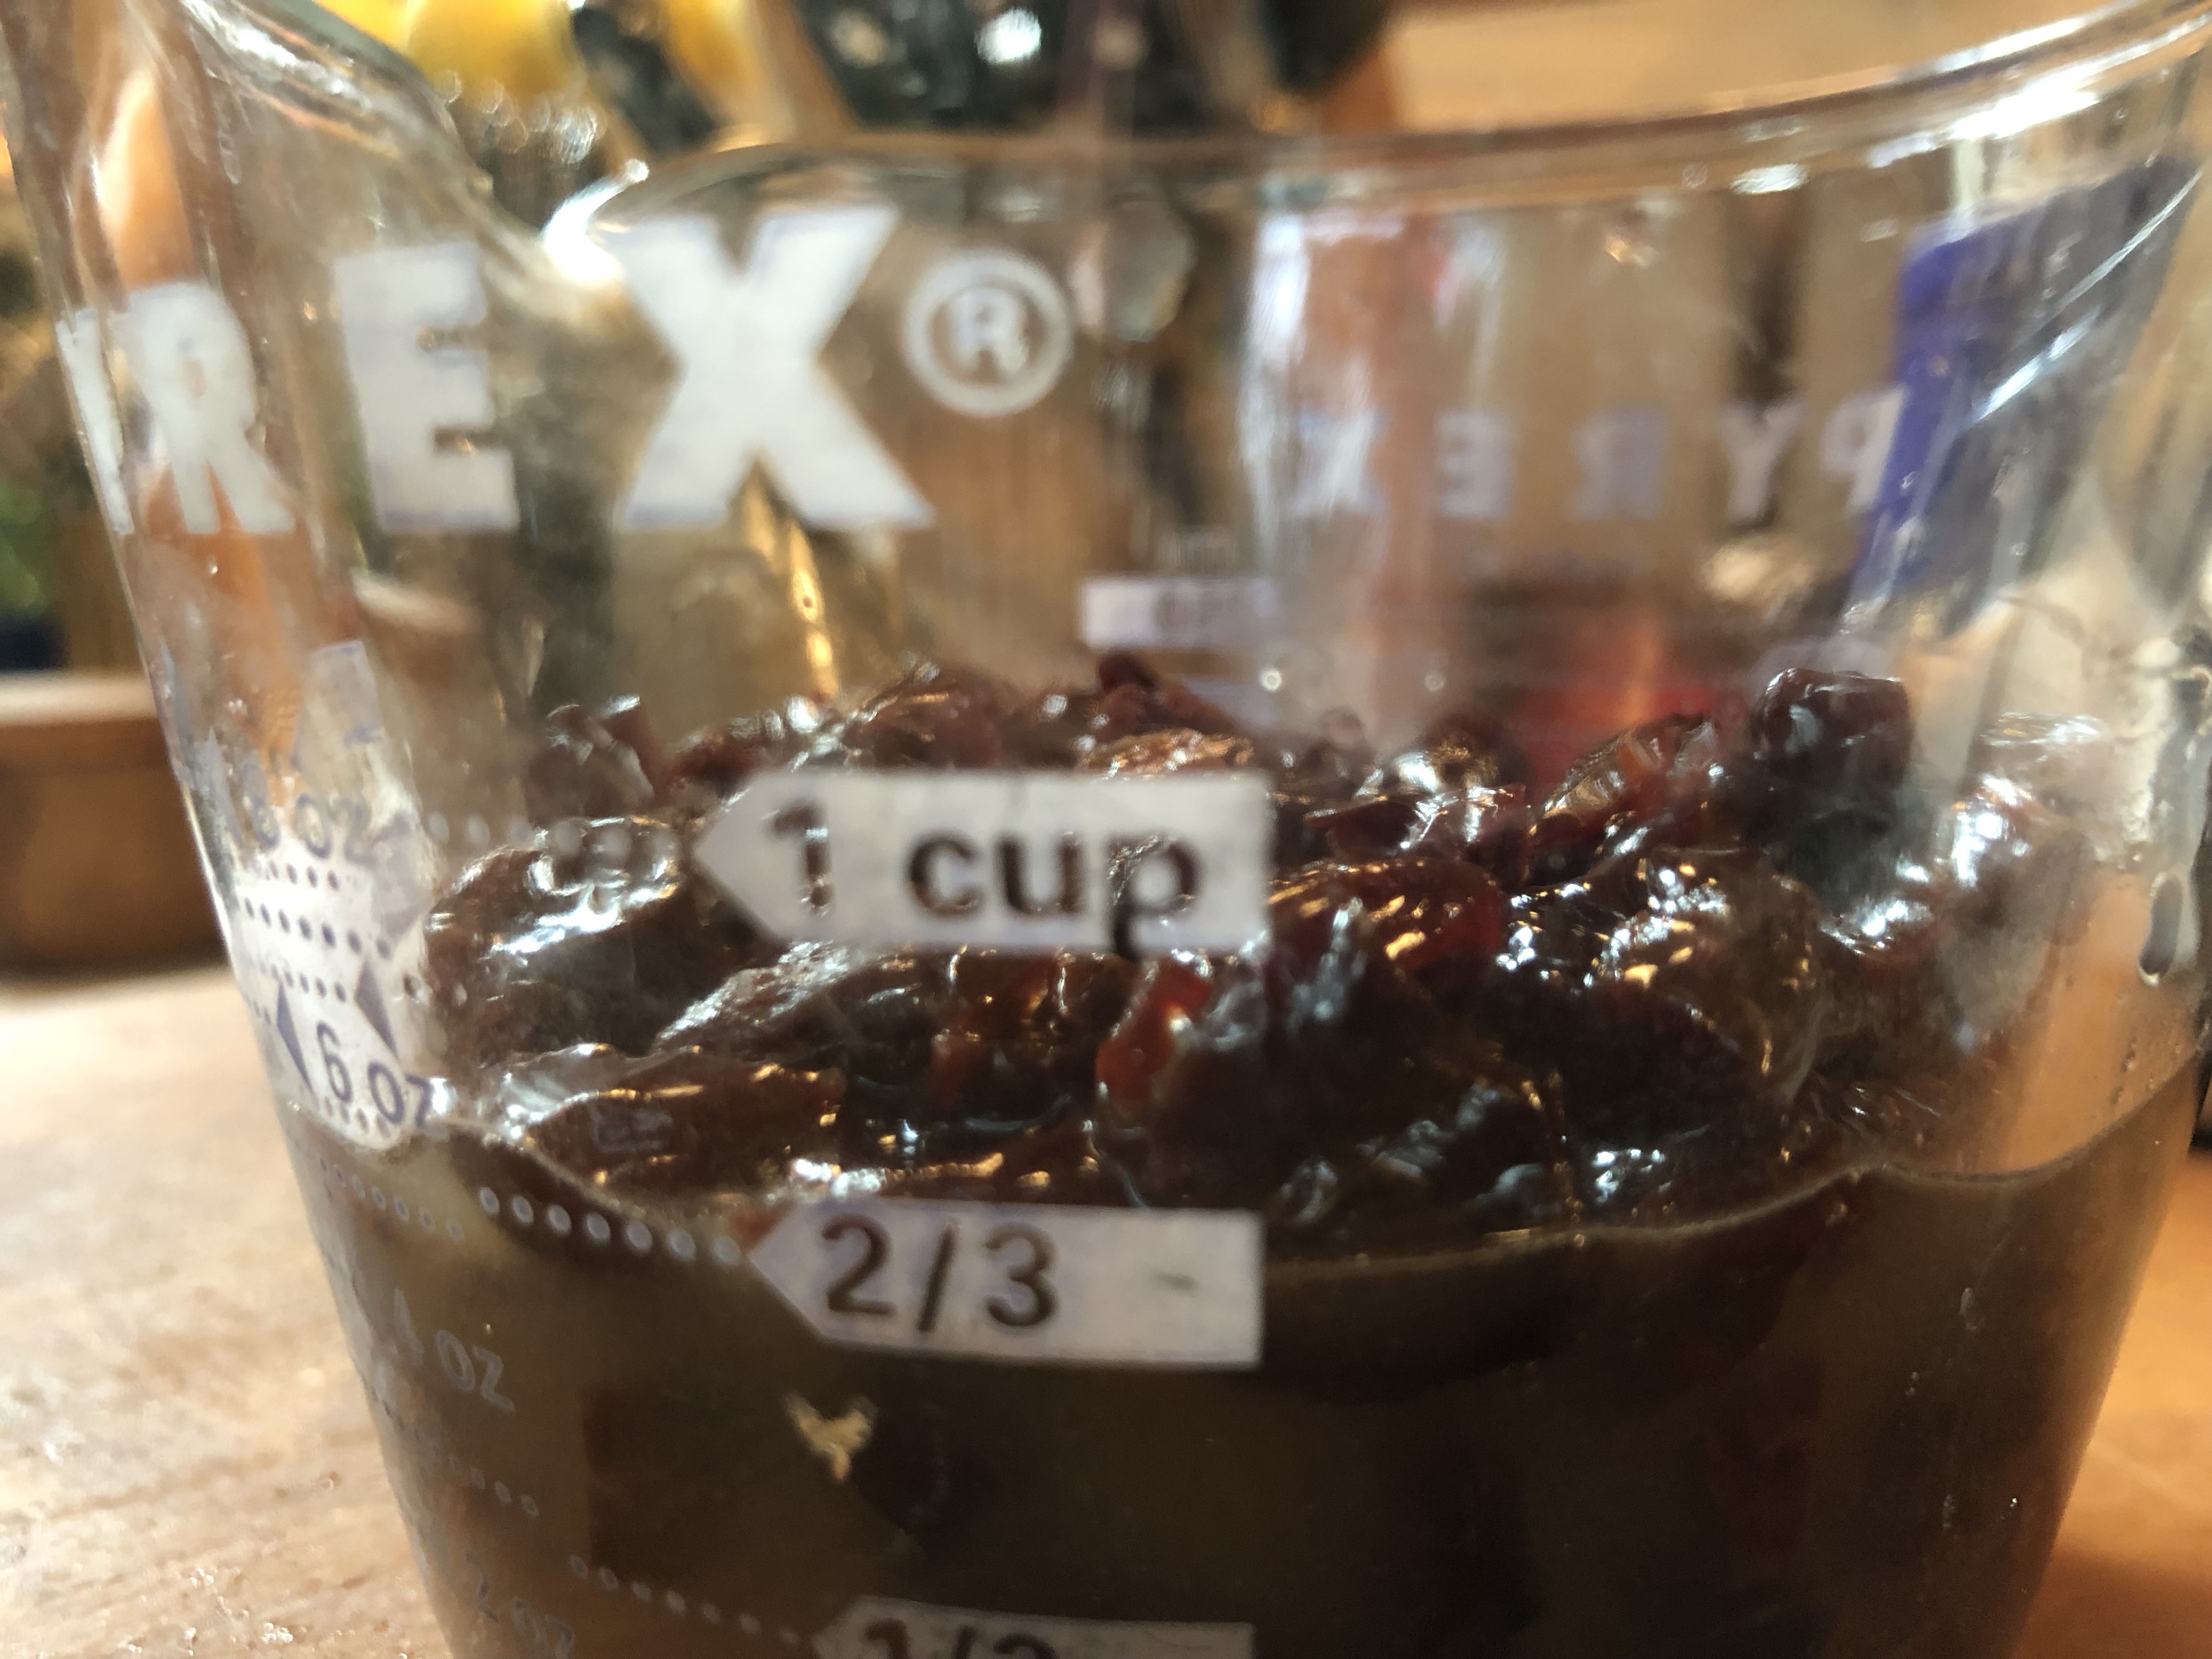
And no doubt you wonder why my apricot “jam” is so thick … because it’s not jam, I couldn’t go running 20 miles to the nearest store in a foot of snow and ice so I made a “jam” out of the Asti Spumante and dried apricots. Oh, yes it was tasty.
7. The baba is best eaten on the day that it’s baked. But if not, keep in the fridge.

fMJfmVEOSEanCTsrYkfSjQ

They’re not difficult to make, so have a go and bake these for Christmas or as a delicious in-between for new years eve. Become our Bread Baking Buddy, mix, bake, post and enjoy this recipe and let us know how they turned out. Send you details to Lien (notitievanlien (at) gmail (dot) com) and Lien will send you the Bread Baking Buddy Badge for your efforts to place with our post, if you like. Please have your entries send in before the end of the year.
BBBuddies are not very active lately, but if there are any of course she’ll make a round up. Happy Baking…. and remember you only need a little champagne for this, so you can party with what’s left in the bottle. Happy baking and Happy holidays! 🎄🎄🎄
 fullsizeoutput_7e5f


14 Comments

BBB ~ English Muffins

Holidays … a full house … chaos … something special … make ahead … fun … hassle free … simple but brilliant … food … wait did you say food, as in feed this full house with chaos full strength and make it special.  And you expect to make it ahead, have it be fun, hassle free and brilliant. 
You are living in an alternate universe and not in this one.
No, truly, our Kitchen of the Month, Pat – Feeding My Enthusiasms, at least has a part of breakfast for us.  Even if you don’t have a crowd you can so two small batches over 2 days and have fresh homemade English muffins to be extravagant with honey, butter, maple syrup and jam … maybe even a peanut butter and cream cheese in the afternoon.
You may ask, why corn meal?  Over the years I’ve seen English muffins with corn meal on the bottoms and I’ve seen semolina.  Is one better than the other or more authentic?  A quick internet search I did this morning, didn’t turn up a consensus.  The function of either is to prevent sticking to the pan, griddle or spatula and lend a crispness to the crust and bottom.  I can’t help thinking it may also be to pull some moisture out of the dough while they rise, seems logical that would result.  In different locations corn meal may be more readily available and cheaper than semolina and would so be more likely to be used.  Either will serve the same function and work well.
The only tricky part of these is getting them reasonably done without burning the bottom.  Elizabeth solved that for me because my copy of Rose Levy Beranbaum, Quick Breads, Little Quick Breads, Little Yeast Breads, and Batter Breads, The Bread Bible, p170 is still packed away and I wasn’t bright enough on my own to consider sticking my thermometer  into the center of one of these to see were it was.  Try for 190°.  Elizabeth finished her’s in the oven which I think I’ll try when I finish my remaining six this afternoon but it maybe just turning the griddle down and cooking longer would work as well.

+JWEhqgrTxO7Nq%%chru8Q
Recipe from: Pat “Feeding My Enthusiasms”  From:  SeriousEats

English Muffins
Yield: 12 – I got 11

245 grams bread flour
40 grams rye flour (originally this 40 grams was bread flour)
140 grams whole wheat flour
11  grams table salt or (11 grams kosher or 2 3/4 teaspoons)
4 grams instant dry yeast 1 1/4 teaspoons
340 grams ounces cold milk
100 grams honey, I used only 55 grams
1 large egg white, cold
fine cornmeal to cover muffins on two sheet pans with space around them – Elle), don’t skip this
bacon or butter or oil, for griddling

Make the Dough and Let Rise: 
In a large bowl, mix bread flour, whole wheat flour, kosher salt, and yeast together until well combined.
Add milk, honey, and egg white, stirring until smooth, about 5 minutes.
Cover with plastic and set aside until spongy, light, and more than doubled, 4 to 5 hours at 70°F.

For the Second Rise:  Thickly cover a rimmed aluminum baking sheet with an even layer of cornmeal.
With a large spoon, dollop out twelve 2 2/3-ounce (75g) portions of dough I only got 11 muffins none weighed more than 78 grams or less than 72 grams; it’s perfectly fine to do this by eye.
If you’d like, pinch the irregular blobs here and there to tidy their shape.  My dough was to sticky to do much shaping, I went with what fell on the pan.  They all came out looking like … English muffins
Sprinkle with additional cornmeal, cover with plastic, and refrigerate at least 12 and up to 42 hours.

dRrZeSckQPWLzqxF8BN%tQ

Rising on the griddle! Oolala!

To Griddle and Serve:  Preheat an electric griddle to 325°F or warm a 12-inch cast iron skillet or griddle over medium-low heat. When sizzling-hot, add half the butter and melt; griddle muffins until their bottoms are golden brown, about 8 minutes. Flip with a square-end spatula and griddle as before. Transfer to a wire rack until cool enough to handle, then split the muffins by working your thumbs around the edges to pull them open a little at a time. Toast before serving and store leftovers in an airtight container up to 1 week at room temperature (or 1 month in the fridge).

This slideshow requires JavaScript.

Special Equipment:  Flexible spatula,  rimmed baking sheet, griddle (electric or cast iron) or 12-inch cast iron skillet, square-end spatula, wire rack

Seriously easy.  Oh and that photo reminds me: homemade slow cooker apple butter is an absolute winner on these too!

Go for it why don’t you. Bake with us. Check out Pat, FeedingMyEnthusiasms for all the scoop and be a Bread Baking Buddy.  Don’t forget all the other Babes, we all had different experiences.