MyKitchenInHalfCups

Once Upon a time: Cooking … Baking … Traveling … Laughing …


7 Comments

BBB ~ Nan e Barbari (Persian flatbread)

Flat, I’m flat, I’m flat as a pancake.  Flat as a pancake, busy as a bee and happy as can be with Nan E Barbari!

Since I am so very late posting this month because the universe has chosen to bless me with a hail storm of crisis events – always loved that Morton salt girl with the huge umbrella in the downpour – when it rains it pours.  I will do this very short with just a few notes of mine.

Notes:  You really want to bake this: It’s drop dead easy and fast for yeasties.

My original goal was to have a lovely Persian dinner with this like lamb meatballs … but I never got that past the idea stage and instead we used half of a loaf for toast and the rest for glorious sandwiches!  When we get to Michigan, this is going to be high on my list for a BBQ nite.

IMG_3336

Recipe from our Kitchen of the Month Elizabeth

and

based on Lida’s recipe for Barbari Bread at 1001recipe.com

Nan e Barbari (Persian flatbread)

dough
5 gm (~1.5 tsp) active dry yeast
360 gm (1.5 c) water, at 90F (32C) ¹
60 gm (~0.5 c) 100% whole wheat flour
360 gm (~2.75 c) unbleached all purpose flour (100 grams of this was spelt)
2 gm (~0.5 tsp) baking powder
6 gm (1 tsp) salt

30 gm ground flax seed
nigella seeds (or black sesame, poppy, sesame seeds)
sauce
1 teaspoon flour
1 teaspoon baking soda
160 gm (2/3 c) water

Directions:

1. In a large bowl, mix the flours, baking powder, yeast and salt and whisk together. with a wooden spoon until the dough pulls away from the sides of the bowl.  (Doesn’t that give you pause … baking powder, yeast.  Well, it did me but I blindly followed along.)   Add water and mix with wooden spoon or your hands until it clears the sides of the bowl.

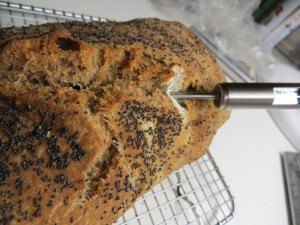
This resulted in flatter loaf.

This resulted in flatter loaf.

2.  Kneading: Turn the dough out onto an UNfloured board. Now Elizabeth has a fetish about washing and drying her bowl … I don’t.  Please do not be tempted to skip this step. I did … ship it.  Using both hands on either side of the dough and thumbs resting on the top in the center, lift it up and flip it over in the air before plopping it back down on the board.  Considering all that hail storm, my plopping was more like whack and bam but boy that was just terrific.   Fold the dough in half away from you as you plop the dough down. Keep repeating until the dough is smooth. Every so often, use the dough scraper to clean the board. Stretching the dough is desired on the turns. But this won’t start happening right away.  When the dough is smooth, place it in the clean mixing bowl (there is no need to oil the bowl).

3. I placed the dough ball in my rising bucket and put the lid on.  Allowed to double.

4. Prepare the sauce: Whisk flour, baking soda and water in a small pot. Bring it to a boil. Remove from heat and set aside to cool.

5. Pre-shaping: Line a cookie sheet with parchment paper. Scatter a light dusting of flour on the board and gently remove the risen dough onto it. Don’t worry that the dough is quite slack. Cut the dough in half. Form each piece into a ball and place well apart on the cookie sheet.

Loaf came out with most loft using this method.

Loaf came out with most loft using this method.

6. I covered this with a large plastic box and allow to rise to double in a draft-free area. (about an hour)

Final rise after shaping.

Final rise after shaping.

7. Final Shaping: Brush each round with the sauce. Dip your fingers in the sauce and dimple the rounds down to form two ovals with lengthwise furrows.  Brush ovals with the sauce once more and sprinkle with nigella seeds. Allow the ovals to stand for about 30 min.  Elizabeth has terrific links for videos, very worth while, I just don’t have time to include today.

8. Baking:  Baking: If you do not have a barbecue, this bread can be baked in a conventional oven. Lida suggests baking it in a preheated 375F (190C) oven for about 30 minutes until golden brown.
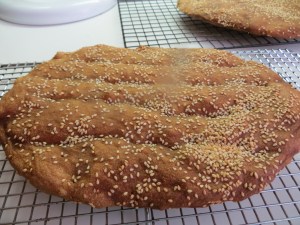
Grand color!

Grand color!

Serve the bread warm.  And if cools completely all is not lost because …
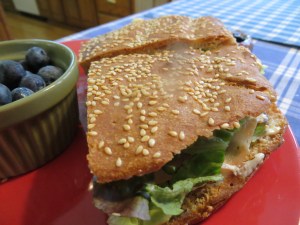
Can you have better at a picnic!?

Can you have better at a picnic!?

You can still have glory!

Are you drooling now ... Get thee to the kitchen and BAKE!

Are you drooling now … Get thee to the kitchen and BAKE!

Thank You Elizabeth for a great bread, please for give the speed post.  Some times life just throws such incredible curves.

See our  Kitchen of the Month Elizabeth blog to be a Bread Baking Buddy!

12 Comments

BBB ~ Whipped Spelt Bread

Our glorious Kitchen of the Month, Ilva, has presented the Babes and all desiring to be Bread Baking Buddies with a most interesting flour and baking technique.  This recipe would have delighted me just because it was using spelt flour.  Spelt has been on my list to try for literally years – I’m that slow.

Here’s how Ilva introduced this bread:

This time we are back to basics, a loaf of good bread, simple but with difference, this one you don’t knead but you whip! And you whip it good! It’s from a bread book by the Danish baker Hanne Risgaard and it is called Home Baked: Nordic Recipes and Techniques for Organic Bread and Pastry. I have made several breads and cakes out of and they have all been good. I made this bread months ago and we liked it a lot, it has a great crust and texture. The dough is soft/wet but not soft like the Croc, it is much easier to work with. She uses spelt flour, both sifted and whole-spelt but I used only sifted spelt flour and then normal wholewheat flour. If you can find spelt flour use it because it has a nice flavour, if not you can try some other flour that absorbs water more or less to the same degree. The spelt flour I find here is similar to AP flour.

... and then there was ... the Whip

… and then there was … the Whip!

There was this whip …  The whip provoked great and long discussions: I tried it and gave up, went to the dough hook J-thingy; I didn’t even try it, it just seemed impractical, started with the dough hook; Hey, it works.  The continuum ran the gauntlet with the whip flying all the time.

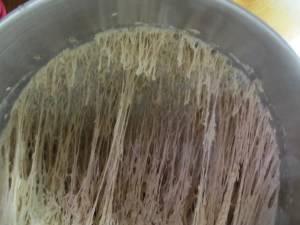
Because I wanted to get it right, I’m baking this a 2nd time.  I wanted to redo it so as to get lowering the oven from 480° to 410°; I wanted to try the balloon whisk; I wanted to get a photo of the wild gluten strands (that Karen calls it like it is: snot).  Three things and I corrected all of those … except I mixed it up Wednesday, rested it overnight … ah, no time to bake … rested it 2 overnights.  The oven warms to ° as we speak.

NOW I’ve discovered that even though, as you will see, the recipe clearly calls for spelt flour twice and that’s what I used, it would seem that most every Babe except me used spelt and some other flour – rye, whole wheat but something other than spelt.  I’m jealous, they got lighter looking breads … but I’m also delighted to find that you can bake a 100% spelt loaf and it is truly delicious.  We did like this bread very much.  One day soon perhaps I’ll try this again and use about 160 grams bread flour for some of the 1000 grams of spelt.

BBB Whipped Bread

Recipe By: Ilva: from Home Baked: Nordic Recipes and Techniques for Organic Bread and Pastry by Hanne Risgaard
Yield: 2 loaves

840 grams 29,63 oz sifted spelt flour
160 grams 5,64 oz whole-spelt flour

(I used 1000 grams whole grain spelt flour total)
30 grams flax seed meal
10  grams 0,35 oz fresh yeast (I used 2.5 teaspoons active dry yeast)
20  grams 0,70 oz salt
800 grams 28,21 oz water, approx

Directions:

1. Mix the two types of flour in the mixing bowl, yeast, salt and water. Mix the dough at high speed using a whisk until the dough no longer sticks to the sides and bottom of the bowl. (By-golly, the balloon whisk works and in just about the same time that the dough hook took.)  Scrape the soft dough off the whisk, put a lid on the mixing bowl, and let the dough rest in the fridge overnight.  I’m sure there is lea-way here but two nights in the fridge is not recommended.

2. The next day, allow the dough to warm for a couple of hours before continuing.

3. Gently turn the dough onto a generously floured work surface

The dough yawns at the Whip.

The dough yawns at the Whip.

and dust the top of the dough with a little – ha I used LOTS, this stuff is sticky – flour. Divide the dough into four equal-size pieces.

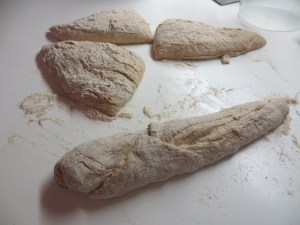
Divide into four pieces

Divide into four pieces

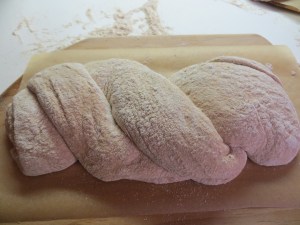
4. Quickly twist the pieces together in pairs, preserving as much air in the dough as possible. Place the two twisted loaves on separate peels lined with parchment paper. Let them proof until nearly doubled in volume.

Fat to skinny ends ...

Fat to skinny ends …

5. Preheat the convection oven with baking stone to 250°C/480°F.

... and do the twist.

… and do the twist.

6. PRE-HEAT 480°

7. Generously mist the inside of the oven with water. Ease the loaves, along with the parchment paper, onto the baking stone. Spray a little more water into the oven. Repeat after one minute.

Help!  I'm falling out of bed.

Help! I’m falling out of bed.

8. After 5 minutes of baking, lower the heat to 210°C/410°F, then bake the loaves for another 20-30 minutes more.

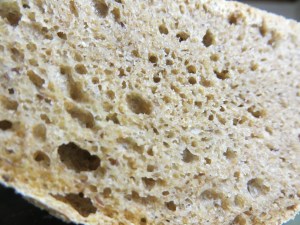
Very nice crumb and taste, no bitterness.

Very nice crumb and taste, no bitterness.

And today’s report whipped with the whisk, right oven temps:

Try me as a loaf ...

Right oven temps ... better color!

Right oven temps … better color!

IMG_3317

Haven’t sliced the loaf, still too warm.  But everything looks good.

How could you resist?  Why would you want to?

Ilva:

If you want to make this bread with us and be a  Bread Baking Buddy, then bake it, blog it and send me a link by May 26th, to luculliandelights AT gmail DOT com with Bread Baking Buddy in the subject line and I will add you to the roundup. But before you do that, check out if and how the other Babes managed their whipping, on my side bar.

We have bread!  Hope you find time to bake with us.