MyKitchenInHalfCups

Once Upon a time: Cooking … Baking … Traveling … Laughing …


6 Comments

All my Roses …

If you’ve ever been to one of those fabulous botanical gardens devoted exclusively to roses then you’ll understand what joy it is to gather all my Buddy Roses in one place.  Just as the perfume in a rose garden is heady, so are the Russian Rose Braids heady in my kitchen.

Thank you each for baking with us and producing such gorgeous breads and the matching perfume!

Sandie blogging at Crumbs of Love

Connie’s Russian Rose blogging at MyDiscoveryOfBread

Ayalon blogging at giladayalonvegan It’s vegan! but know it needs translation.

Kelly @ A Messy Kitchen

Kathy @ BreadExperienc

Jamie blogging at Life’s A Feast

Karen blogging at Kitchen Stories

Judy blogging at Judy’s Gross Eats

Claires blogging at  ClairesBaking

Carola blogging at Sweet & That’s It

Aparna Blogging at MyDiverseKitchen

Barbara blogging at Barbara Bakes

I can’t seem to get a download of the loaf but follow the link below for a very rare rose

Soep Kipje

I really have tried but please if I missed any Buddy, let me know and I’ll add you in to this round-up.

If you fear this bread because it’s beauty looks intimidating, I suggest you consider how much everyone who baked this loves the shape.  Several of us have baked sweet and savory versions and have plans for many more.  Lastly, consider how similar these loaves appear.  Usually our loaves can vary wildly in appearance as well as taste.  This shaping technique is remarkable in it’s ease of execution and the consistency of results.

Enjoy!


20 Comments

Russian Braid/Rose

My memory of a time when I thought bread was an impossibility for my skill is pretty foggy.  I know there was that time.   But, I have been baking bread for a long time now.  I do sort of remember that yeast was a very delicate finicky thing to be very careful with.  For whatever reason, I no longer proof yeast.  When the recipe says dissolve the yeast in water and proof for 5 minutes … I whisk the yeast into the flour and use the total amount of liquid into the flour(s).  If a recipe uses oil and doesn’t make a big deal out of adding it separately at a special place in the recipe, it goes into the liquid.  If, as I did with my second loaf of this bread, I put my dough into the rising bucket and suddenly remember … ooops, I left out the oil, I simply take the dough out of the container, flatten it out a bit, pour on a tablespoon, knead it, adding a tablespoon at a time until I think I’ve added the correct amount and put it back into the tub to rise again.  I can’t really date when this lack-a-dayical attitude took hold of me.

The raw materials: flours, yeast, flax seed, salt

The raw materials: flours, yeast, flax seed, salt

I won’t claim that my bread is the very best on this globe.  I will claim that it is wonderful bread enjoyed by all I’ve served it to.  What that translates to for me is this:  If you want to obsess about yeast failure, loaf failure, or some other aspect of this bread baking thing, you’re welcome to it.  I’ll even admit a certain amount of obsessing is in order when you are first baking BUT if you bake, you will get to the point that you develop a healthy ability to adapt to your moments of lapses and your enjoyment level will soar like the eagle 😉

Roasted garlic: 1st loaf, mild sweet flavor

Roasted garlic: 1st loaf, mild sweet flavor

Do not think just because this looks fabulous, all the Babes and Buddies baking this one are beyond your abilities and this is way out of your reach.  This is truly a fabulous loaf and YOU really can do it.  Think one step at a time.  When I baked my first loaf with this recipe, I went downstairs into the kitchen after 7AM and took the loaf out of the oven at 10:30AM.  Bread in under four hours … using yeast … and it looks incredibly difficult … it’s not.

Beginning of 1st rise

Beginning of 1st rise

End of 1st rise

End of 1st rise

Russian Braid/Rose

This bread described as:
beautiful braided bread, tender, a rich straight dough
requires moderate braiding skills, time and attention.

Recipe Adapted from The Fresh Loaf
Yield: 1 loaf

Ingredients:

Rosemary

Rosemary

– Dough
– 300 grams bread flour
– 200 grams white whole wheat flour
– 100 grams sprouted wheat flour
– total flour should equal 600 grams – try different combinations
– 2-3 tablespoons ground flax seeds or wheat germ or a combo (optional)
– 2.25 teaspoons dry yeast (Fresh Yeast 28g (1oz) used 1 heaping tablespoon
– 10 grams Sugar 10g (0.35oz)
– 10 grams Salt 10g (0.35oz)
– 50 grams Canola Oil 50cc (1.7 fl oz) I used 56 grams butter in 1st loaf; 50 grams olive oil in 2nd loaf
– 1 tablespoon White Vinegar, I used white Balsamic Vinegar in my 2nd loaf
– 450 – 500 grams Water 300cc (10 fl oz) (alternate use potato water
– Original recipe called for
– AP Flour 600g (21oz) total
– seasoning was pesto, dusted with sumac
– Filling – the options are only limited by your imagination and what’s in your kitchen!
– butter, softened
– garlic, pressed
– parmesan, finely grated

– salt, to taste
– rosemary or basil


Directions:

1.  Set oven to 210c (410F) Prep: Baking Pan – 26cm (8″) springform (no bottom), take a piece of parchment paper and crimp tightly around the bottom of the springform, oil the sides. Place on top of a baking sheet. Set aside.  I baked my first loaf in a 10 inch springform pan and it was too large.  The second loaf I baked in a glass pie dish with parchment paper.

2.  Add all ingredients to a mixing bowl, add the water carefully as you start mixing.  I mix this with a wooden spoon.  My first loaf I used just a little more than 300 ml potato water and it seemed stiff but manageable.  The second loaf I used 450 ml of water and it seemed about the same.  Flours were the same in both loaves, I did however add the 1 tablespoon of vinegar to the second loaf.  I can not understand how the first loaf could have worked at all, it didn’t rise as much as the second loaf but it was excellent.  Dough should be supple and not sticky to the touch. Add water or flour if dough is too stiff or too loose (respectively). When dough is ready, spray a bowl with oil and gently put the dough in the bowl. Spray a little more oil on top and cover. Let rise (80%) about 40 minutes to an hour.

3.  Lightly flour your work area. Flatten the dough gently with your hands. Roll the dough as thin as you can using a floured rolling pin. When rolling out the dough, try not to lift and move it too much. You can try and gently pull the dough to stretch it thin like with Strudel.  I rolled this as thin as I could but it was nothing like the paper thin when I did Strudel.

 Now you can read about shaping this below and totally mess your mind thinking you can’t possibly do this bread OR you can watch Ciril Hitz’s YouTube video and drop your jaw at how easy this is to do.

4. Apply a thin layer of your filling on top of the dough (leave the edge clear 1/4″).

5. Slowly, tightly and very gently roll the dough into a roulade (pinwheel ). You will now have a very long roulade.

6.  Take a sharp chef’s knife (not a serrated knife) and cut (not saw) the roulade lengthwise trying to keep the knife in the middle so you end up with two equal parts (you can cut down from the seam but it is not make or break).

7.  Place the two halves crossing each other (open roulade layers facing up) to create and X shape. Gently pick up the two ends of the bottom half, cross them over the top half, and place them back down. Continue this process, taking the two bottom ends and crossing them over the top until all the roulade has been used.

8.  You now have a two strand rope shape. If for some reason some of the open roulade layers are pointing down or sideways, carefully turn them so they are facing up. Gently pinch the ends to seal. Look at the braid. If one end looks a little thinner make that your starting point. If not, just start from either end. Slowly and very gently, roll the braid sideways (horizontally) without lifting your hands from the table. You should keep those open roulade layers facing up. Pinch the end delicately. The end result should look like a giant snail shell or a giant cinnamon bun. Depending on your filling you may want to sprinkle on something (paprika, sumac, brown sugar & cinnamon). Keep in mind you don’t want to cover up the effect of the shaping.

9.  Carefully pick up the braid and place in the prepared springform. Keep it flat on the parchment. The bottom of the braid should set nicely.

10. Cover. Let rise until the braid hits three quarters the way up the springform. Depending upon the temp in your kitchen this may take from 20 to 40 minutes.

This slideshow requires JavaScript.

11. Bake at 210c (410F) for 5-10 mins., lower oven to 180c (355F) and bake for another 20-30 mins. There should be a decent amount of oven spring. The bread should rise above the springform edge.  If your loaf is getting too dark on top before it’s done, cover it with foil until it’s done.  When the bread is out of the oven lightly brush olive oil or butter on top and sides. Let cool on a rack.  In my opinion, the vinegar gives this a wonderful boost in rising.  Thanks to our Buddy Carola for the link. re the vinegar and it’s effects.

12. You are welcome to bake this with all white flour or any combination of you like. I tried to incorporate more whole grains, the original recipe uses all purpose flour;  I will probably try this with some rye flour, onion and garlic. I’m sure that there is a spinach, bacon/chicken sausage, parmesan filling in the future for this recipe; perhaps with a shaping modification.  Someday I will do a sweet cinnamon iteration.  The fillings are limited only by your imagination and what’s on hand.

For me this romance is about SHAPE.

***************

I was Kitchen of the Month for the Bread Baking Babes and Buddies.  If you’d like to bake this bread with us and be a buddy, you will be rewarded with a fabulous bread and a badge if you bake the bread, post it, send me a photo with a note giving your take on baking the bread and send me an e-mail at commentsmykitchen At mac Dot com.  I’ll have a round up with all that here on the 29th so you must get that info to me by the 26th.

******************************

YeastSpotting
Yeastspotting - every Friday (wordle.net image)

Each week, Susan (Wild Yeast) compiles a list of many bread-specific recipes from across the web. For complete details on how to be included in the YeastSpotting round up, please read the following:


Many thanks to Zorra for allowing the Babes and Buddies to participate in World Bread Day as a group.  And always we thank her for the long running Bread Baking Series she sponsors every month.

Now if you know what’s good for you

Get Baking Russian Braid/Rose

and I know you’ll thank me.


13 Comments

BBB – Molasses Fennel Rye

Surprise people!  Here’s another bread/recipe I would have read and passed on and I would have missed out big time.  Gorn would have missed out bigger time.  Do I repeat myself?  Perhaps but this is why I am so sold on baking with a group of friends.  Try something new that I wouldn’t have tried on my own.

The bread.  Some of us dressed and shaped our loaves with more style than I did but none of that would have changed the aroma coming from the oven or the fabulous flavor in every bite.  So mine is a very plain looking loaf everything else about this bread is stellar.

Kitchen of the Month: Elizabeth who blogs at From Our Kitchen.  For Elizabeth and her husband this is a super special bread because they shared it on on super special evening (see her story here).  For me it’s a super special bread because Gorn ate 2/3 of the first loaf in one evening and I don’t think it had that much sugar in it.  Raisins, it does have raisins in it and he’ll go for raisins every time.  I like molasses, I just don’t like too much of it SO, I only used 2 tablespoons molasses and then used 2 tablespoons of Rise Appelstroop (a long ago gift from Holland).

Molasses Fennel Rye Bread As Posted
——————————————————————————–

Recipe By: based on Jack Francis’ recipe for Molasses-Fennel Bread served at “Clark’s by the Bay” restaurant in Collins Bay, Ontario (near Kingston) – now sadly closed
Yield: 2 loaves

Ingredients:  my changes

1 1/2 teaspoon ( 6gm  5gm) active dry yeast
1/4 cup (63gm) lukewarm water
2 tablespoons molasses

2 tablespoons Rinse Appelstroop
1 3/4 cup (438gm) water, room temperature
1 tablespoon (6gm) fennel seeds
1 1/2 inch knob grated fresh ginger root
1 cup (103gm) rye flour
1 cup (122 gm) sprouted whole wheat flour
1/2 cup (59gm) wheat germ + 3 tablespoons flax seed
2 cups (254gm) unbleached white whole wheat flour
1 tablespoon (18gm) salt (I used 15 gm)
1/4 cup (36gm) Thompson raisins … it was more
up to ½ c (64gm) unbleached all purpose flour for kneading – I used about 2 tablespoons

Directions:

Mixing

In a smallish bowl, whisk yeast with the lukewarm water (do the baby’s bottle test on your wrist) until it resembles cream. Set aside.  Actually, I mixed the yeast in the entire 2 cups of water … and one cup of the two was potato water.
Meanwhile, in a bowl large enough for the dough to double, pour the rest of the water – In my case it was all the water.   Stir in sugar (I skipped the sugar) molasses. (If the molasses is stiff because of a chilly kitchen, use warm water instead of room temperature.) Add fennel seeds and ground ginger. Dump in flours, wheat germ, flax seed and salt and stir with a wooden spoon until the flour is mostly absorbed. Stir to form a rough dough.
Cover the bowl with a plate and let sit on the counter for about 20 minutes.
Kneading
Scatter a little of the flour for kneading onto a wooden board. Turn the dough out onto the board. Wash and dry the mixing bowl. (Please do not be tempted to skip this step.) Hand knead the dough 10 to 15 minutes, adding the smallest amounts of additional flour if dough is sticky. You don’t have to use up all the flour. When the dough is springy and silky to the touch, knead in raisins.
Proofing
Form the dough into a ball and put it in the clean bowl; cover it with a plate (there is no need to oil the bowl!) Let the dough rise in a no-draft place at room temperature (or in the oven with only the light turned on if you want) for about an hour or until it has doubled in size.
Gently deflate dough.
Recover with the plate and allow to rise until doubled again.
Gently turn the dough out onto a lightly floured board; cut it in half with a dough scraper if you have one, with a knife if you don’t.
Shape into two round balls and place them (not touching) on a parchment papered pan or a cornmeal dusted peel. Dust the tops with flour.
Cover with a large plastic bag overtop let rise until double in size. (about an hour if the temperature is around 20C) Baking
Place a breadstone, if you have one, on the middle to second from the top rack and preheat the oven to 400F. If you want, slash the top of the rounds with a very sharp knife. Liberally spray the tops with water. Put bread in oven and immediately turn the oven down to 350F – I left it at 400° for 5 minutes then turned it down to 350°. Bake the bread on the middle to second from the top rack for 35-40 (I bake it for  45-50  30-35) minutes until the bread reaches an internal temperature of 205-210F or until it is hollow sounding on the bottom.  My bread took 35 minutes total to reach 205° .  I took the bread out of the pans and set them on their sides for the last 5 minutes in the oven.   It’s a good idea to turn the bread  after about 20 minutes of  half way through baking to allow for uneven heat in the oven (remove parchment paper at the same time).
Remove to cool on racks. Please wait until the bread is cool before cutting it. It’s still baking inside! If you like to eat warm bread, reheat the bread after it has cooled.

This is a really lovely bread.  With the ginger, raisins, baking aromas and gorgeous flavors, I’d easily call this a holiday bread.

Elizabeth has some terrific suggestions for serving this bread but finding this a very simple, even rustic loaf I went with simple and rustic: Tuscan Bean Soup.

Simple Rustic Bread & Soup

Simple and Rustic foods … I very much like the contrast here between the today square style clear bowl, bamboo wooden spoon and the very old my Grandmother’s Jewel Tea plate.  The plate rim ring is long gone from years of washing … by hand as there was never a mechanical dishwasher in that house.  These are the plates my Grandmother collected every time she went to the grocery story and these are the plates all the family ate off of for so many years.  Sitting for hours around the table with lively talk of old times and heated political debates.  One such meal and debate ended with my father making a point by tapping my Aunt Dort’s chest which sent her over backwards (she always was tipping her chair on the back legs) and hitting her head on the molding around the floor.  Dr. Brown (John Brown) was called out to stitch her head requiring 15 stitches.  Doctors still made house calls in those days.

To receive a Baking Buddy Badge to display on your site: bake Molasses Fennel Rye Bread in the next couple of weeks and post about it (we love to see how your bread turned out AND hear what you think about it – what you didn’t like and/or what you liked) before the 29 September 2012. If you do not have a blog, no problem; you can also post your picture(s) to Flickr (or any other photo sharing site) and record your thoughts about the bread there. Please remember to contact the Kitchen of the Month (Elizabeth who blogs at From Our Kitchen) to say that your post is up.

Either email Elizabeth or leave a comment on her post that you have baked the bread and a link back to your post.

YeastSpotting
Yeastspotting - every Friday (wordle.net image)

Each week, Susan (Wild Yeast) compiles a list of many bread-specific recipes from across the web. For complete details on how to be included in the YeastSpotting round up, please read the following:

Bake Your Own Bread (BYOB)
BYOB is a monthly event hosted by Heather (girlichef)

that encourages you to start (or continue) getting comfortable baking bread in your own kitchen. Anything from simple quick breads to conquering that fear of yeast to making and nurturing your own sourdough starter. All levels of bakers are welcome to participate.

BYOB BadgeFor more information about BYOB, please read the following:

Spread it with cream cheese!  Lovely.  Today we’re finishing the second loaf with salmon, cream cheese & capers!  I know it’s going to be great.  Bake it!


17 Comments

Oh Julia … Hysterical Nonchalance … Happy Birthday!

Many weeks ago, our Bread Babe Susan of Wild Yeast and Kitchen of the Month came to us with the suggestion that we all post a day early, hence the 15th this month, AND that we invite the Buddies to Bake and Post with us … well I think Julia would have loved that idea for Celebrating her Centennial … and so did all the other Babes and so here we are with Babes & Buddies posting together.  Our Bread Babe Pat of Feeding My Enthusiasms put together a wonderful invite for the event.

I am elegant.
I am French.

Wouldn’t you know it, our fabulous Babe of the Badge Making Talent Lien of Lien’s Notes put together a wonderful Babes & Buddy Badge.

Babes & Buddies Bake Together!

Babes & Buddies Bake Together!

Do you/ would you quake in your kitchen boots, faced with a 20 page recipe?  I can tell you there are plenty of infinitely shorter recipes that have brought me to my knees.  With a bread recipe, most often the most upsetting thing I find myself yelling:  What does it feel like at this point?   If the recipe in question is for French Bread in vol 2 of Mastering the Art of French Cooking and written by Julia Child, then I would suggest you relax with confidence, make yourself comfortable and enjoy the intoxicating experience of silky soft dough in your hands.  All from just the reading of her recipe.  I’ve often said and  heard others say: the best way to learn to bake bread is at the side of an experienced bread baker.  I found an amazing video of Julia baking this recipe on her   The French Chef – Julia Child – Bakes French Bread  

Keep it cool and you can prolong the rise even when it’s 103° outside!
A little ice in the bowl kept it cool enough to provide a 4 hour first rise.

Most of the time you’ll find a video does a much better job of communicating a recipe than the written word does.  Well,  if you read Julia’s recipe first, I think you’ll find that all the video adds is the wonderfully odd sound of her voice and her fabulous enthusiasm/love for life and cooking.  I say ‘all’ it adds is the voice and the enthusiasm/love because what it doesn’t really add much to is the recipe because it’s all written there.  Let me try that another way, if you actually read the recipe you will find yourself able to picture clearly the entire process including the feel of the dough and how it changes in your hands – all just in the reading.  So 20 pages of reading this recipe is really like Julia standing next to you while you make this in your own kitchen.

Used my French Bread Form and got well shaped and just the right length loaves. Tasted great.

One other thing you may get from the video is how unrehearsed Julia and the show appear, especially if you compare it to todays cooking shows.    I do not feel there is anything really dated about Julia or the shows.  There’s a line in Bob Spritz’s bio of Julia titled Dearie: The Remarkable Life of Julia Child, that describes her as always with “a soupçon of hysterical nonchalance.”  She flips bench scrapers and nasal sprayers all over as well as throwing flour on the floor.

Nice crumb … all three loaves gone in 36 hours … we need another baking of these.

When I read that line about “always a soupçon of hysterical nonchalance”,  I feel connection with this Julia Child.  I think it was and is exactly this ‘soupçon of hysterical nonchalance’ that appeals and attracts so many of us to Julia.  She never polished her enthusiasm to be sophisticated and toned down;  she continues to make us feel real and possible in the kitchen.   For Julia, there were no mistakes, only lessons and good times.

OK, let’s do it again and go free form …

I first baked this bread as a Daring Baker Challenge from none other than our own BBB Mary (aka BreadChick from theSourDough) and Sara (from ILikeToCook) way back in February 2008.  Yes, once upon a time I was a daring baker.  (If you don’t know who the DBs are, I’d love to meet you because you must be from Mars!)

The 2nd Bake: Oh the crust was gorgeous, the crumb excellent … the shapes were tortured ugly … the taste transported you back to Paris.

Twenty pages of recipe reading is daunting but you can only do one step at a time.  One step at a time with a lot of time in between each step delivers France and the streets of Paris.  Hey, I’m there.

Tortured, really they were.

It’s bread: you mix up water, yeast, flour and salt. That’s it.  One thing this recipe has you doing is giving the dough short (2 to 5 minutes) resting times between several of the steps.  One of the most fascinating things to me about this dough was how much it changed from the first kneading – gluey, sticky, stringy – give it a 3 minute rest, then knead it for a minute before putting it in for the first rise.  In that 3 minute rest, it went from that gluey, sticky, stringy state to almost smooth and barely sticky!

Breakfast, lunch and dinner appetizers … oh they were glorious.


The recipe describes the dough after the first rise as “humped into a slight dome…light and spongy when pressed…some big bubbly blister on the surface…”  This is a recipe that uses words to tell you where you’re headed.  Words that tell me what I’m looking for are the sign of a good recipe to me.

Tortured still tastes heavenly, proving once again beauty that counts is more than skin deep.


You’d think that in all the times baking I’d have gotten fancy but this bread does the fancy on your taste buds.


Breakfast this morning?  Coffee, a simple basil bruschetta on Julia’s French Bread!  

I’m sure you can find the recipe on Susan’s site but I’d really encourage you to own a book.  Heck, this is two (volume 1 & 2) that I have both a hard copy AND an iBook copy of.  Trust me, really you want to bake this bread and honor Julia Child and all the possibility her legacy continues to open for all who step into the kitchen.

Thanks to all the Babes and Buddies who joined with us this month to wish a very very Happy 100th Birthday Julia, it’s been a blast.

Don’t forget to visit my fellow Bread Baking Babes to see how they baked and also… visit our Katie! She is the BBBBB (Bitchin’ Bread Baking Babe Bibliothécaire) who writes up such lovely round ups of all the BBB Breads every month!

This Bread and all it’s iterations is going to Susan for YeastSpotting!

Check out a TON of Julia tributes here

BBB logo July 2012


20 Comments

BBB Oats, Oatmeal, Oh…Sara’s Easy Little Oatmeal Bread

There are times when you know exactly where things started to go off course, where things went wrong.  Then there are other times when you’re really following the recipe, everything clicked along just perfectly and you have to look back and question every step and still can’t find where it went off.  Easy is just not to be trusted.  Fast is one thing … Easy is something else.  Some of us can make easy really hard.

This month’s Kitchen of the Month is hosted by Sara of I Like to Cook and she has a blog to prove it too!  The bread she brought us this month is really very healthy; filled with whole grains – wheat and oats – low sugar – only a tablespoon of honey and no added fat … well none in the loaf, you do brush it with melted butter 😉

Now, Sara must have found this an easy bread because that’s what she called it and she baked it more than once and she has a little one to keep her busy.  I found the rising part a little not easy.  I will admit that I just about never bloom my yeast before using it.  Since I baked with this yeast before and after this loaf and they both rose with great vigor, I don’t think the problem was with the yeast.  The kitchen was warm, 79°F so you can’t blame it on a cold kitchen.  It did rise but even with doubling the time it didn’t reach the rim of the pan and had no oven spring.

What’s special about this bread:  No Kneading, good grains, low sugar, low fat, baby it’s fast!

Sara’s Easy Little Bread

Recipe By: Sara: Adapted from Gran’s Kitchen: Recipes from the Notebooks of Dulcie May Booker via 101 Cookbooks
Yield: 1 loaf

1 1/4 cups / 300 ml warm water (105-115F)
2 teaspoons active dry yeast (one packet)
1 tablespoon runny honey
1 cup / 4.5 oz / 125 g unbleached all-purpose flour
1 cup / 5 oz / 140 g whole wheat flour
1 cup / 3.5 oz / 100 g rolled oats (not instant oats)
1 1/2 teaspoons fine grain sea salt
2 tablespoons butter, melted, for brushing

50 minutes into rising...

50 minutes into rising…

Here’s the way I did it:

Mix the flours, oats, yeast and salt in a large bowl.

Add the honey & water mixture to the dry and stir very well.

Mix together the wet and the dry to blend evenly.

Brush a 8-cup loaf pan generously with some of the melted butter.

Turn the dough into the tin, cover with a clean, slightly damp cloth, and set in a warm place for 30 minutes, to rise.  I left mine an hour to rise.

Preheat the oven to 350F / 180C, with a rack in the middle.

When ready, bake the bread for 35-40 minutes (mine was ready = pulling away from the side of the pan and registered 198°F) @35 minutes, until golden and pulling away from the sides of the pan.  Sara finishes things up by leaving the bread under the broiler for just a heartbeat – to give the top a bit deeper color.  I did this and gave it an extra heart beat too much and it was a little dark but still fine; so just be advised and watch it.

It's the bottom.

It’s the bottom.

Remove from oven, and turn the bread out of the pan quickly. Let it cool on a rack so it doesn’t steam in the pan. Serve warm, slathered with butter.  I let mine cool thinking of all the whole grains in it.

The crumb ... and buttered!

The crumb … and buttered!

Breakfast

Breakfast

It made fine toast and a very nice breakfast.

And then … And then … And then … it was Friday and I was reading YeastSpotting and found a rather interesting post by a new to me blog:  TreatNTrick.

Well, it was sort of like a delayed 4th of July.  It really did send off all kinds of fireworks.  It was like the light bulb went off in my head, the light bulb that was 1000 watts.  This went from an interesting learning experience nice home made loaf into the realm of the “you will bake this one again” and more than once because this is the extraordinary bread that meets the need for good tasting utility bread.  I’m sorry, I can see your eyes have glazed over and you’re not getting it; utility sounds like a dirty word to you.

Alright, let’s do this pancake shall we and have breakfast together.  Coffee ready.  I can wait or let me show you this will it brews.

So, I’m YeastSpotting at midnight and it was all I could do to keep myself in bed and not go straight into the kitchen to try this out.

You need bread cubes, corn stripped off the cob and it’s juices, garlic clove minced, pepper (I chopped a Poblano pepper but pick your favorite), tomato, salt to taste and some seasonings (I used some fresh chopped rosemary left over from the night before, cumin and a good pinch of Aleppo pepper; pick your favorites).  Then you need some liquid and a little binder.  I used 2 eggs, buttermilk and I think about 7 tablespoons of corn flour and 2 tablespoons of oat bran, no sugar in sight.  You do see that we’re staying within the a very healthy place right?  If you check out TreatNTrick you’ll see how to do it without eggs or milk.

I’ve always disliked pancakes, let me qualify that.  I dislike flipping pancakes, I just suck at it … always.  These were no exception.  The first one I made too thick and too big.  It came unglued.  Next I tried doing it in a waffle maker.  MUCH better.  The last couple I did on my griddle and they were perfect; I can flip on a griddle not in a skillet.  The best thing about the waffle was you got several crunchy bread cubes in each waffle.  Somehow that didn’t happen with the pancakes.  My favorites were the smaller griddle cakes.  These are really special.  Great for company.

So, my thought is this is a utility bread.  It’s good healthy home made bread that can be baked quickly and then turned into something really spectacular with these Savory Bread Pancakes.  The bread cubes can be frozen even for later use.

While the pancakes I think are brilliant, my next thought really rocked … at least I think it does.  I love making and eating Thanksgiving dressing.  I’m always wanting to make it with healthy really good homemade bread.  My intentions are good.  But when it comes down to the wire, I really don’t like to use terrific bread that I put so much into to make dressing.  This bread however made with wonderful healthy ingredients takes a very small investment of time and seems just perfect to the task.  Easy enough to load it up with herbs when it’s mixed.  Now you see the “utility” of this bread and utility doesn’t seem like such a dirty word does it?

I do hope you’ll want to be a Buddy with us on this one.   1.Bake the featured bread, snap a pic & share your thoughts about how you liked it (or not liked it) 2.Send  an email to Kitchen of the Month.  Sara of I Like to Cook to notify her and make it easier to write the round up.

Don’t forget to visit my fellow Bread Baking Babes to see how they baked and also… visit our Katie! She is the BBBBB (Bitchin’ Bread Baking Babe Bibliothécaire) who writes up such lovely round ups of all the BBB Breads every month!

This Bread and all it’s iterations is going to Susan for YeastSpotting!

And now as they say for something completely different:


The Babes will bake and post on August 15th in honor of Julia Child’s 100th birthday, and we would love for the Buddies (that is, anyone who would like to play), to join us in posting on that day. Big thanks to Elle for creating the invitation. For the recipe we will be baking, please email Susan:   susan at wildyeastblog dot com (NB: This is an invitation for NEXT month, August. THIS month (July), Buddies are still invited to make the Easy Little Bread.)

Savory bread pancake from http://treatntrick.blogspot.sg/2012/07/savory-bread-pancake.html

Oatmeal Twists with rainbow


20 Comments

Mystery of the Twisting Oatmeal

The best mysteries have twists and double crosses … bread can too.

Oatmeal Twists with rainbow

Oatmeal Twists with rainbow

In my world there are two kinds of bread bakers: there are those of us who sweat blood over the details, follow the recipe to the fourth even fifth decimal point, take the temperature of the dough, obsess over the exact ingredients. And then there are … well, the rest of us. We can’t read and when we do, we often decide to not read a detail with “I think I didn’t see that.” Technically speaking then their’s a continum between both those extremes. If I were to peg myself, I say I’m a “slider”. There have/are times when I actually follow the recipe. Then there are other times when I follow a recipe … except I play with ingredients. Other times I start the recipe and everything under the sun seems to conspire to go change things around.

Oatmeal Twists with rainbow

Oatmeal Twists with rainbow

First Mystery: Who’s Kitchen of the Month?

Kitchen of the Month is Elle from Feeding My Enthusiasms.

Now, this kitchen table is a very wild place where there are Babes without rules there’s bound to be wildness. There was some twisting, I’m not sure there may have been some hoola hoops involved but I’m sure there was and is and always will be wonderful bread where ever the Babes gather. Elle has us twisting a very happy twist!

Second Mystery: Where’d she find the recipe?

Farine (that’s the name of her blog too)

Farine called these Morning Cuddles. They do have lots of lovely oatmeal in them so I can see why you can enjoy them for breakfast! I enjoyed them for breakfast lunch and dinner. Thank you Farine!

I baked this one twice. First baking … was gone in two days, I shared only 6 with a neighbor – this recipe makes a lot. Second baking … thanks to a freezer, I’m sharing them with my sister and Dad visiting. The second time I baked these I used the refrigerator to retard the dough overnight and baked them in the morning and enjoyed them with a great salad for lunch.

One of my favorite things about these was the walnut dust used for topping. Don’t think that you have to use any one nut. I think just about any nut you enjoy will be wonderful with these, I’m thinking peanuts, then I’m thinking hazelnuts. Babes used savory to sweet on these. I really enjoyed the walnut and salty dust. Still I realize that the options are endless and I don’t just mean the nut ingredient and I really need to give these a big ingredient twist next time I’m baking.

One ingredient I won’t twist is the oatmeal and the coarse grinding. It gave the dough a wonderful nobby texture on my hands that I enjoyed; some might not enjoy such but I found it fun and different.

Oatmeal Twists

Recipe By: Pat: based on Farine’s Morning Cuddles
Yield: 8 to 18. Make smaller sizes for snacks or appetizers. Make them bigger for a sandwich bun.

Farine of the blog Farine made the cutest breads and called them Morning Cuddles. Elle twisted Farine’s recipe and added buttermilk and some butter. I think Farine’s original idea with these for breakfast comes from all the wonderful oatmeal in them and indeed they are a really nice breakfast roll.

Starter/Poolish

700 g sourdough starter
OR Poolish, just not both
350 g all-purpose flour
350 g water
2 teaspoons yeast
Dough
320 g all-purpose flour
230 g whole wheat flour, used organic
1/2 teaspoon active dry yeast
115 g rolled oats, coarsely ground in a food processor
15 g salt
1 1/4 cup water – I used potato water, 300 grams
1/4 cup buttermilk, 64 grams
1/4 cup unsalted butter, melted and cooled – 56 grams
100 g pecans – I used walnuts, chopped – 1 cup

1. If mixing and using Poolish – without sourdough starter – Sit 3 hours on counter, stir down, cover and put in fridge overnight.

First Rise

First Rise

Rising

Rising

Rising Finished - pop the top

Rising Finished – pop the top

2. After overnight in the fridge: Mix the flours together with the yeast, oats and salt. Stir the water, buttermilk and butter into the starter. Slowly add the dry ingredients to the starter mixture until a soft dough forms. Let sit 10 minutes. Turn out onto a lightly floured board and knead in additional flour if needed until dough is tacky but not sticky.

3. Knead in the walnuts.  Here’s my caution on the nuts:  If you leave them too big, they tear the dough when you roll it into the snakes to twist.  Just pinch it back together and/or chop your nuts a little finer. Shape into a ball and put dough ball into oiled rising bowl or container, turning dough to coat with the oil. Cover and let rise in a warm place until doubled in bulk. This might take 2 hours or 6. (Also fine to cover and let sit overnight in the fridge, then let rise until doubled on the counter the next day.) I did it both ways.

4. When dough has doubled, turn out onto lightly floured board. Shape into a log and cut into two pieces. Return one piece of the dough to the rising bowl and cover.

5. Shape the second piece of dough on the board into a log and cut into 8 pieces, each about 100 g. Cut each piece in half and shape each piece into a snake and twist two pieces together a a time or two, then place twist on a parchment or silicone mat lined baking sheet.

Twisted and rising

Twisted and rising

6. Repeat with remaining 7 (100 g) pieces. You will have eight twists. Take the remaining large (about 800 g) piece of dough and repeat the shaping into a log, cutting into 8 pieces, cutting those in half and shaping into twists. You will finish with 16 twists set out on parchment or silicon mat covered baking sheets. Cover twists and let rise until doubled in bulk. Preheat oven to 400 degrees F when twists are almost doubled.

7. Uncover, glaze with buttermilk with clean pastry brush. If desired sprinkle with finely chopped pecans, or preferred seeds or with sea salt.  I tried one without glazing with the buttermilk – seemed infinitely better with the buttermilk glaze.

8. Bake in preheated oven for 15 minutes. If browning too rapidly, turn down the oven temperature. Turn the pans back to front and bake another 10 – 15 minutes or until breads are 180 degrees inside. Cool on a rack then serve.

9. Variations: When you knead in the pecans you can knead in dried fruit like dried cranberries or diced prunes, apricots or dates to make a breakfast twist. If you prefer savory you can knead in herbs and/or Parmesan cheese and/or seeds. This bread loves to have you make your own combinations, so other nuts can also be used in place of the pecans or with them. I made my second batch without any nuts, seeds, fruit or herbs and they were yummy, too.

BBB logo June 2012

BBB logo June 2012

So I’d call myself a “slider”. What kind of a baker are you? Bake this bread with us and become a Bread Baking Buddy and tell us. Bake the bread, take some photos, blog (or not), send your link and photos to Kitchen of the Month – Elle of Feeding My Enthusiasms – and if you can do that by the 29th, Elle will have you in the round up!

YeastSpotting!  What is it?  Find out here.


11 Comments

BBB ~ the Shepherd’s in the Pot

I imagine the globe’s first baker was an insomniac.  You don’t agree or you don’t follow that?  I seem to have no trouble going to sleep, staying asleep is an all together different thing.  I’m most often routinely awake at 3 or 3:30 in the morning.  Many nights when I wake up like that, I’ll read.  On one particular night recently when I woke like that, it seemed the very perfect time to … Bake the BBB bread for this month.

Our Kitchen of the Month is Karen of BakeMyDay!  If you’re aiming to bake this ~ you really should you know ~ and be a Buddy by baking, post by the 28th of this month, send a photo, a short comment and a link to your blog (link not necessary if you don’t have a blog), and e-mail the Kitchen Of the Month: Karen (Bake My Day) this month. You’ll be included in the Buddy Round Up and receive a sharp looking Buddy Badge.

The next part is some of my bit about bread.  I find dough, flour and bread endlessly fascinating and mysterious.  I mean on some level flour, water and especially that library paste white stuff is nothing but BORING … really boring.  But … there is a world of flour out there besides white all purpose flour.  Add yeast to some high quality flours, get even mildly creative with some shaping and then play around with how you can change up the baking of a dough and you have an endless and never ending interesting loaf of bread filling your home with gorgeous aromas, gracing your table with glory and filling all at your table with wonder.  Yes, I love the kneading, the baking, the sharing and the mystery of bread.  I have never baked a boring bread.

I think this Shepherd’s Bread is suppose to be just a very simple, common even if you will, loaf.  Baking this in a pot, be it clay or cast iron or whatever you have, totally changes everything.  This is really an excellent bread and a very thrilling experience.

Shepherd’s Bread

Karen (BakeMyDay) found this recipe in {Bread for All Seasons by Beth Hensperger}

Yield: 1 loaf … celestially HUGE one loaf … or two “just right” sized loaves if you divide the dough and have two large pots with lids to bake them in … and you probably need two ovens to bake those two pots in.

Sponge (takes 2 hours) – (or Refrigerate overnight like I did)
2 teaspoons active dry yeast or 3/4 oz fresh yeast
2 cups tepid water (460 ml)
2 cups unbleached bread flour, 280 grams total -used all white bread flour
[I saw Karen’s suggestion for 140 white+140 rye long after mine was mixed, will try that next]
1/2 cup sugar (90 gr), I only used 50 grams

Dough (first rise 2.5 hours, second only 15 minutes!)
1 teaspoon active dry yeast
70 grams flax seed meal
1 cup warm water
1 tablespoon salt
1/2 cup olive oil, 90 milliliters/grams
5.1/2 to 6 cups unbleached AP flour or bread flour (770gr + 1/2 cup + 1/4 cup), used 2.5 cups sprouted wheat, remaining bread flour
1/4 cup unbleached AP flour or bread flour

Directions:

1. Prepare the sponge: In a large bowl mix yeast plus 1 cup of the flour and the sugar using a large whisk. Add remaining cup of flour and beat hard until very smooth, 2 minutes. Scrape down the sides of the bowl and cover with plastic wrap. Let stand at room temp until soft, spongy and pleasantly fermented, 2 hours.
Or refrigerated several hours/overnight.

I mixed the sponge just befor dinner and refrigerated it. I would have left it till morning but the insomniac bird awakened the baker in me at 3 AM … so I started the bread in true baker style.

2. Prepare the dough: Using a wooden spoon, beat down the sponge. Alternatively, beat down the sponge in the work bowl of a stand mixer fitted with the paddle attachment. In a measuring cup, stir the yeast into the warm water to dissolve. Whisk yeast and salt into 1 cup of flour. Add the warm water and olive oil to the sponge and beat well. Add the yeasted, salted flour, 1/2 cup at a time, beating vigorously until a soft dough is formed that just clears the sides of the bowl.

3. Turn out the dough onto a floured work surface and knead about 5 minutes until a smooth dough is formed. Will be firm yet springy and resilient.
I dipped my open hand into flour to add very small amounts to prevent really sticky dough. This is a well hydrated dough so don’t be tempted to add in too much extra flour. I used slightly less than 5 and a half cups.
Place the dough in a floured deep container, dust the top with flour, and cover with plastic wrap. Let rise at cool room temp until tripled in bulk, 2.1/2 – 3 hours.

When I put this dough in my usual 4 quart rising bucket, it was already at the half way mark. I wasn’t comfortable with that so I cleaned out the 6 quart rising bucket. Since this dough tripled in bulk, I think that was the right choice.

4. Shaping:
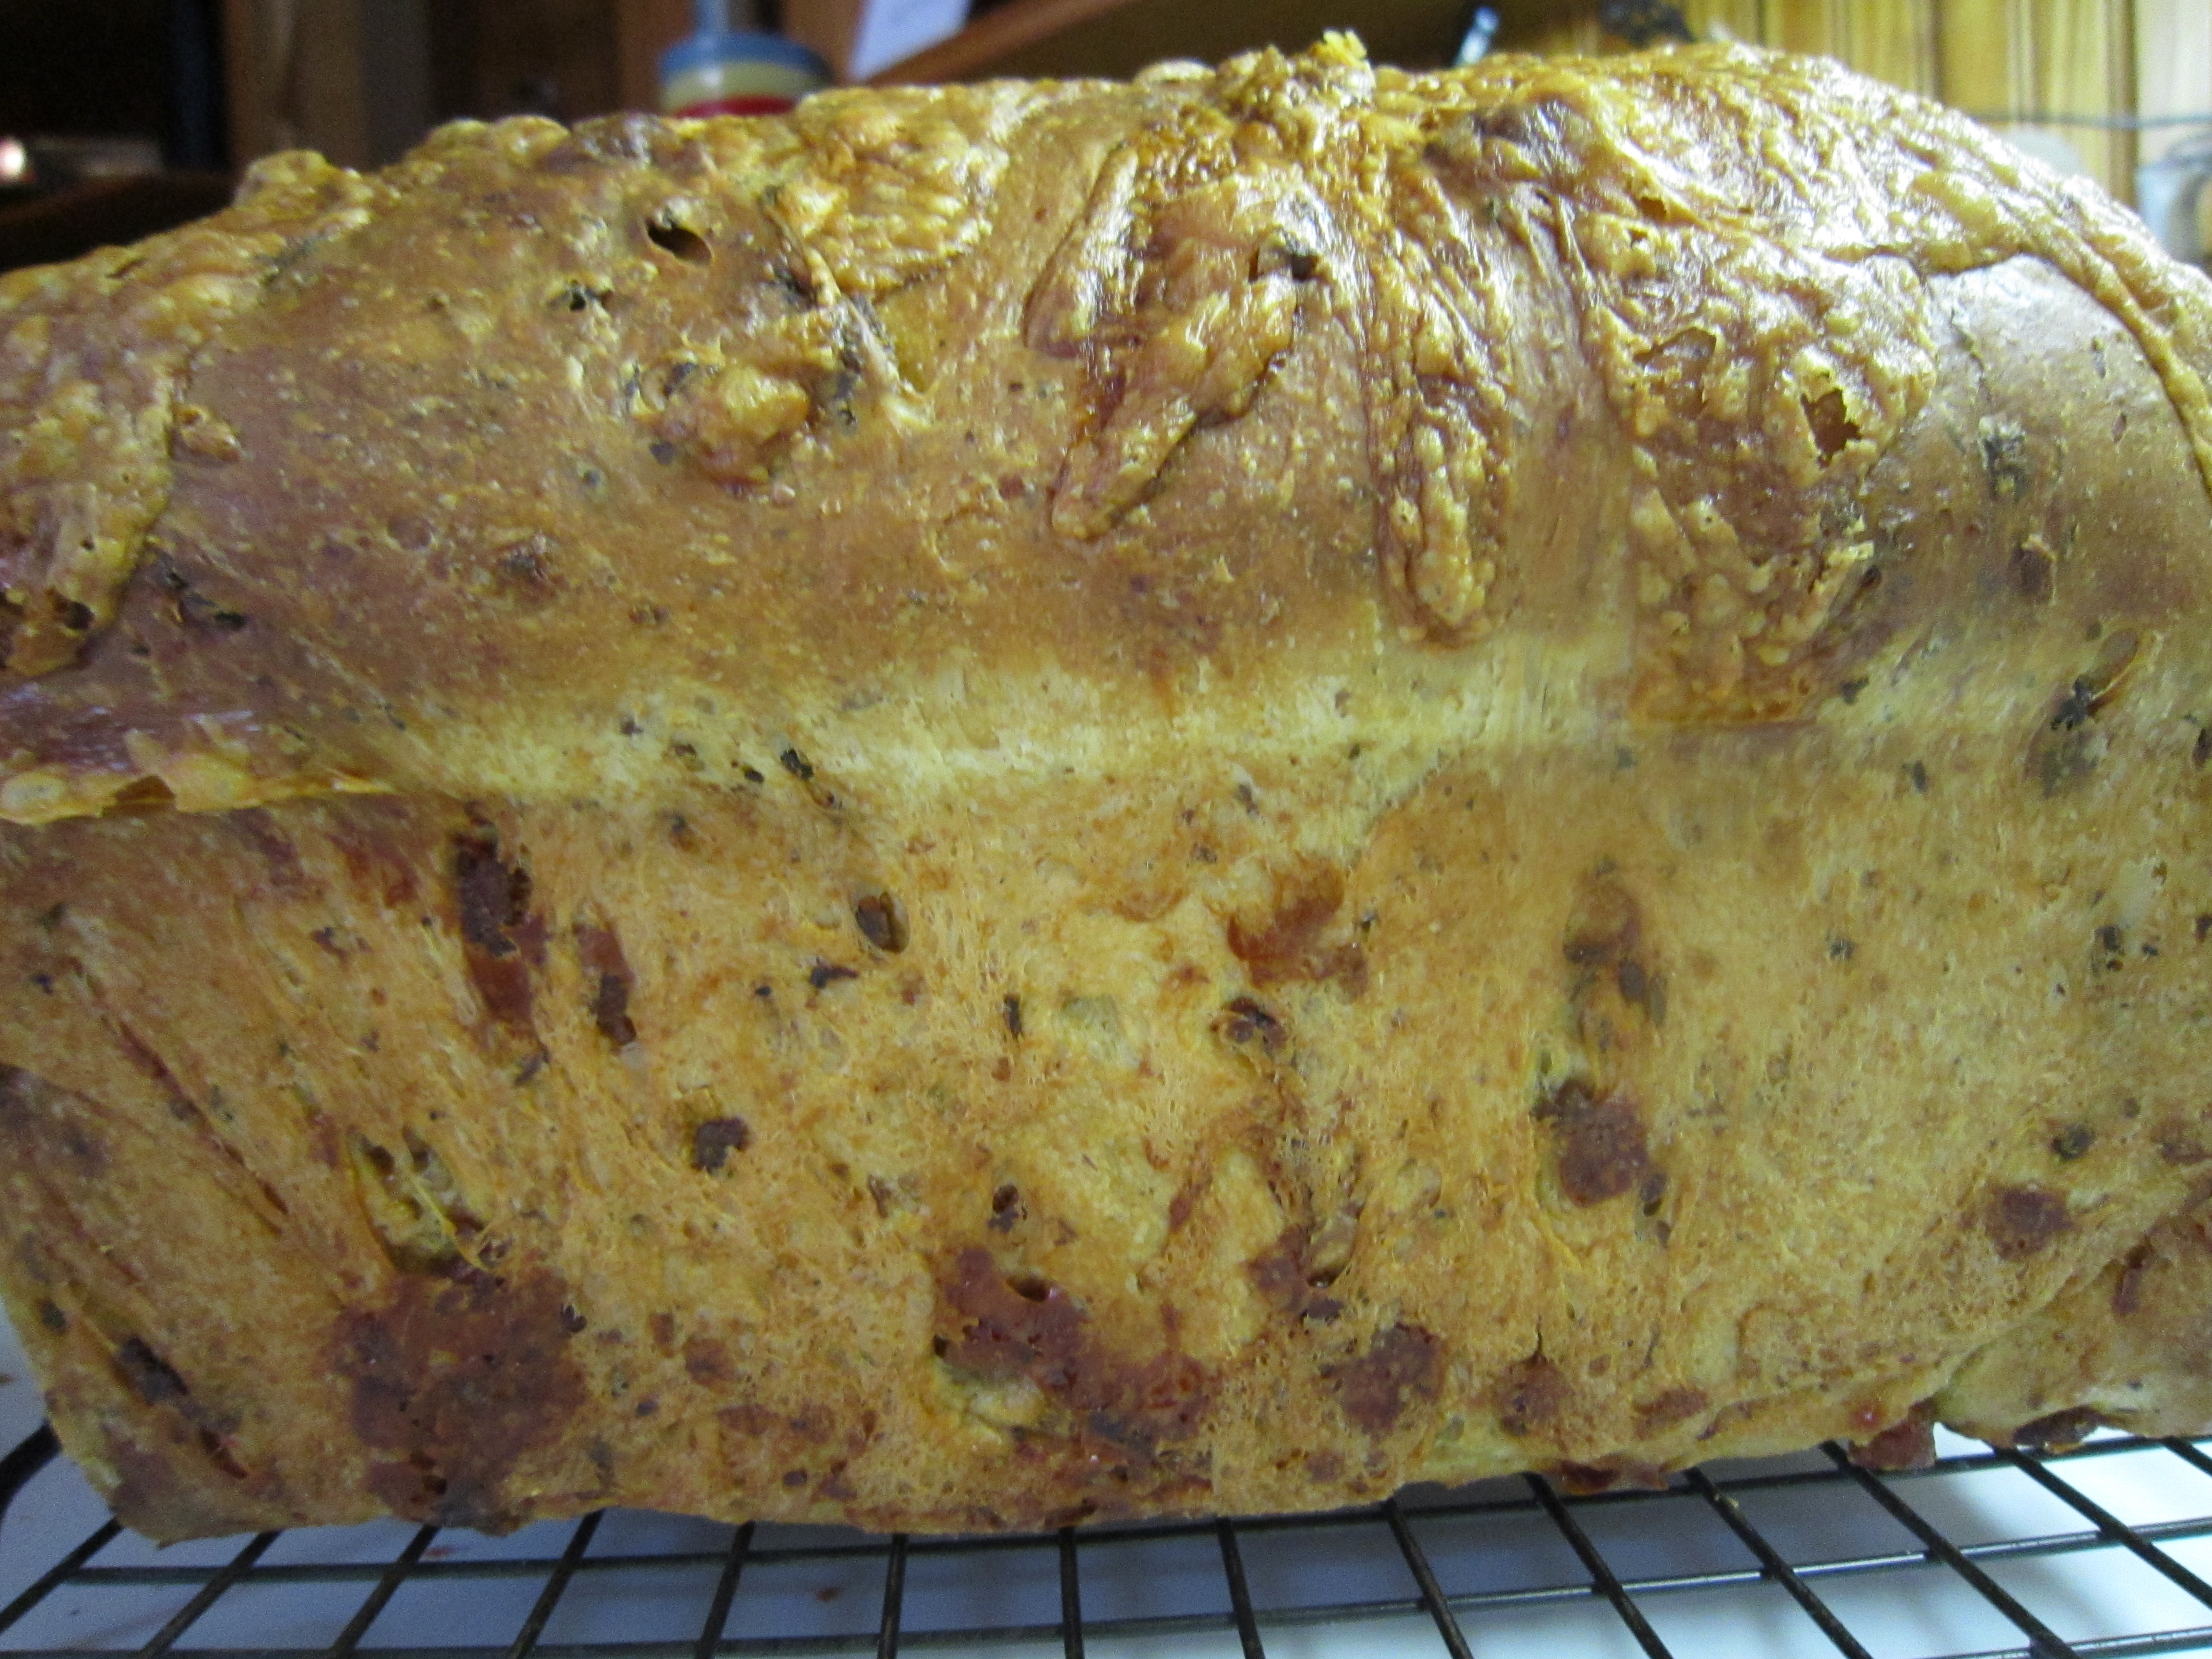
Again turn out the dough on a clean surface. It will be slightly sticky from the long rise. My dough had huge bubbles in it and was very light and airy. Knead in about 1/4 cup more flour to make a firmer dough – I only added about half of the quarter cup flour, about 1 minute – dough is sticky (more than post-it note sticky) I divided the dough into two equal sized balls. Pull the ends tightly to the center of the loaf to form a smooth bottom and sides. Mist the surface with water. Using about 2 tbs of flour, heavily coat the top surface. Using a serrated knife, slash the top surface decoratively, no more than 1/4 inch deep to allow steam to escape and to allow room for the dough to expand.

Karen has used a photo of this bread many times on her blog; it is picture perfect gorgeous.  Mine wasn’t absolutely perfect but close enough for me.

5. Karen offered to send the directions for baking the bread in a charcoal ash pit … since I have the book, I read them, fun to read, don’t think I’ll be baking the bread that way.

6. Cloche instructions: Sprinkle the dish with flour and place the dough ball in the center of the dish. Move the dough around to cover the bottom and up the sides a bit with flour. Cover with the cloche dome/bell and let rest at room temp 15 minutes. The dough rose only slightly in that 15 minutes. Before placing in the oven, rinse the inside of the cloche bell with water, draining off excess drips. Since I was baking mine in a cast iron pot with same lid, I skipped this rinse step. Place cover over the bread and place in the preheated 425F oven.
Bake 10 minutes.
Lower thermostat to 400F and bake a further 25-35 minutes.
Remove the bell after 30 minutes of baking to allow the loaf to brown thoroughly.

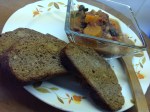
7. Remove and cool at least 15 minutes before serving.

*** If you’d like to use your bread baking stone or tiles; let rise a second time for 35 minutes then use same oven setting but don’t lower the temp. and bake until the bread is golden brown, crisp and sounds hollow when tapped.

This dough tripled in the oven. This is a very large amount of dough! If I hadn’t divided it in half, I think it would have been way too much for the le Creuset Dufou pan (7 quart) I used to bake one loaf. Without the pot creating steam, my free form loaf suffered and physics took over. Without the steam, the hot oven formed a tight solid skin on the bread preventing it from rising. My two loaves from the same dough, remember I divided this dough in half, looked like distant cousins when I took them out of the oven. Next time I’ll either have another pot with a lid to bake the second loaf in or perhaps try a loaf pan.

My it’s such good bread … and you really should bake it.

What IS this Buddy thing?

The Bread Baking Babes are a closed group but we thought it would be fun to reward people who take the effort of baking our breads with us and give them a nice Buddy Badge and mention in a round up post every month. Just to say thank you for baking along and sharing your thoughts with us.

Since we are Babes and do no obey to rules, there are nearly no rules for Buddies, except these two:

1.Bake the featured bread, snap a pic & share your thoughts about how you liked it (or not liked it)

2.Send  an email to Kitchen of the Month.  Karen at bakemyday at gmail dot com to notify me and make it easier to write the round up.

Don’t forget to visit my fellow Bread Baking Babes to see how they baked and also… visit our Katie! She is the BBBBB (Bitchin’ Bread Baking Babe Bibliothécaire) who writes up such lovely round ups of all the BBB Breads every month!

This Bread is going to Susan for YeastSpotting!


23 Comments

BBB ~ Granville Island Beer Bread

Audacious has a edge of the negative. Bodacious is brazen, blatant but remarkable in a more positive way. This month’s bread … is out of sight boldacious! I mean it’s remarkably brazenly audaciously bodacious, oh, and is delicious as well. And oh the places you can go with it.

Image

Bodacious Kitchen of the Month: Natashya (Living in the Kitchen with Puppies) Thanks for taking us into and around your Canadian kitchen table.

Bodacious Recipe Source: Chuck (The Knead for Bread) Thank you tremendously for a gorgeous loaf.

To thine own self be true:

I added my signature flax seed to this bread. I used brown sugar to replace the white and cut it back just a bit. Initially I started doing the flax and brown sugar things because it seemed healthy. If it is, I’m happy. If it isn’t, I just like it.

The original recipe uses all unbleached white bread flour. I replaced two cups of that with one cup ArrowHead Mills sprouted wheat flour and one cup KAF white whole wheat. The more whole grains I can work into our foods, the better I feel about it. The addition of the whole grains probably added five minutes to the baking time but I don’t think it resulted in a loss of rise or a dense loaf.

I can’t remember the last time I’ve used dried diced onion. I didn’t have any in my kitchen, all the usual neighbors I borrow from were gone so I used the Pensy’s freeze dried shallots I found and added an extra two tablespoons thinking dried onion would have been more potent than the shallots.

I’m rather embarrassed to admit that we use a tremendous amount of cheese here – not necessarily the most healthy thing. Our favorite and the cheese I buy in huge block is Pepper Jack Cheese and that’s what we had and I used for this bread.

Our favorite sausage is from Whole Foods: Hot Italian Chicken Sausage. That’s what went into this bread at our house.

Amber Ale

Amber Ale

I get no extra points for using Canadian Beer, I just couldn’t find it on the shelf and Gorn came up from the cellar with

and that’s what I used.

Here’s what the recipe looked like after I worked it over with all my tweaks:

Granville Island Beer Bread

Night before:

177 grams bread flour, 1 1/4 cup

172 grams tepid water, 3/4 cup

1/4 teaspoon instant yeast

Day of:

12 ounces bottle ale (room temperature)

1/4 cup olive oil

3 tablespoons freeze-dried shallots

1 1/2 teaspoons salt

4 teaspoon instant yeast

1/2 teaspoon ground pepper

28 grams brown sugar, slightly less than called for in the recipe

3 tablespoons flax seed meal

154 grams bread flour

110 grams sprouted wheat flour

132 grams white whole wheat flour

154 grams bread flour

1 1/2 cups Hot Italian Chicken sausage

2 cups grated Pepper Jack cheese

  1. The next morning pour the mixture into a large bowl. Add in the room temp. bottle of beer, olive oil, dried freeze-dried shallots, 1 cup of bread flour, instant yeast, salt, pepper and sugar, and with a wooden spoon mix all these ingredients together till well blended.
  2. Mix in another 1½ cups of flour. Kneading in this flour made me think I was working a really beautiful pillowy soft dough.
  3. Sprinkle some more of the flour onto a counter. Pour out the wet dough onto the floured surface, place a little more flour on top. Start to knead the dough and continue to add a little flour till the dough becomes smooth (a little on the tacky side). Knead the dough for about 8 minutes, then place into a lightly oiled bowl, being sure all sides of the dough are lightly coated with the oil. (the light oil coating at this stage prevents the outer dough drying out and forming a skin that would prevent rising.)
  4. Cover with plastic and let rise for 1 hour or till it has doubled in size.
  5. Sprinkle a little flour onto the counter and pour out the dough. Add the sausage of your choosing. Add most of the cheese (reserve enough cheese to put on top of the two loaves) and knead till all incorporated. This is likely to seem like incorporation is never going to happen.
    Needs Kneading

    Needs Kneading

    When it seems better but not quite there: Cover dough with plastic wrap and allow to rest for another 15 minutes.

  6. After that 15 minute rest, the sausage and cheese seem in much better harmony with the dough.
  7. Cut dough in half, shape into loaves. I put the dough into regular loaf pans. The original recipe placed the loaves onto a cornmeal parchment lined cookie sheet. I think these loaves would do wonderfully well in a basket.
  8. Cover with plastic wrap and allow to rest for 1 hour.
  9. Using a sharp knife score the dough about a inch deep. Sprinkle the rest of the grated cheese on top of the loaves. Bake in a preheated 350F oven for 30-35 minutes or till a thermometer places into middle of loaf reads 180F-190F. My loaves took 40 minutes to reach 190°.
  10. Remove from oven and allow to cool on a wire rack.

Changing so much and not using Canadian beer, I don’t know that I can claim to have made it to Canada with this bread.

However, I can claim to have gotten pretty close to heaven with this as just plain toast.

Tomorrow for breakfast I’m going to try to get even closer to heaven when I use this bread in this KAF recipe.

I ate Texas!

I ate Texas!

Now you may laugh but I also ate the whole, entire state of Texas with this bread.

Be a Bodacious Buddy by baking, posting by the 28th of this month, send a photo, a short comment and a link to your blog (link not necessary if you don’t have a blog), and e-mail the Kitchen Of the Month: Natashya (Living in the Kitchen with Puppies) this month. You’ll be included in the Buddy Round Up and receive a sharp looking Buddy Badge.

Find all the bodacious Bread Baking Babes on the side bar to the right and check out their beer breads.

Oo la la


12 Comments

BBB ~ Swedish Rye Bread

Bread Baking Babes gather round a kitchen table in Vienna this month but travel north for a Swedish Rye Bread.  Our kitchen of the month is Astrid from Paulchen’s Food Blog.  I do thank you for this one Astrid, we are loving it … again.  Yes, it’s so good, I’ve already baked it twice.
Oo la la

Oo la la

Swedish Rye Bread

Astrid adapted from Tassajara Bread Book by Edward Espe Brown
Orange zest: be sure to chop it to avoid long strings

Orange zest: be sure to chop it to avoid long strings

Zesty patterning

Zesty patterning

part one
3 cups lukewarm water
1 1/2 tablespoons dry yeast (2 packets)
1/3 cups honey
1 cup dry milk
grated peel of 2 oranges
2 teaspoons anise seeds
2 teaspoons caraway seeds
4 cups unbleached white flour
Pumpernickel or Medium Rye: half & half

Pumpernickel or Medium Rye: half & half

part two
4 teaspoons salt
1/4 cup oil
4 cups rye flour
4 tablespoons flax seed meal
1 cup whole wheat flour (for kneading) (mix sprouted wheat and white whole wheat flours)
(used maybe 1/2 cup of this while kneading)
Mix water(I juiced the oranges and replace that with an equal amount of the water) and honey. Whisk yeast, flour, dry milk, orange zest and seeds together.  I started with about 2 cups of the dry mix and added the liquid; then continued adding the flour mix a cup at a time. Stirring well after each addition. The recipe uses bread flour in step one so there’s going to be a lot of gluten development going on during this step.  The “dough” in this stage is of mud like consistency.  Angle the spoon and your bowl aiming for a circular top to bottom motion.  There is no kneading the dough right now but beating the dough with the spoon is going to develop gluten.  Be sure  to scrape the sides of the bowl from time to time.Beat well with a spoon (100 strokes).
Continue to beat until you have a smooth dough. Again pull your spoon under the dough and bring it up to the surface again in a circular mode. The batter will be getting more elastic while you are doing this as more and more air gets incorporated.Cover the bowl with a damp towel or shower cap and let rise in a warm place about 45 minutes.

Once rested dough; oil poured around the edge

Once rested dough; oil poured around the edge

Sprinkle on the salt and pour on the oil. Stir around the side of the bowl working carefully your way towards the center. Rotate your bowl a little with every stroke you do. Repeat until all of the salt and oil is incorporated.

Add remaining flour 1/2 cup at a time

Add remaining flour 1/2 cup at a time

Sprinkle the flax seed and the flour 1/2 a cup at a time onto the dough. Again fold it in while rotating your bowl.

When you can no longer continue to mix in the flour, the dough is ready to give it a good knead!
Plop your dough on your kneading board and scrap all remaining from the bowl onto the dough.  Keep in mind that your surface should be floured enough to prevent the dough from sticking to much on the board.

Flour your hands and the top of the dough. From the middle of your down stretch it away from you and then fold it back onto the remaining part of the dough. Continue to push down and forward.

Turn the dough a quarter turn. Again continue with the pushing and folding.

Turn, fold, push. Rock forward. Twist and fold as you rock back. Be careful not to stretch the dough too much and tear it. Add flour to the boards as needed.

How not to add too much flour: just dust your hands

How not to add too much flour: just dust your hands

Be mindful that you may not need that entire last cup of whole wheat or white whole wheat flour for kneading.  Don’t add more flour than needed.

While you continue with the kneading the dough will become more and more elastic, smooth and shiny.
When you are finished, place the dough in your lightly oiled bowl smooth side down, then turn it over so the dough ball is covered lightly with oil. This will prevent the dough from forming a crust on the top while rising.
Cover the bowl with a damp towel again and set aside to rise in a warm place. (50-60 minutes until doubled in size)

Start of the rise

Start of the rise

Punch down your dough with your fists steadily and firmly about 15-20 times.
Let rise again 40-50 minutes until doubled in size again.

Preheat your oven to 350°F.

End of rise: popping my top

End of rise: popping my top

Turn your dough onto the board again.
Form the dough into a ball. Cut the dough into two even pieces and form smaller balls again. Let rest for 5 minutes.

Two dough balls will be two loaves

Two dough balls will be two loaves

Knead the dough and fold it about 5 times, this gives the dough added spring. After the final push turn the dough a quarter turn.

Roll up the dough into a log shape. Seam at the bottom, flatten the top of the dough. Square the sides and ends. Turn the dough over and pinch the seams all the way.
Put the dough seam side down into your pan.

Push the dough to the edges of the pan

Push the dough to the edges of the pan

Press it down into the pan with your fingers; try to square it into the corners.
Cover and let rise again. This will take 20-25 minutes.

Slash

Rise, egg wash

Cut the top with 1/2 inch deep slits to allow the steam to escape.
You can brush with egg wash and sprinkle with poppy seeds or sesame.
Bake for about 50-60 minutes.  (My long skinny triple loaf pan took 50 minutes to reach 206° internal temp; the regular loaf pan took 65 minutes to reach 204°).

Take my temperature, let me cool to room temperature

Take my temperature, let me cool to room temperature

I am a firm believer that bread baking is not rocket science but I do find an instant read thermometer an invaluable tool in determining when a loaf is done.

That phrase:  cool completely.  That’s really super significant when baking rye bread.  Cool completely means let it cool to room temperature.  I just leave my thermometer in a loaf and check it IF I don’t just leave it over night to cool.  It takes way longer to cool when you’re smelling gorgeous hot bread baking and itching to cut into it.  Slice into a warm loaf of rye and you’ll be disappointed with a gummy interior.

Since I baked this twice, we’ve enjoyed almost three loaves.  The fourth will be next.  Uuu, no I didn’t give any of these away.  Well, you know not everybody loves rye like we do, I wouldn’t want to give a loaf to someone who might not like rye … yes I guess I could have asked them if they liked rye but they might have said yes when they really didn’t mean it … OK so I just wanted this for myself, I admit it.
What did I do with it:
Just toast

Just toast

Shapes make for fun  

Shapes make for fun

Toast with egg in the basket ...  

Toast with egg in the basket ...

Yes, Rueben!  

Yes, Rueben!

This is far from what I would consider a difficult bread.  But it’s not the easiest bread either.  Still this is such a gorgeous flavored bread that I would really encourage you to bake it … especially if you enjoy rye because you see I’m probably not going to share mine with you 😉
You probably know the routine now:  Be a Buddy by baking, posting by the 28th of this month, send a photo, a short comment and a link to your blog (link not necessary if you don’t have a blog) and Kitchen Of the Month Astrid from Paulchen’s Food Blog will include you in the Buddy Round Up and send you a sharp looking Buddy Badge.Not only is she the BBB Kitchen of the Month, she’s also hosting Bread Baking Day so if you want to participate in that read her post here.


15 Comments

BBB – Biscotti Picanti (Sicilian Spicy Rusks) – 4th Anniversary!

I enjoy people.  Does that surprise you?  I think most of the bloggers I enjoy reading, enjoy people.  People and food 😉 we enjoy.  I enjoy lots of people, lots of bloggers.  Sometimes we all run off into a corner all by ourselves.  Alone time, it’s good time, refuel time, sometimes.  I enjoy party time, lots of people, it’s connecting fun.  And then there is this small group of crazies who drop in and out of my kitchen, some with more regularity than others but I know I can drop in on them anytime and somebody will be there.  Over this last four years we’ve lost a Babe and added a couple.  We’ve shared that wild wild thing we call life with it’s joys, anxieties, big downs, big ups, tears, belly laughs.  We’ve grown (one less than others) together in all the right ways.

So Lien’s Biscotti Picanti is just the perfect choice of breads to celebrate our 4th Bread Baking Anniversary!  This is an easy and reasonably quickly put together bread that really is an addictive treat.  Don’t think to badly of me for suggesting another addiction for you, will you please.  I really hope you’ll bake along with us this month.  You probably know the routine now:  Be a Buddy by baking, posting by the 28th of this month, send a photo, a short comment and a link to your blog (link not necessary if you don’t have a blog) and Kitchen Of the Month (Lien in this case) will include you in the Buddy Round Up and send you a sharp looking Buddy Badge.  Toast us all Babes and Buddies with a Biscotti Picanti!

UPDATE: I forgot my manners.  A lovely lady, I have many of her books, graciously gave the Babes permission to use her recipe for this bread and I just breezed right by it.  When Lien told us she’d given us permission, I checked out her blog here and was in wonderment!   So I’m back to show you my red face and say I’m sorry.  Thanks for the really fabulous recipe Anissas, wonderful cookbooks, glorious stories about cooking and cultures and a truly inspiring blog!


Biscotti Picanti (Sicilian Spicy Rusks)

Recipe By: Lien adapted from “Savory Baking from the Mediterranean” – Anissa Helou and further adapted by MyKitchenInHalfCups

2 ¼ tsp active dry yeast (1 package = 7 grams)
60 ml warm water
1 ⅔ (± 225 g) cups KA white whole wheat flour (+ extra for kneading and shaping)

1 ⅔ (240 g) cups semolina flour

1/4 cups (25 g) ground aniseed
3 TBsp (28 g) white sesame seeds
2 TBsp ground flax seeds
1 teaspoon salt
1 teaspoon freshly ground black pepper
1/2 cup + 2 TBsp (150 ml/130 g) extra-virgin olive oil (+ extra for greasing the bowl)
1/4 cup (60 ml) red wine
115 ml water

Combine flours, aniseed, sesame seeds, ground flax seeds, yeast (recipe has yeast dissolved in water and added later, I goofed and added it early), salt and pepper in a large mixing bowl and make a well in the center. Add the olive oil in the well and rub into the flour with your fingertips until well incorporated.Add wine and 175 ml warm water en knead briefly to make a rough ball of dough. Knead this for another 3-5 minutes or so. Cover and let rest for 15 minutes. Knead for another 3 minutes until the dough is smooth and elastic. Shape into a ball and let rise in a lightly greased bowl, covered with greased plastic, for 1 hour in a warm place (or until doubled).

Divide the dough in 3 equal pieces and shape each piece into a loaf about 12”( 30 cm) long. Transfer the logs to a baking sheet lined with parchment paper and leaving at least 2 inches/5 cm between them so they can expand. Take a dough cutter (or sharp knife) and cut the loaves into 1 inch/2,5 cm thick slices (or if you prefer them thinner in 1″/1 cm slices). The dough cutter smashed the dough down, deflating it.  My sharpest knife had the same result.  Ultimately what worked best for me was using dental floss and cutting all the way through the log; pushing the ends slightly back together again.  Cover with a large plastic box and let the rise for about 45 minutes.Meanwhile preheat the oven to 500ºF/260ºC.

Bake the sliced loaves for 15 minutes, until golden.
Remove from the oven and reduce the temperature to 175ºF/80ºC. Separate the slices and turn so that they lie flat on the baking sheet. Return to the oven and bake for about 1 hour more, or until golden brown and completely hardened (if not totally hardened, return to the turned off oven to let them dry more).Transfer to a wire rack to cool. Serve at room temperature, or store in an airtight container for up to 3 weeks.
I know I have some big time learning to do here and hope to repair the broken links like to about me soon 😉  patience please.  In the mean time enjoy Spicy Rusks!