My memory of a time when I thought bread was an impossibility for my skill is pretty foggy. I know there was that time. But, I have been baking bread for a long time now. I do sort of remember that yeast was a very delicate finicky thing to be very careful with. For whatever reason, I no longer proof yeast. When the recipe says dissolve the yeast in water and proof for 5 minutes … I whisk the yeast into the flour and use the total amount of liquid into the flour(s). If a recipe uses oil and doesn’t make a big deal out of adding it separately at a special place in the recipe, it goes into the liquid. If, as I did with my second loaf of this bread, I put my dough into the rising bucket and suddenly remember … ooops, I left out the oil, I simply take the dough out of the container, flatten it out a bit, pour on a tablespoon, knead it, adding a tablespoon at a time until I think I’ve added the correct amount and put it back into the tub to rise again. I can’t really date when this lack-a-dayical attitude took hold of me.

The raw materials: flours, yeast, flax seed, salt
I won’t claim that my bread is the very best on this globe. I will claim that it is wonderful bread enjoyed by all I’ve served it to. What that translates to for me is this: If you want to obsess about yeast failure, loaf failure, or some other aspect of this bread baking thing, you’re welcome to it. I’ll even admit a certain amount of obsessing is in order when you are first baking BUT if you bake, you will get to the point that you develop a healthy ability to adapt to your moments of lapses and your enjoyment level will soar like the eagle 😉

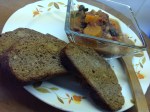
Roasted garlic: 1st loaf, mild sweet flavor
Do not think just because this looks fabulous, all the Babes and Buddies baking this one are beyond your abilities and this is way out of your reach. This is truly a fabulous loaf and YOU really can do it. Think one step at a time. When I baked my first loaf with this recipe, I went downstairs into the kitchen after 7AM and took the loaf out of the oven at 10:30AM. Bread in under four hours … using yeast … and it looks incredibly difficult … it’s not.

Beginning of 1st rise

End of 1st rise
Russian Braid/Rose
This bread described as:
beautiful braided bread, tender, a rich straight dough
requires moderate braiding skills, time and attention.
Recipe Adapted from The Fresh Loaf
Yield: 1 loaf
Ingredients:

Rosemary
– Dough
– 300 grams bread flour
– 200 grams white whole wheat flour
– 100 grams sprouted wheat flour
– total flour should equal 600 grams – try different combinations
– 2-3 tablespoons ground flax seeds or wheat germ or a combo (optional)
– 2.25 teaspoons dry yeast (Fresh Yeast 28g (1oz) used 1 heaping tablespoon
– 10 grams Sugar 10g (0.35oz)
– 10 grams Salt 10g (0.35oz)
– 50 grams Canola Oil 50cc (1.7 fl oz) I used 56 grams butter in 1st loaf; 50 grams olive oil in 2nd loaf
– 1 tablespoon White Vinegar, I used white Balsamic Vinegar in my 2nd loaf
– 450 – 500 grams Water 300cc (10 fl oz) (alternate use potato water
– Original recipe called for
– AP Flour 600g (21oz) total
– seasoning was pesto, dusted with sumac
– Filling – the options are only limited by your imagination and what’s in your kitchen!
– butter, softened
– garlic, pressed
– parmesan, finely grated
– salt, to taste
– rosemary or basil


Directions:
1. Set oven to 210c (410F) Prep: Baking Pan – 26cm (8″) springform (no bottom), take a piece of parchment paper and crimp tightly around the bottom of the springform, oil the sides. Place on top of a baking sheet. Set aside. I baked my first loaf in a 10 inch springform pan and it was too large. The second loaf I baked in a glass pie dish with parchment paper.
2. Add all ingredients to a mixing bowl, add the water carefully as you start mixing. I mix this with a wooden spoon. My first loaf I used just a little more than 300 ml potato water and it seemed stiff but manageable. The second loaf I used 450 ml of water and it seemed about the same. Flours were the same in both loaves, I did however add the 1 tablespoon of vinegar to the second loaf. I can not understand how the first loaf could have worked at all, it didn’t rise as much as the second loaf but it was excellent. Dough should be supple and not sticky to the touch. Add water or flour if dough is too stiff or too loose (respectively). When dough is ready, spray a bowl with oil and gently put the dough in the bowl. Spray a little more oil on top and cover. Let rise (80%) about 40 minutes to an hour.
3. Lightly flour your work area. Flatten the dough gently with your hands. Roll the dough as thin as you can using a floured rolling pin. When rolling out the dough, try not to lift and move it too much. You can try and gently pull the dough to stretch it thin like with Strudel. I rolled this as thin as I could but it was nothing like the paper thin when I did Strudel.

Now you can read about shaping this below and totally mess your mind thinking you can’t possibly do this bread OR you can watch Ciril Hitz’s YouTube video and drop your jaw at how easy this is to do.
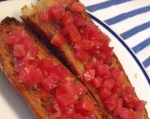
4. Apply a thin layer of your filling on top of the dough (leave the edge clear 1/4″).
5. Slowly, tightly and very gently roll the dough into a roulade (pinwheel ). You will now have a very long roulade.
6. Take a sharp chef’s knife (not a serrated knife) and cut (not saw) the roulade lengthwise trying to keep the knife in the middle so you end up with two equal parts (you can cut down from the seam but it is not make or break).
7. Place the two halves crossing each other (open roulade layers facing up) to create and X shape. Gently pick up the two ends of the bottom half, cross them over the top half, and place them back down. Continue this process, taking the two bottom ends and crossing them over the top until all the roulade has been used.
8. You now have a two strand rope shape. If for some reason some of the open roulade layers are pointing down or sideways, carefully turn them so they are facing up. Gently pinch the ends to seal. Look at the braid. If one end looks a little thinner make that your starting point. If not, just start from either end. Slowly and very gently, roll the braid sideways (horizontally) without lifting your hands from the table. You should keep those open roulade layers facing up. Pinch the end delicately. The end result should look like a giant snail shell or a giant cinnamon bun. Depending on your filling you may want to sprinkle on something (paprika, sumac, brown sugar & cinnamon). Keep in mind you don’t want to cover up the effect of the shaping.
9. Carefully pick up the braid and place in the prepared springform. Keep it flat on the parchment. The bottom of the braid should set nicely.
10. Cover. Let rise until the braid hits three quarters the way up the springform. Depending upon the temp in your kitchen this may take from 20 to 40 minutes.
This slideshow requires JavaScript.
11. Bake at 210c (410F) for 5-10 mins., lower oven to 180c (355F) and bake for another 20-30 mins. There should be a decent amount of oven spring. The bread should rise above the springform edge. If your loaf is getting too dark on top before it’s done, cover it with foil until it’s done. When the bread is out of the oven lightly brush olive oil or butter on top and sides. Let cool on a rack. In my opinion, the vinegar gives this a wonderful boost in rising. Thanks to our Buddy Carola for the link. re the vinegar and it’s effects.
12. You are welcome to bake this with all white flour or any combination of you like. I tried to incorporate more whole grains, the original recipe uses all purpose flour; I will probably try this with some rye flour, onion and garlic. I’m sure that there is a spinach, bacon/chicken sausage, parmesan filling in the future for this recipe; perhaps with a shaping modification. Someday I will do a sweet cinnamon iteration. The fillings are limited only by your imagination and what’s on hand.
For me this romance is about SHAPE.
***************
I was Kitchen of the Month for the Bread Baking Babes and Buddies. If you’d like to bake this bread with us and be a buddy, you will be rewarded with a fabulous bread and a badge if you bake the bread, post it, send me a photo with a note giving your take on baking the bread and send me an e-mail at commentsmykitchen At mac Dot com. I’ll have a round up with all that here on the 29th so you must get that info to me by the 26th.

******************************
YeastSpotting

Each week, Susan (Wild Yeast) compiles a list of many bread-specific recipes from across the web. For complete details on how to be included in the YeastSpotting round up, please read the following:
Many thanks to Zorra for allowing the Babes and Buddies to participate in World Bread Day as a group. And always we thank her for the long running Bread Baking Series she sponsors every month.

Now if you know what’s good for you
Get Baking Russian Braid/Rose
and I know you’ll thank me.