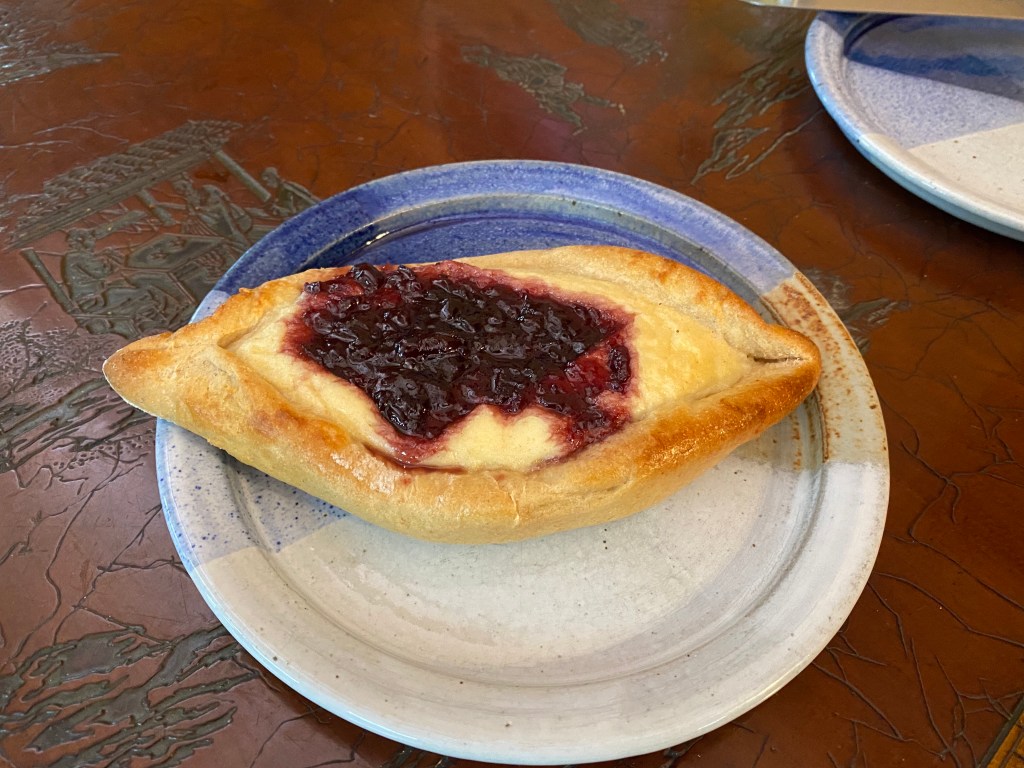
What looks like a beautiful boat with a gem and tastes like a bite of heaven. EKMAK.
This bread was brought to the Babes kitchen table by Karen’s Kitchen Stories! It is lovely in every way. I know I will be baking it again because there are obviously so many jam/preserve flavor gems to play around with on this one. Karen has great photos of how to shape these – it is super easy. Perfect for Christmas, New Years Eve, New Years morning breakfast BUT equally special any day with morning coffee, afternoon tea, dessert after dinner … maybe this could be dinner, I mean there’s cheese.
CHEESE FILLING:
Ricotta is easy to make and I did … it just wasn’t enough for this recipe but WOW was the whey ever delightful in another bread! Most of the ricotta I used here was full fat commercial along with my homemade.
115 grams (3/4 cup) fresh blackberries, cut in half, lengthwise
112 grams (1/3 cup) blackberry preserves
DOUGH:
4 tablespoons brown sugar, divided
2 1/4 teaspoons active dry or instant yeast
12 ounces warm water (95 to 100 degrees F), divided
105 grams all purpose flour
470 grams white whole wheat
1/4 cup (57 grams) butter, room temperature (super soft)
1 1/2 teaspoons apple cider vinegar
9 grams (1 tablespoon) kosher salt
EGG WASH:
1 egg yolk
1 tablespoon water
GARNISH:
Confectioner’s sugar
Honey for serving
CHEESE FILLING:
First, mix the cheese filling ingredients thoroughly. Refrigerate at least three hours, while you are making the dough. Or mix the night before.
FRUIT FILLING:
Mix the ingredients and set aside.
EKMAK Dough:
1. In a small bowl, whisk together the yeast and one tablespoon of the sugar. Add 6 ounces of the warm water and let sit until foamy.
2. In the bowl of a stand mixer, add 500 grams of the flour, the remaining 3 tablespoons of the sugar, and the butter and mix with the dough hook on low until the butter is evenly distributed, about a minute. Pour in the yeast mixture and the apple cider vinegar and mix on low while gradually adding the remaining 6 ounces of warm water.
3. Knead on medium-low until the dough comes together. Switch to medium and knead until the dough clears the sides of the bowl and is tacky but not sticky. Add remaining flour, by tablespoons, until the dough is the right consistency – smooth & silky.
4. Add the salt and knead for an additional minute on medium speed.
5. Turn the dough out onto your counter and form it into a ball.
6. Place it into an oiled bowl, cover, and let rise until doubled, about 45 minutes to an hour.
7. Heat your oven to 420° F with a rack in the upper third of the oven.
8. Line three baking sheets with parchment and lightly sprinkle each with flour.
9. Deflate the risen dough and let rest for 10 minutes.
10. Divide the dough into 9 pieces (I divided into 10 pieces because 12 inches just sounded huge to me. 10 pieces were still plenty large) and cover the pieces with oiled plastic wrap. (I covered mine with extra cookie sheets.) Let rest for 15 minutes. We went for a walk and this got extended to 40 minutes.
11. Roll each piece into a round and place each onto a lightly floured work surface. Cover with oiled plastic wrap (cookie sheets) and let rest for 10 minutes.
12. Stretch each ball into a 6 inch round, re-cover, and let rest for 10 minutes.
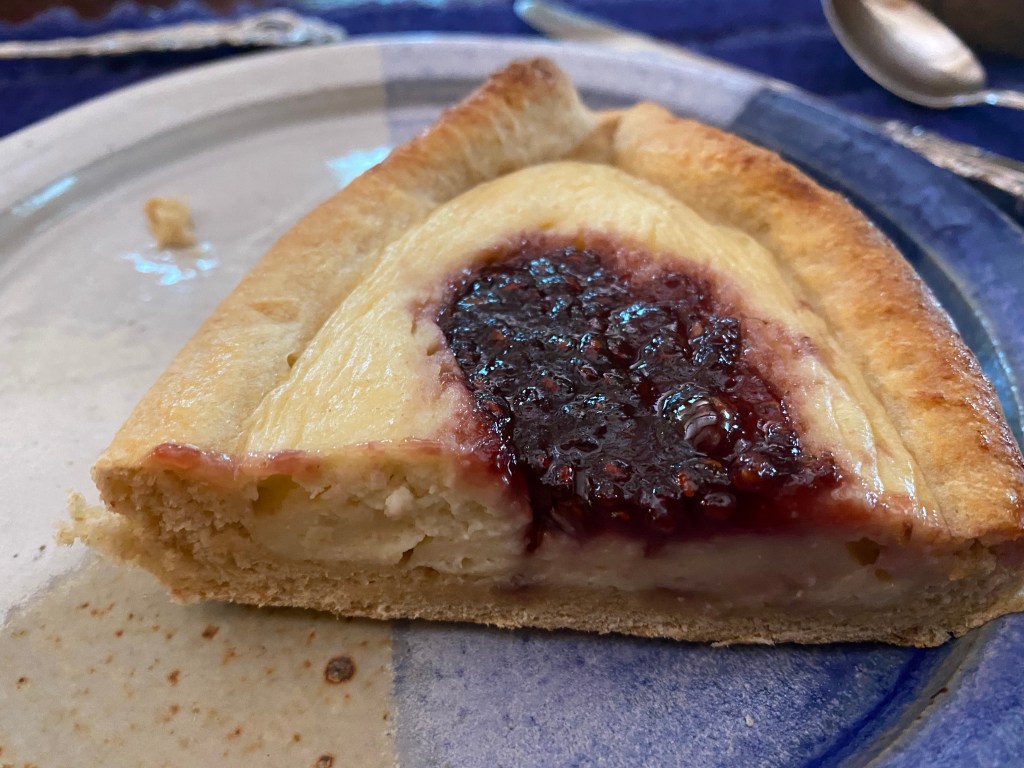
13. Stretch each round into a 10 inch by 4 inch oval (mine slightly smaller) and spoon 1/3 cup of the cheese filling onto the dough.
14. Fold the dough as pictured to create “boats” and stretch the dough to about 10 inches long. Place the “boats” on the parchment lined baking sheets, 4 per sheet. Really pinch the boat ends tightly. Cover and let rest for 10 minutes.
15. Spoon a tablespoon of the blackberry (I did 4 raspberry and 6 cherry) mixture in the middle of the cheese mixture. Brush the dough with the egg wash.
16. Bake the ekmak for 17 minutes – mine took 2 extra minutes because I used 470 grams white whole wheat flour – one sheet at a time, turning the baking sheet half way through.
17. Let cool on the pan for 10 minutes on a rack.
18. Sprinkle with powdered sugar and serve warm with honey.
Refrigerate leftovers and REHEAT in a 325 degree oven for about 5 to 10 minutes.
Tip: Work with dough in stages so that you can prepare three ekmak at a time and continue to shape, fill, let rise, and bake, in stages. I worked in 5 minute intervals so that each 3rd of dough was about 5 minutes behind.
Sorry to be so fast with this but my batteries are low on the iPad and the phone (& the hotspot for internet). We are without electricity this morning.
Bake this please. I know you won’t regret it! Let us know: Karen has the details on her site.
Ricotta added …Start of the boat …Cherry or Raspberry …What ‘gem’ will you sail in your boat?
These are not overly sweet … it only now occurs to me, these could so easily be savory! Above I said these could be dinner what with the cheese. I’m thinking instead of jam there could be … sail with your imagination! Go for it!
Do we ever know bread? Probably not, just like can you ever have enough bread books? Probably not.
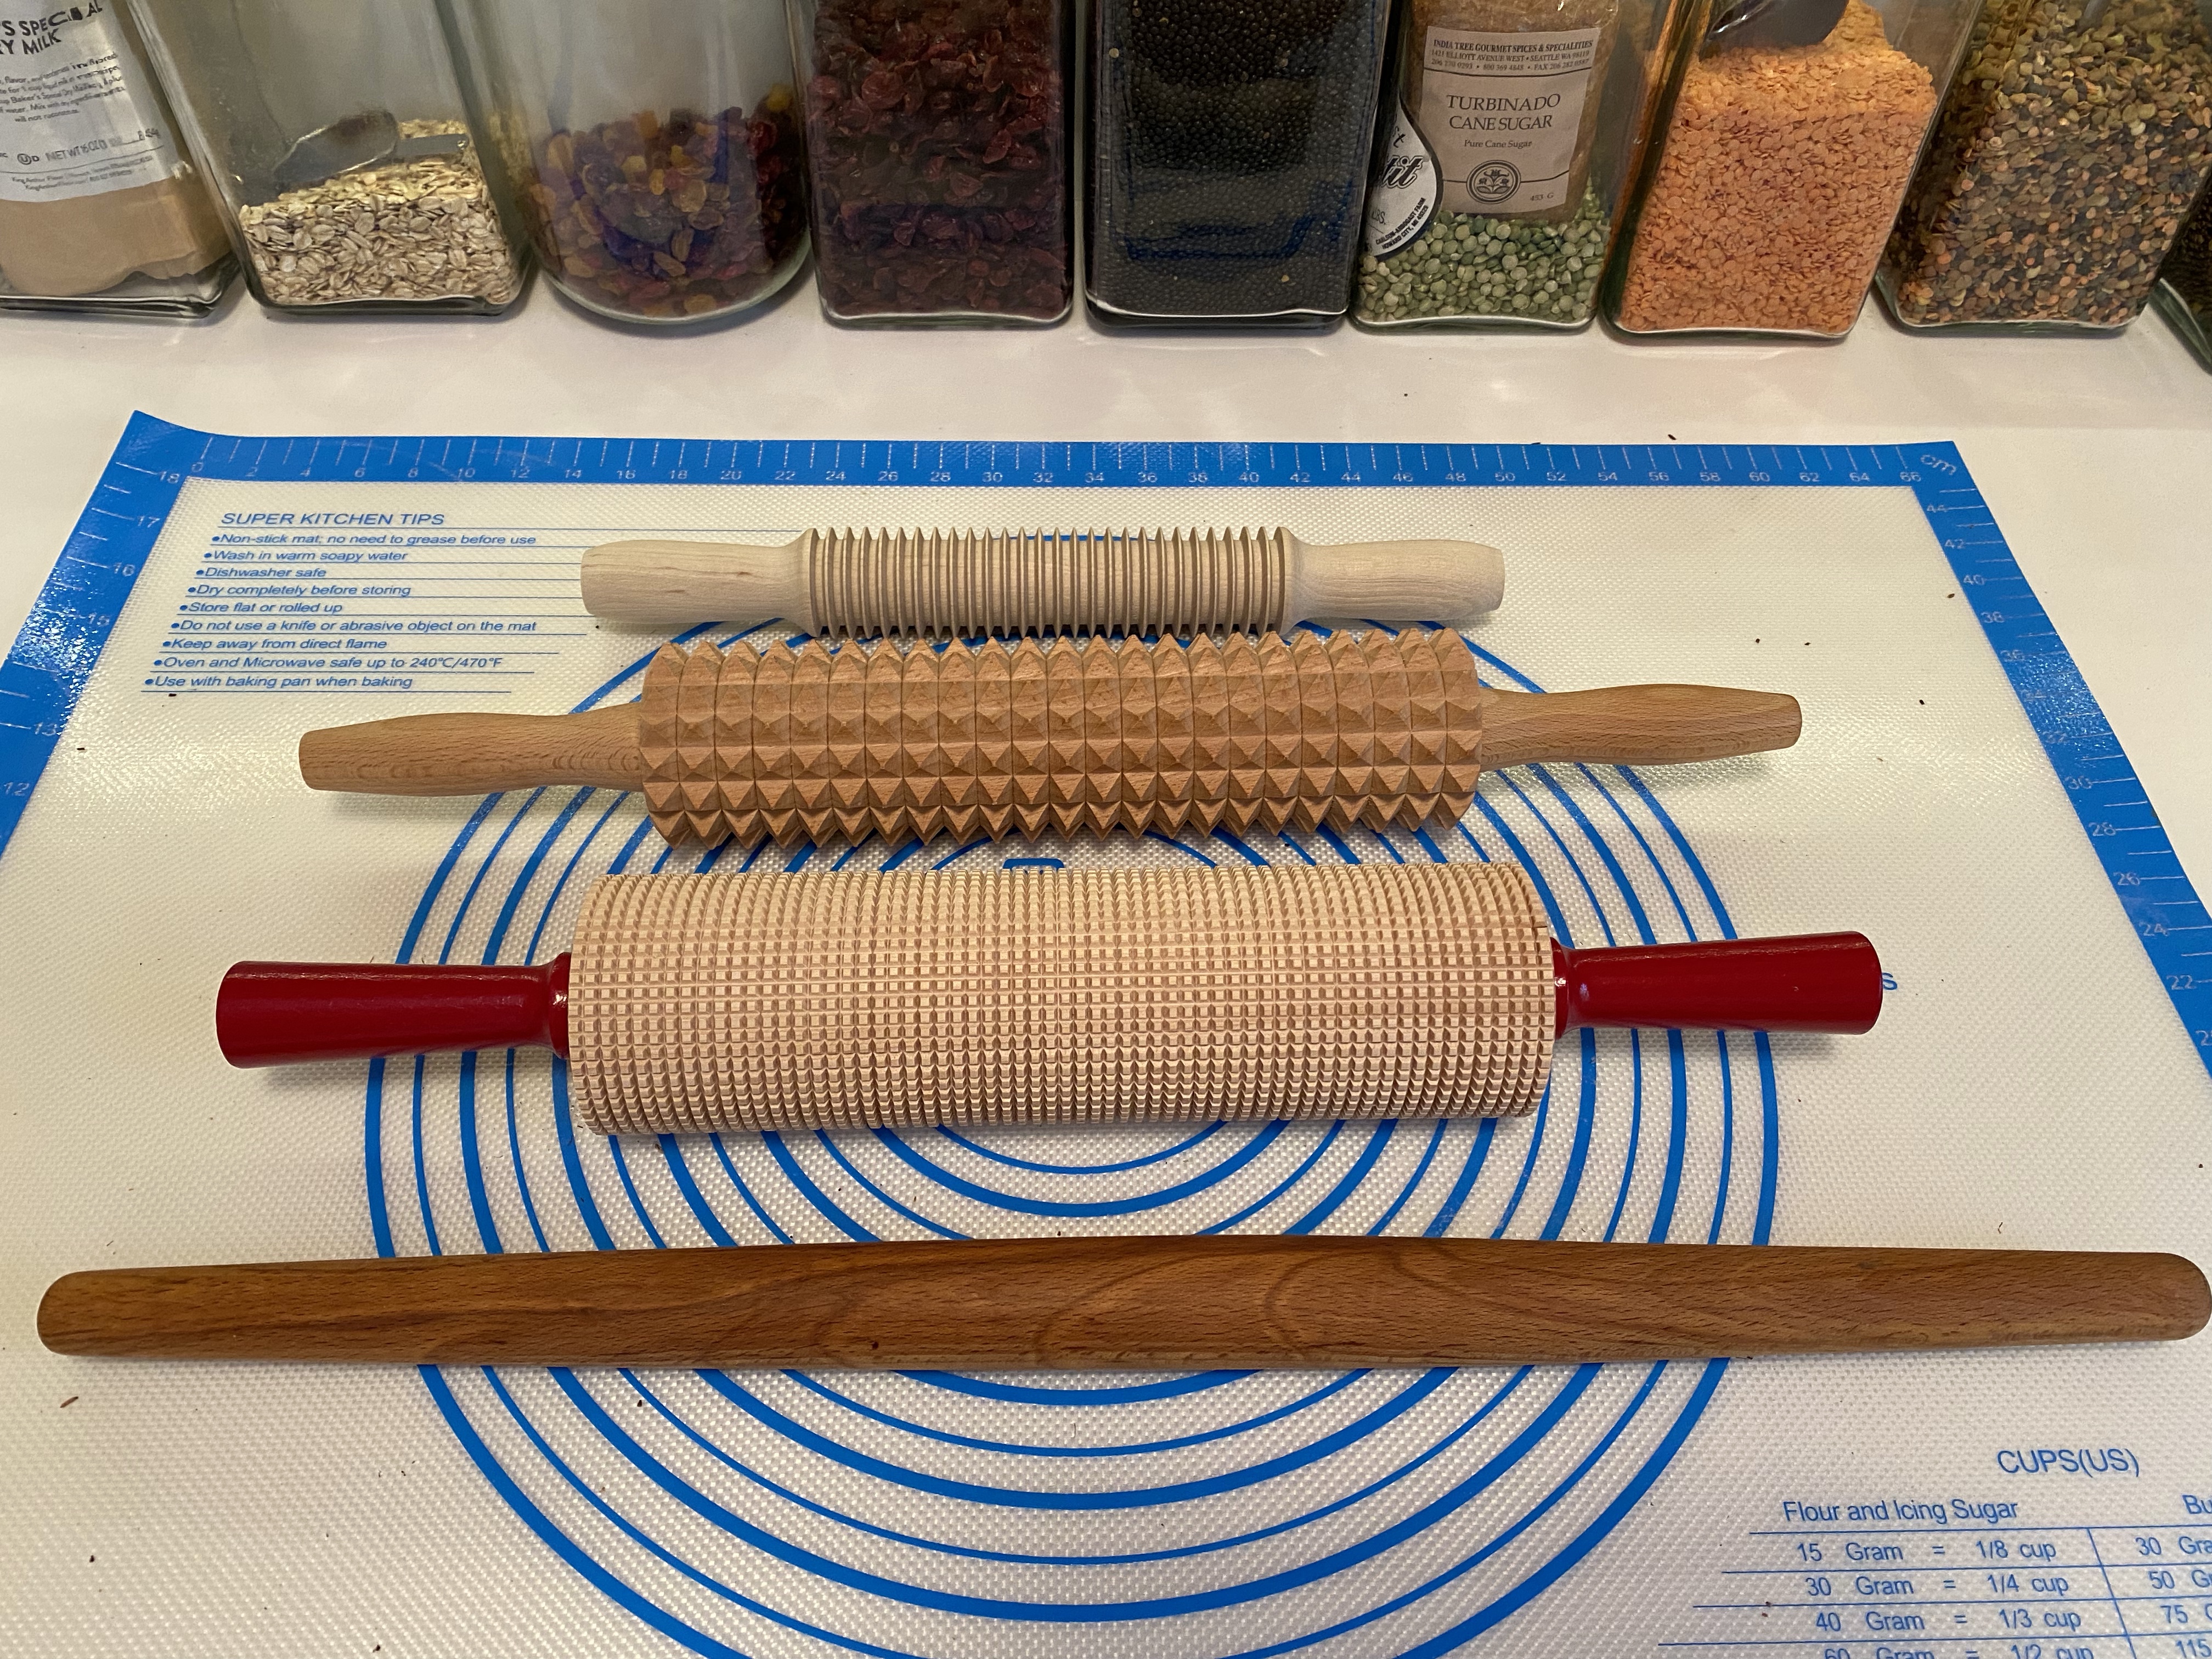
Unbeknownst to me, I’ve had a kuskavel in my rolling pin drawer for any number of years. Didn’t know it’s name. Didn’t know what it’s specialty was. Don’t remember where I came upon it. I just thought it was fun looking and might work on crackers which I tried once. Don’t really remember how that turned out.
This is the Kuskavel. See what I mean about fun looking.
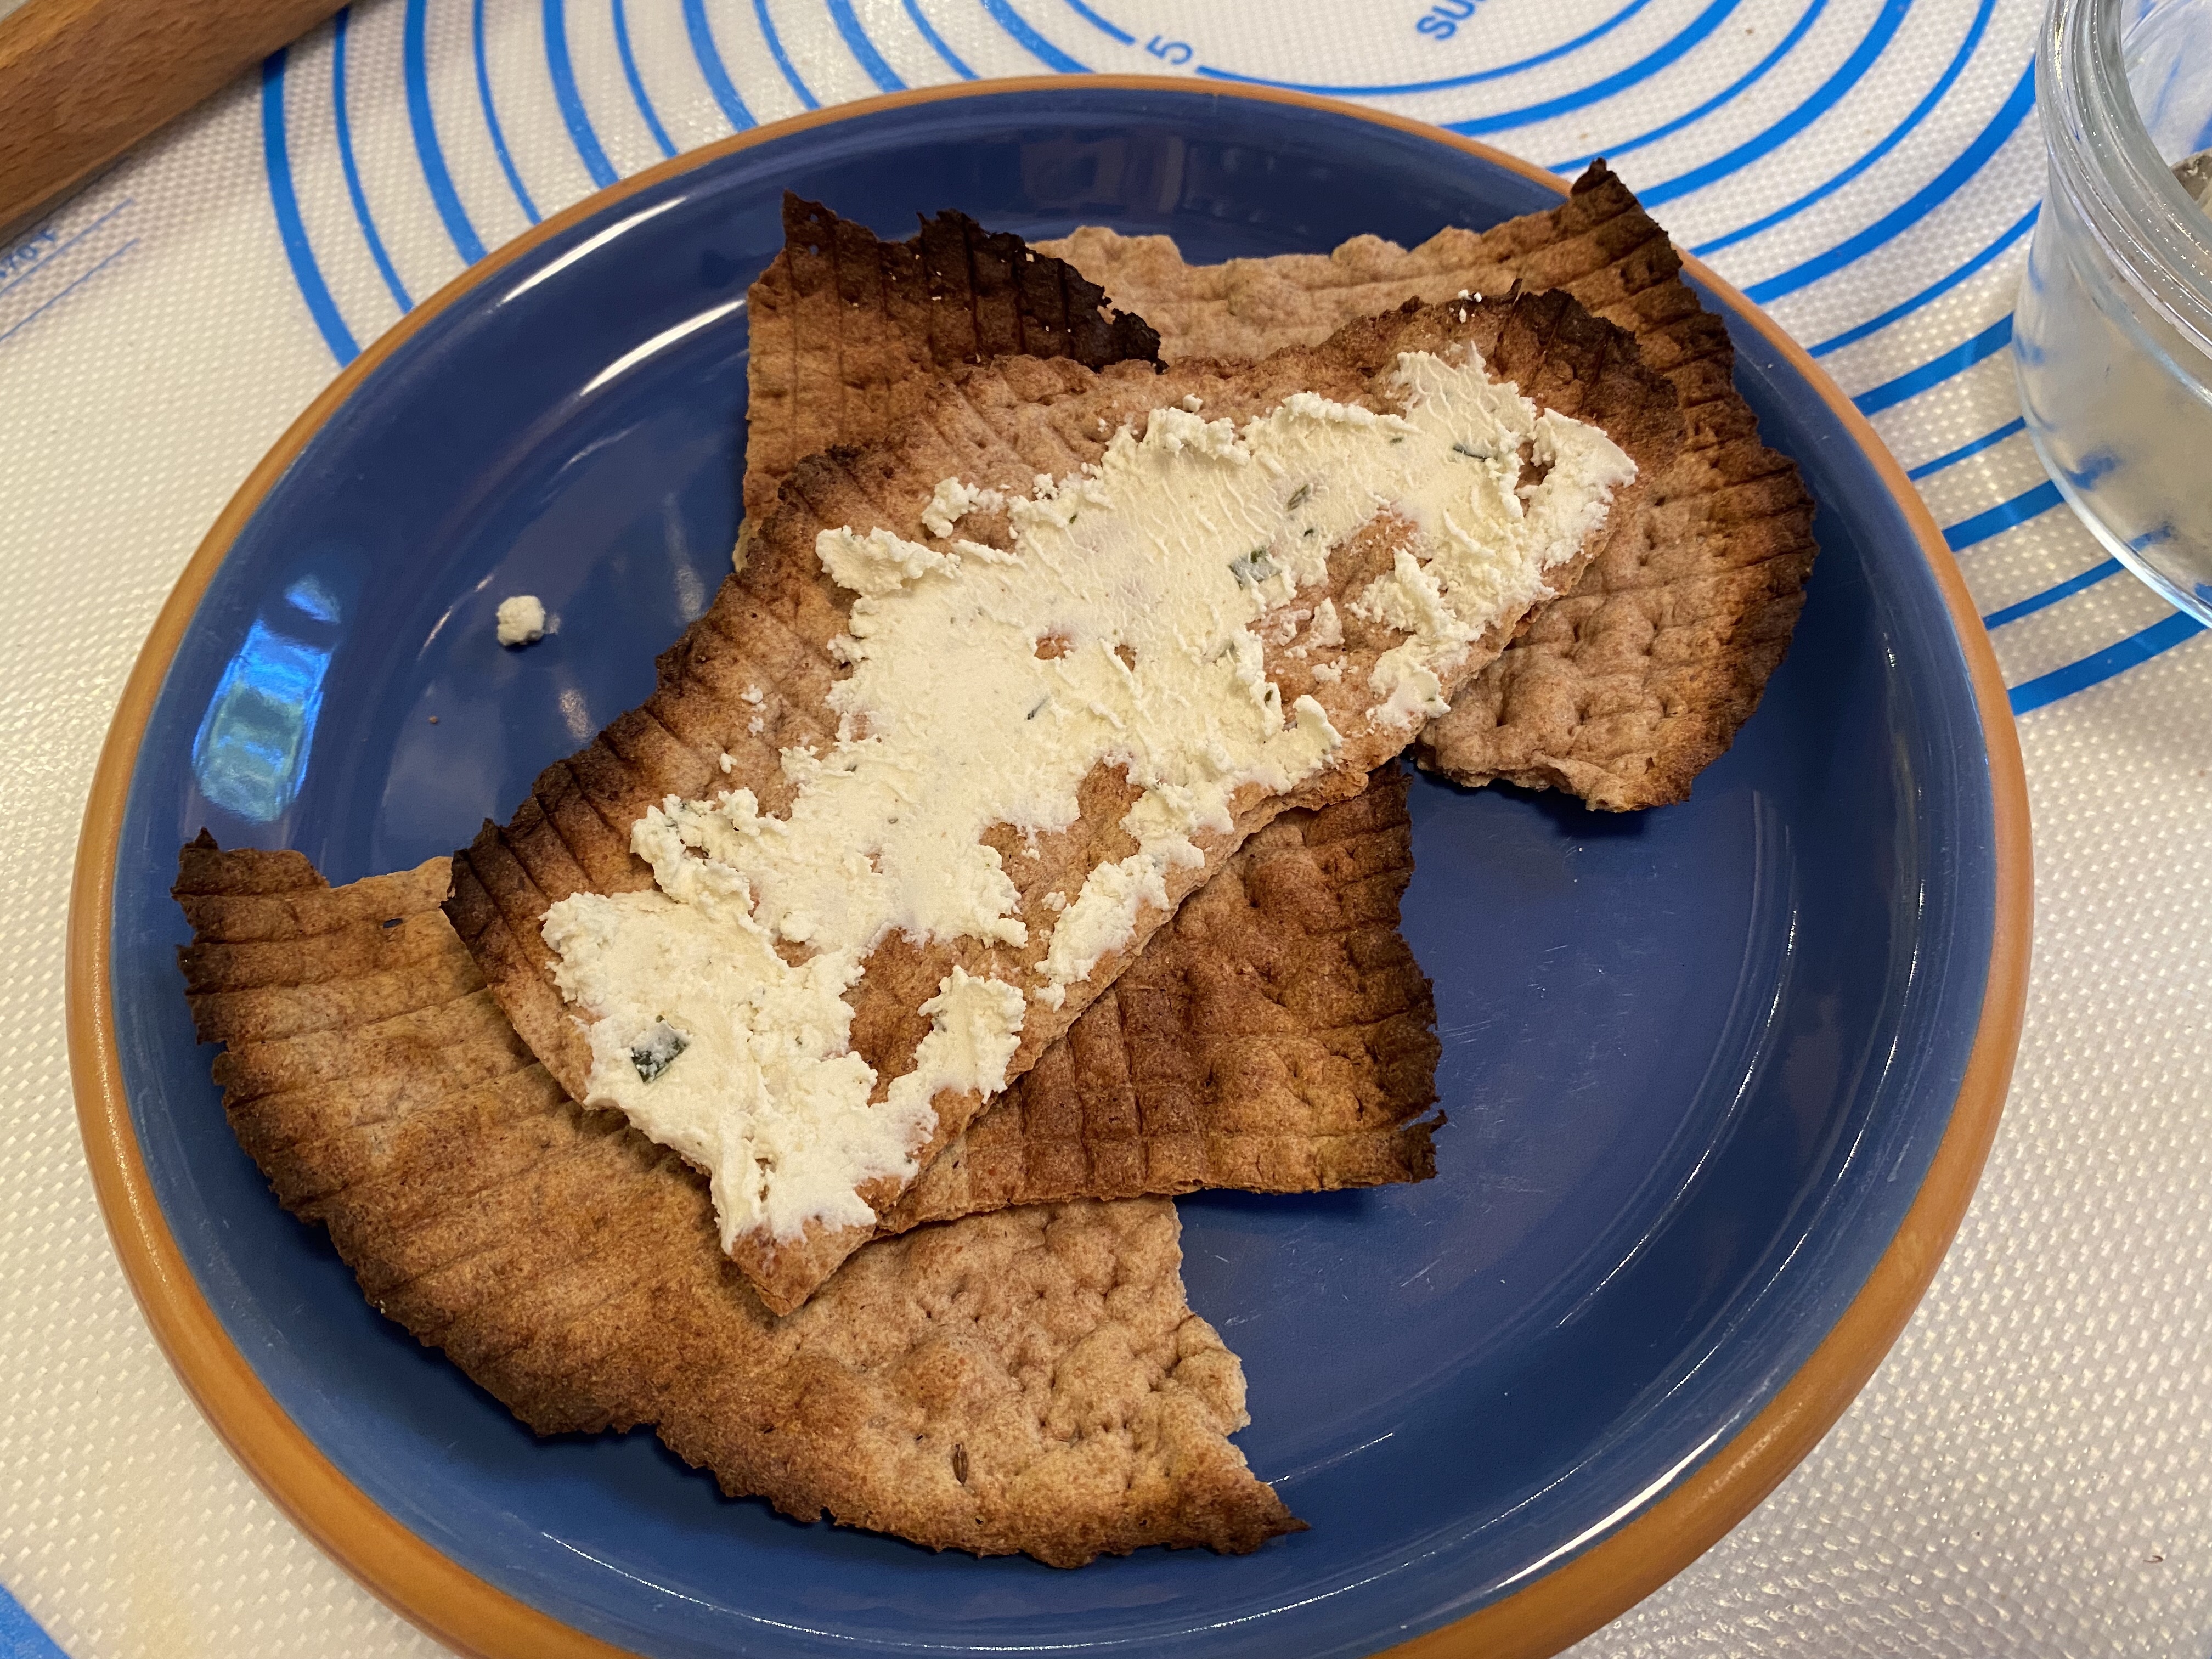
Kelly from MessyKitchen is our host Kitchen of the Month and the bread she brought us is delightful! Flatbread from Sweden. Sounds simple and yes it is. It is one of those simple breads that is so much more than it’s simplicity. Check out Kelly’s site for all the background on this bread!
Before baking powder there was deer horn salt aka baker’s ammonia. And about that deer horn salt aka baker’s ammonia, yes you can get it from Amazon, and yes it really is ammonia, and yes it really smells like ammonia and yes it really SMELLS. BUT somehow it bakes away. I baked this first with baking powder and then took some really deep breaths (not over the baker’s ammonia) after Kelly assured me I would not smell it after baking and gutted it up and baked the recipe using the deer horn salt aka Baker’s ammonia. I could not discern any appreciable difference in texture or bake between the two.
1 g (¼ tsp) deer horn salt (baker’s ammonia), dissolved in water (you can use baking powder instead)
6 g yeast
8 g sea salt
25 g honey
20 g butter
235g milk (dairy or non dairy works fine)
1 teaspoon caraway, crushed in a mortar/pestle)
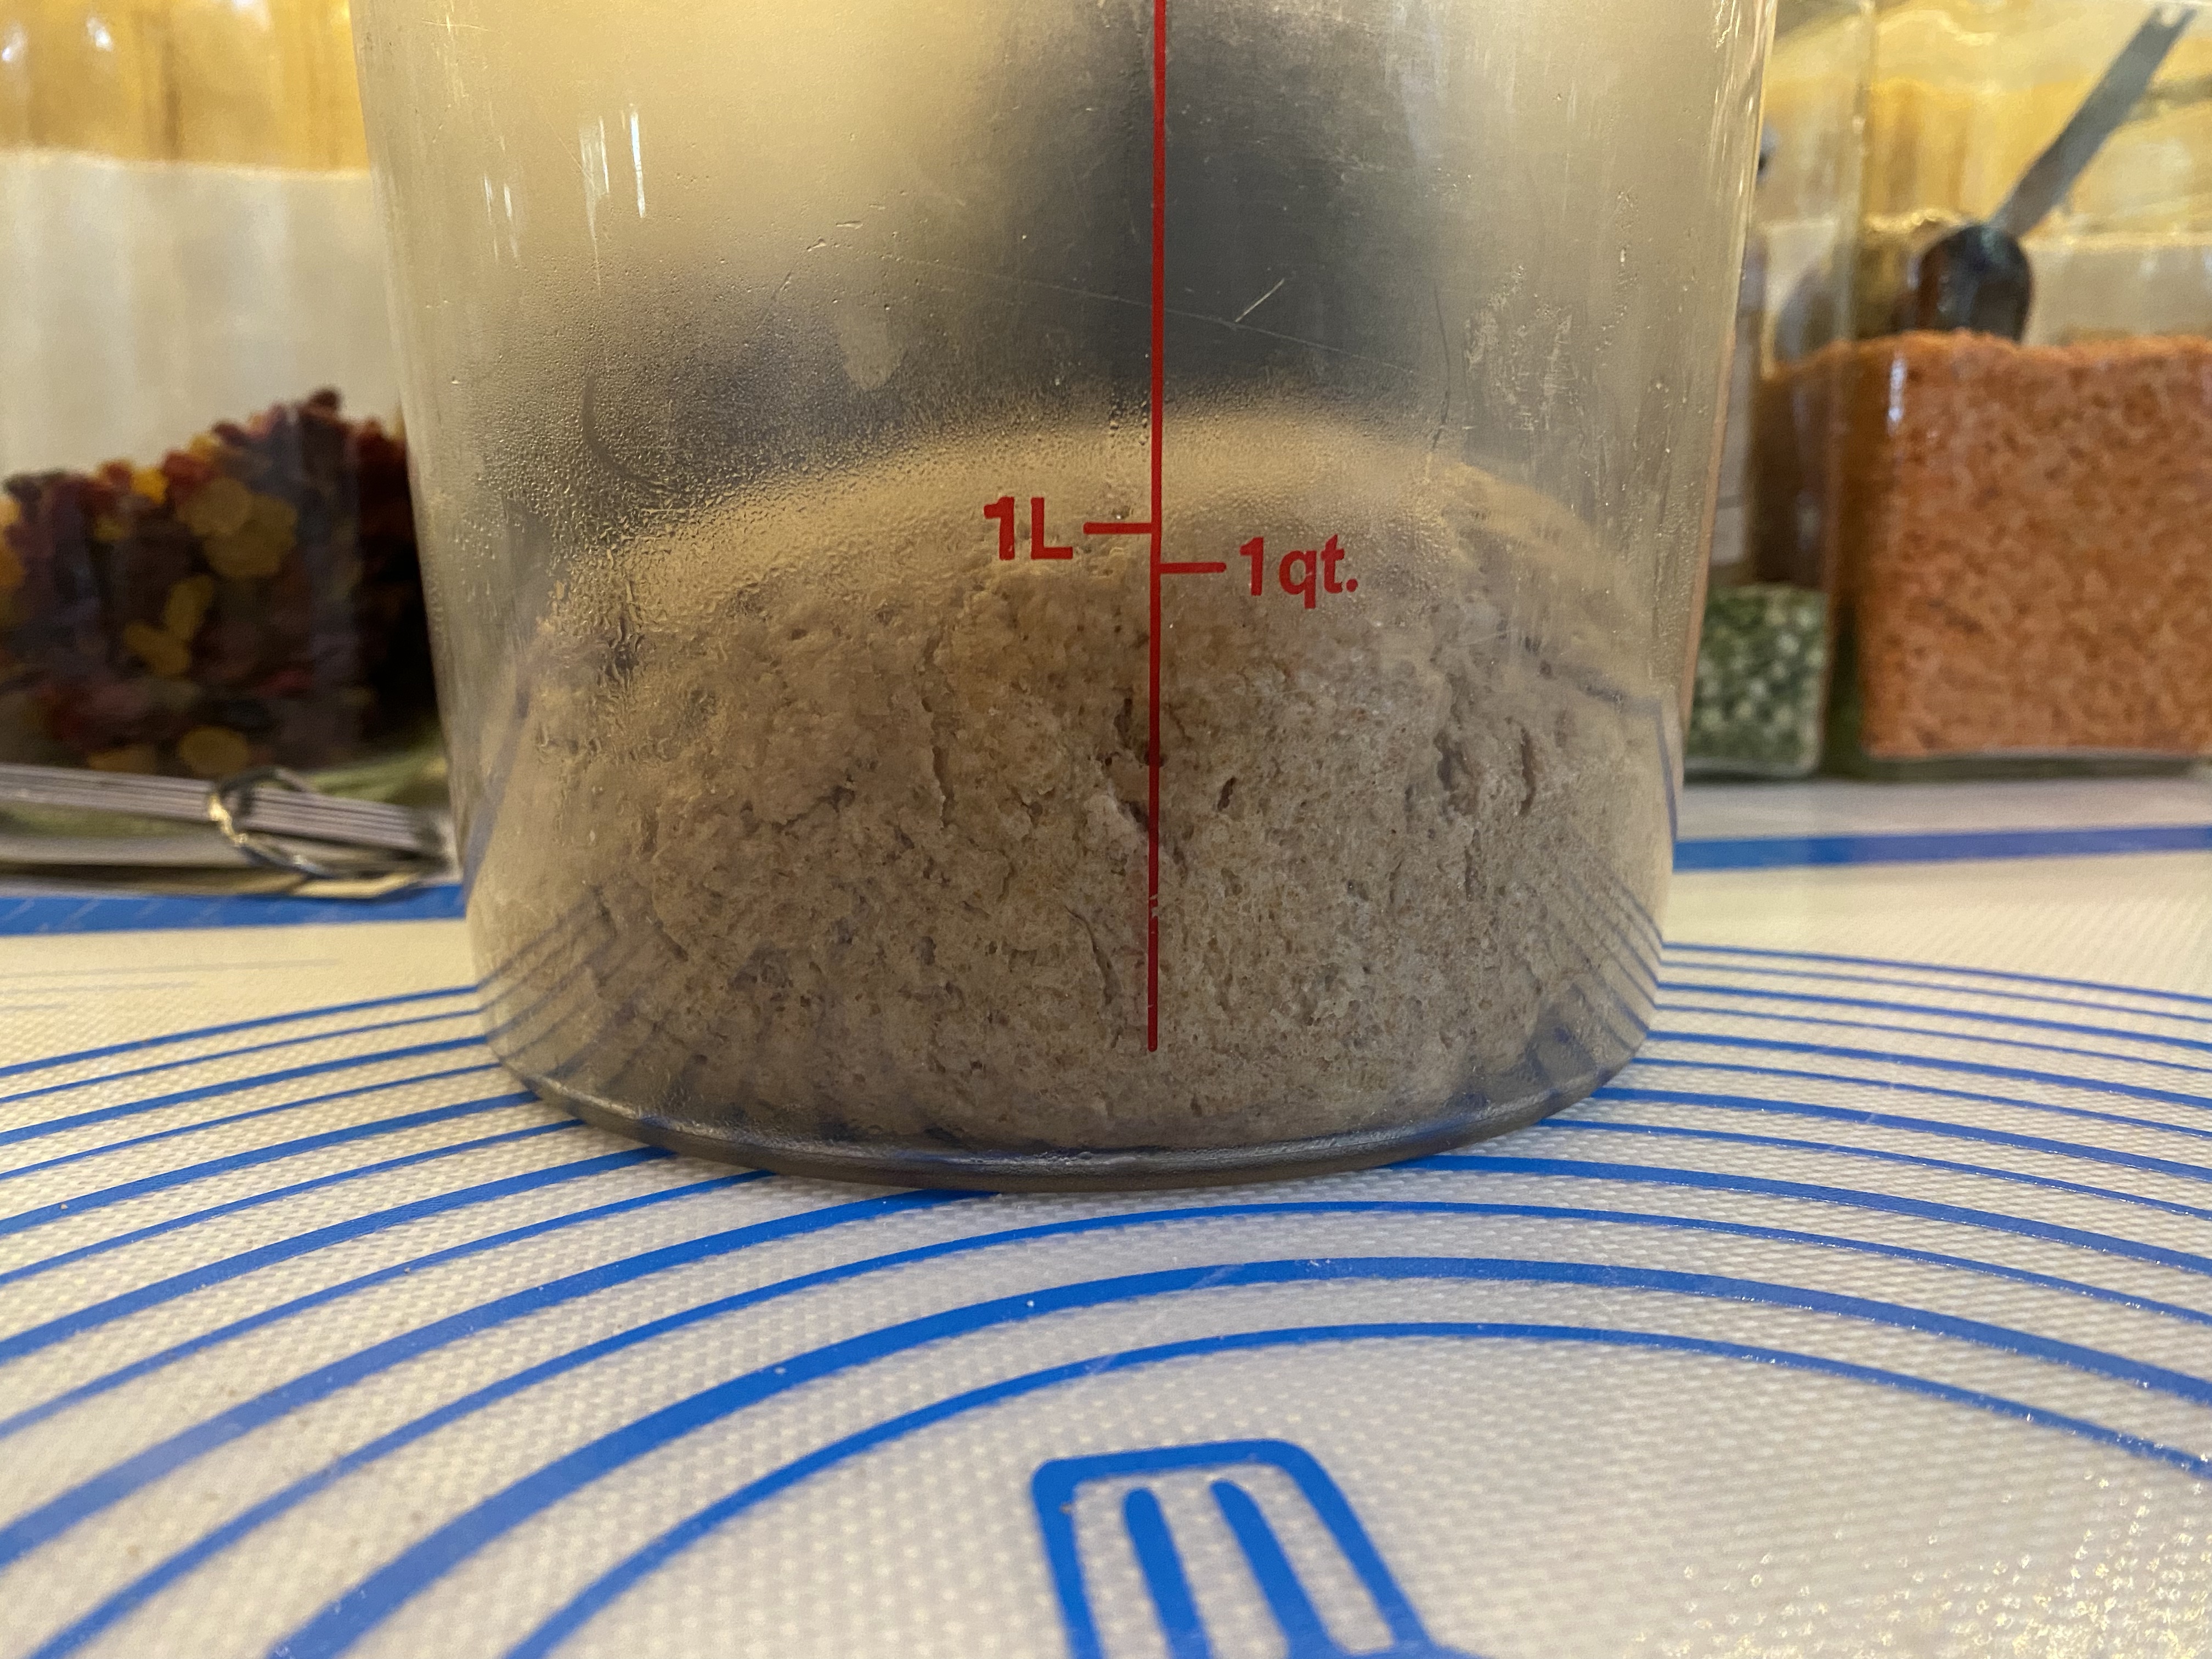
I kneaded a very stiff dough for 15 minutes. I probably added 10-20 grams water while kneading. Let rise for 6 hours at room temperature and knock back and briefly knead twice in the first two hours. (The dough can also be chilled overnight.)
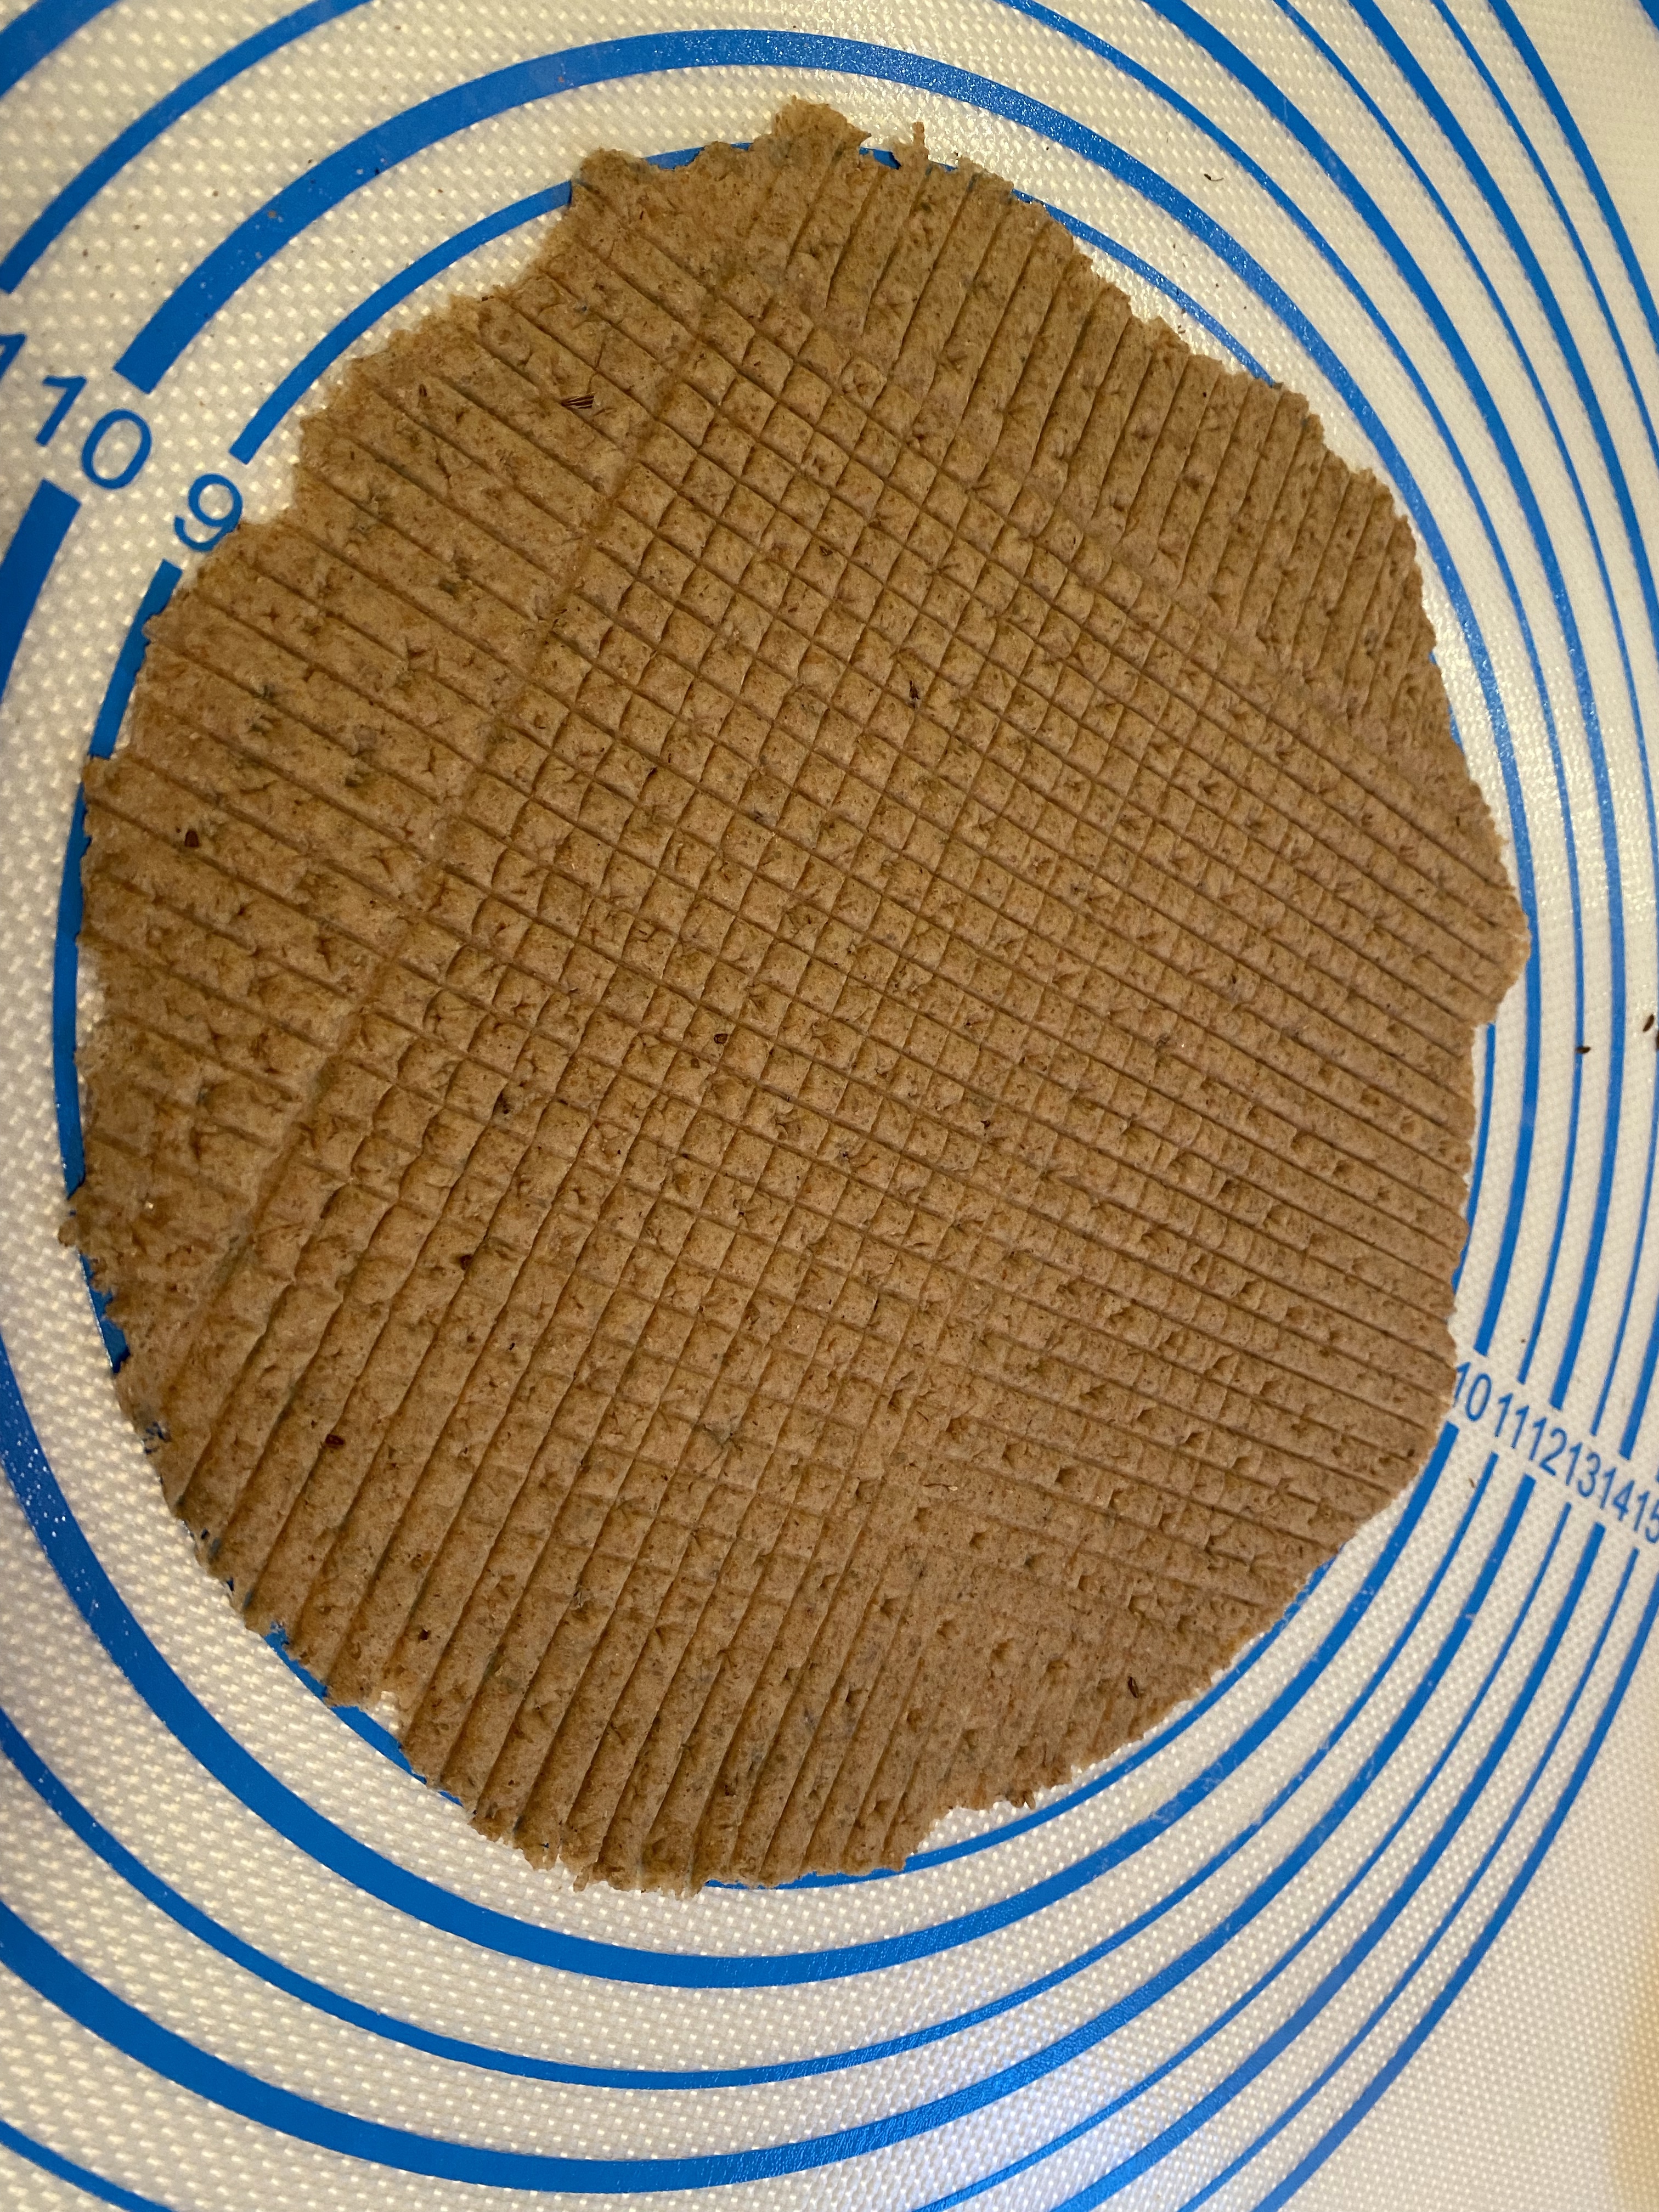
Cut off 85 – 95 gram portions and shape into round balls. Flour lightly and let rise briefly, about 20 minutes. Roll out round dough circles to about 25cm or 9in with a notched or regular rolling pin. Dock well if using a flat rolling pin. If using a grooved pin, follow with the notched pin.
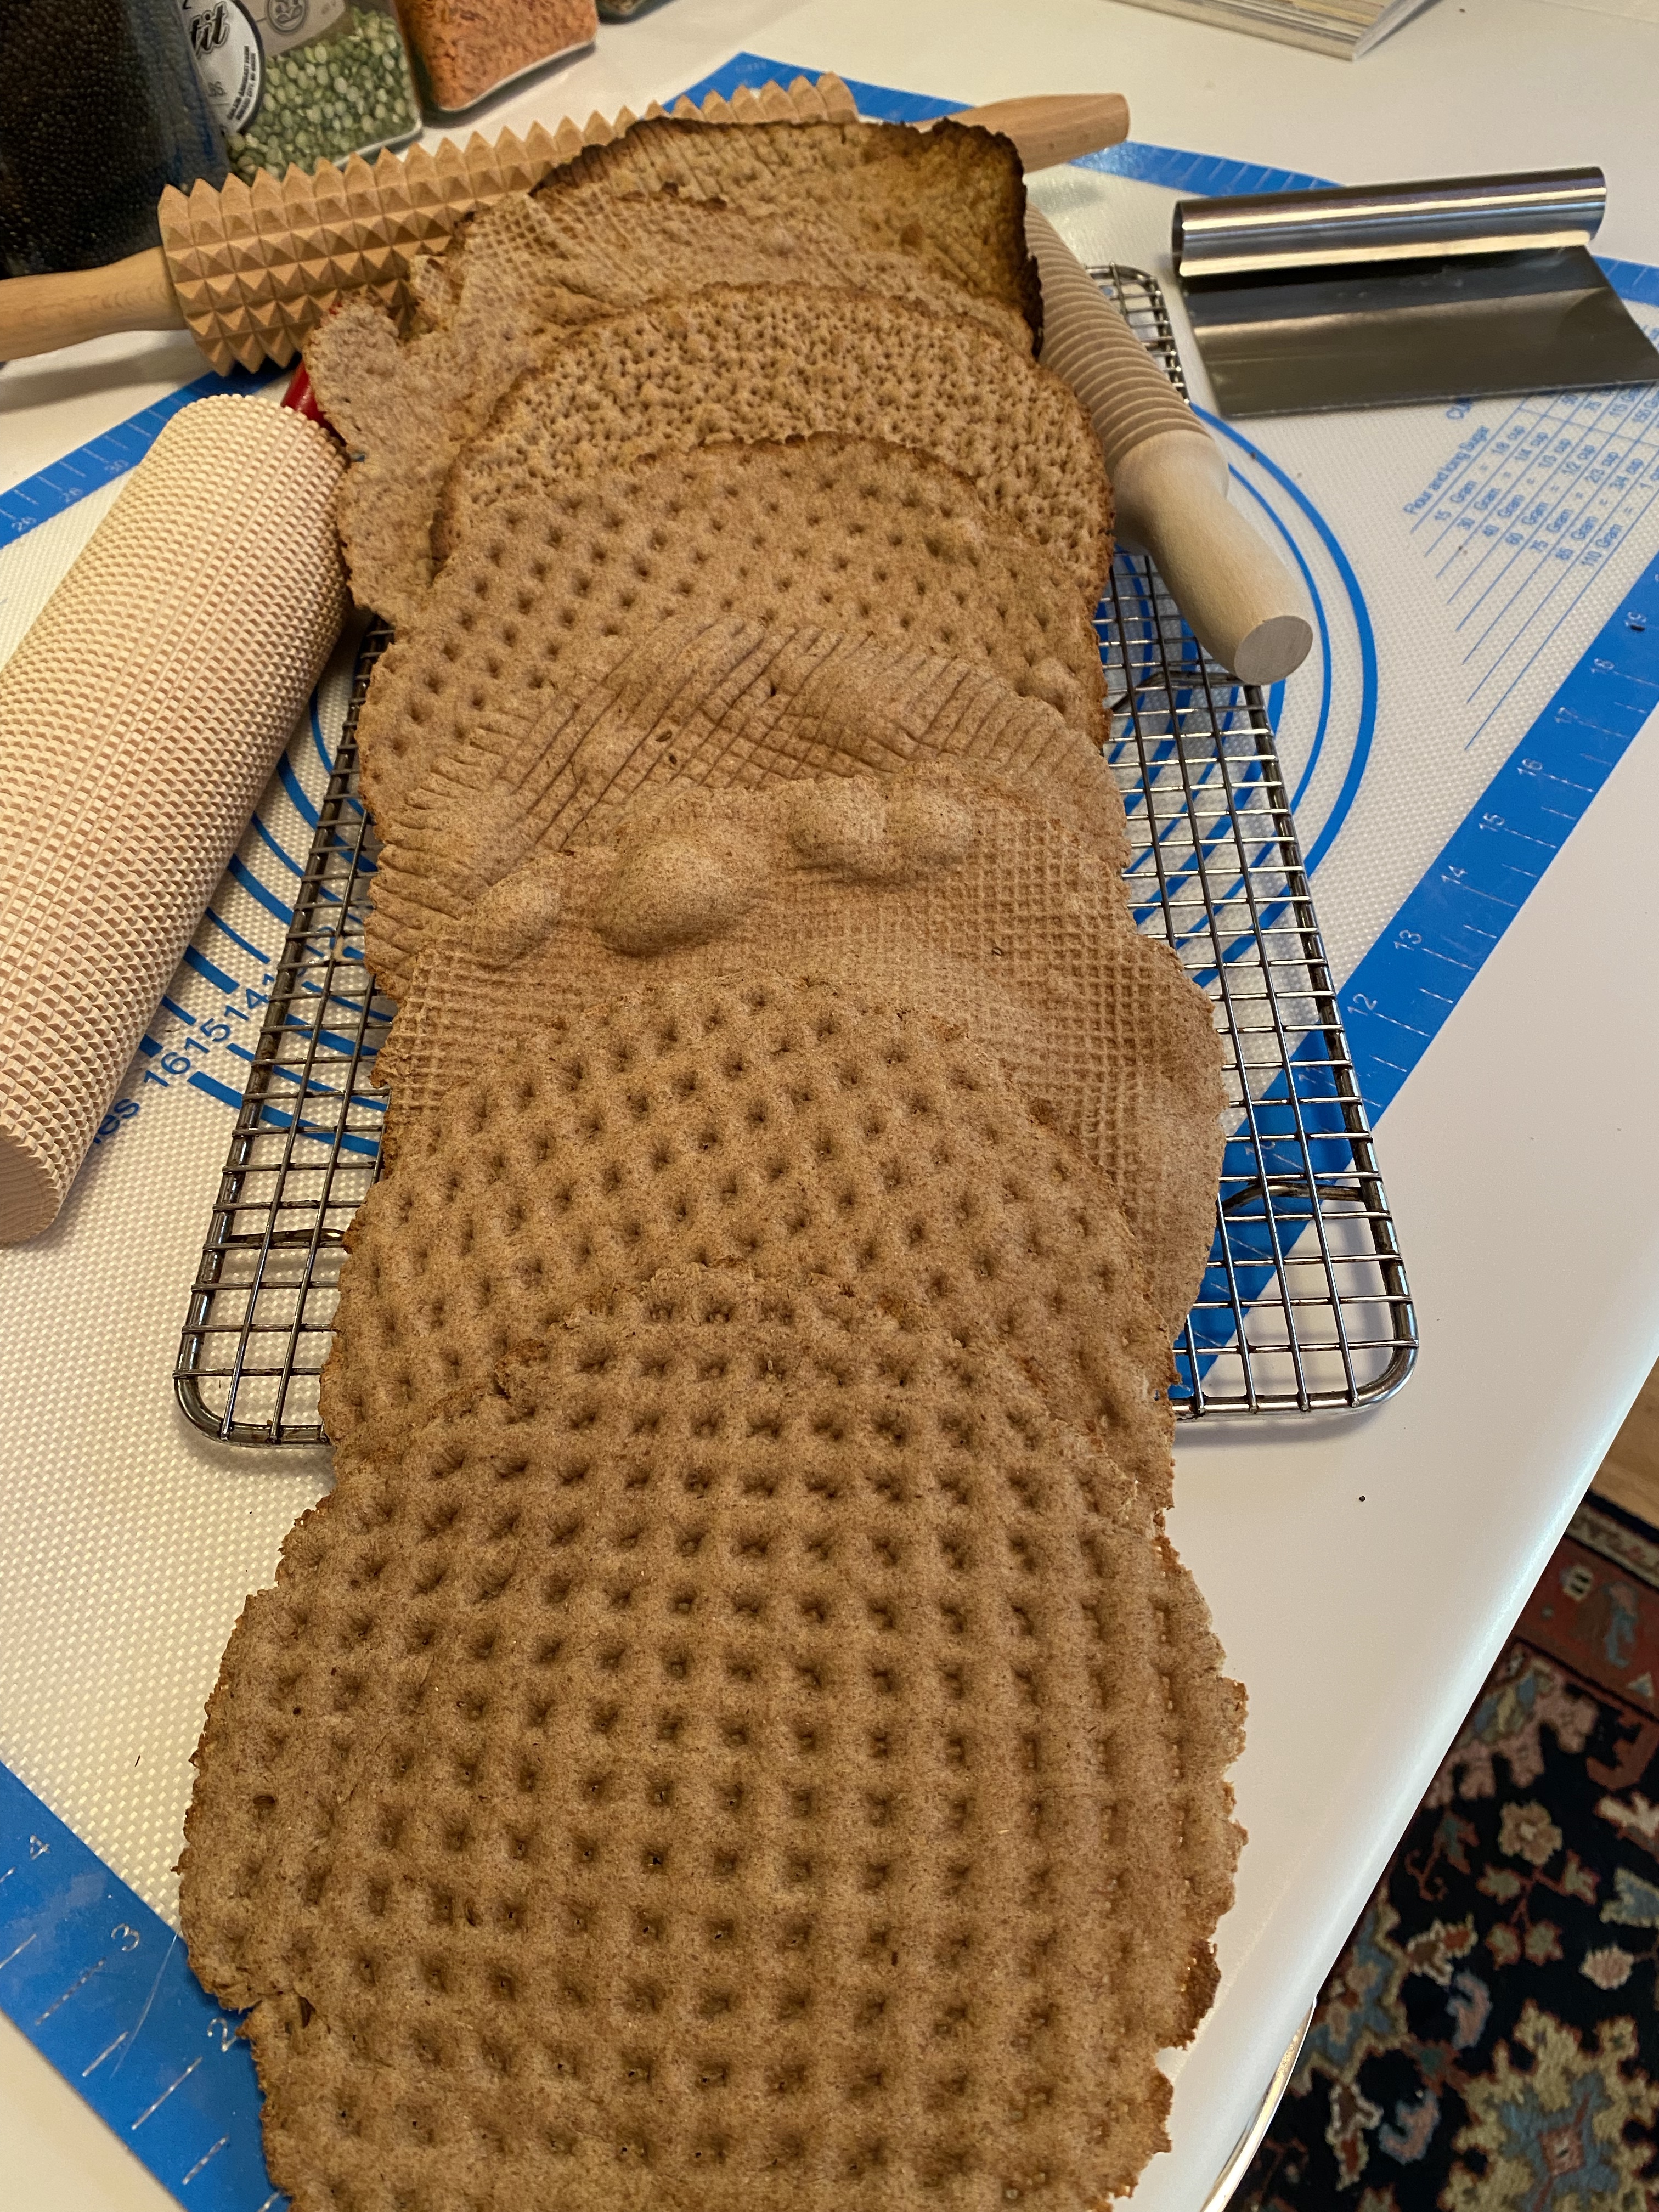
Preheat the oven to the highest possible temperature (500° worked best for my oven & stone. 525° seemed too hot) and ideally place the flatbread directly on a baking stone or steel and bake them into golden, soft flatbread. Bake for 3-4 minutes each. Mine took 4 minutes.
I did play with the flours in this recipe. My first bake was as Kelly wrote it. My second bake I took 100 grams from the whole wheat and make it rye. I used caraway seeds in both those bakes. We enjoyed both and I really couldn’t discern any difference between them. My third bake yesterday I tried 162 grams whole grain barley. The dough never really rose anything like the first two batches. While the dough came together, it remained crumbly throughout the entire process and was even very difficult to get onto the baking stone without cracking and breaking pieces off. In an effort to prevent breaking apart I didn’t roll it so thin and it did a little better.
Haven’t tried any of the barley flatbread yet but we’ll be taking it on a short road trip today and I’ll report back later.
I hope you’ll bake this one with us. Now that days are probably somewhat busy these flat breads are easy and throughly entertaining and engaging! As Kelly says: Hällakakor can be frozen and then reheated straight out of the freezer on a flat toaster, toaster oven, or hot pan. They should refresh well and taste like they were freshly baked out of the oven. They are lovely with butter and jam or syrup, or with mascarpone and jam. They are just as good with an herbed cheese spread or to sop up stew or curry. We would love for you to try out this flat bread with us this month and share how you used it! New recipes are posted every month on the 16th. Check out our Facebook group to see the participants’ baking results during that time.
Do you love the crisp fall air, leaf raking, fresh apples, pumpkin and spices? I’m ready for the air to be cooler and cinnamon is always welcome in my kitchen! Pumpkin has never been my very favorite but in this bread it is perfect. This is the bread of fall. Totally my new favorite with fresh home made apple butter. How can you beat that? OK, well maybe put peanut butter AND apple butter on a slice of this. Yes, maybe that would be even better.
32 grams whole grain rye or other whole grain flour
¾ tsp. / 6 grams fine sea salt
1-2 Tbsp. / 7-14 grams pumpkin pie spice or other spice of choice
200 grams pumpkin puree
2-3 Tbsp. / 40-60 grams maple syrup or honey (I used 40 grams of maple syrup)
Extra flour or water as needed
*Using yeast instead of sourdough.
To make a yeast version, add 1/8 teaspoon of dried yeast to the Pâte fermentée and an additional teaspoon in the final dough and omit the sourdough starter.
First Day: Make the Pâte fermentée
In a large bowl, whisk together the flours and salt. To keep from dirtying another container, make a well in the center and add the starter. Pour the water in gradually and mix using a large wooden spoon or Danish dough whisk until everything comes together to form a smooth ball.
Adjust the water or flour as necessary to make a dough that isn’t too sticky or stiff. Knead the dough until it is soft and pliable and tacky but not sticky, about 4 to 6 minutes.
Cover the bowl with plastic wrap or a kitchen towel, and ferment at room temperature for 1 hour or longer. The dough should swell to about 1 ½ times its original size.
Remove the dough from the bowl and degas it by kneading it gently. Return the dough to the bowl and cover tightly with plastic wrap. Place in the refrigerator overnight or up to 3 days. Or freeze in an airtight freezer bag for up to 3 months.
Next Morning/Afternoon: Make the Final Dough/Bake Bread
The next day, remove the Pâte fermentée from the refrigerator. Cut it into 10 – 12 small pieces using a bench knife or serrated knife. Place the pieces in the bowl of a stand mixer and allow them to warm up for about 1 hour.
In a separate bowl, whisk together the flours, pumpkin pie spice, and salt.
Add the pumpkin puree, maple syrup or honey, if using, to the Pâte fermentée and mix on low speed to break up the pieces. Gradually add in the dry ingredients and continue mixing on low speed until everything comes together to form a coarse ball. Add extra water if necessary to form a soft and pliable dough. ***In retrospect, next time I would add 30-60 grams of water.
Mix on medium speed using the dough hook and adjust with flour if necessary to make a soft, pliable dough that is tacky but not sticky.
Transfer the dough to a clean large bowl and cover with plastic wrap or a kitchen towel.
Let the dough ferment at room temperature for 2 hours. Stretch and fold the dough after the 1st hour, then let it rest the final hour.
Remove the dough to a work surface dusted with flour. Divide the dough into two pieces and shape roughly into rounds. Let them rest on the counter for 15 minutes.
Shape the pieces into tighter boules, and place in lined banneton proofing baskets, between the folds of a heavily floured baker’s couche, or on cornmeal-dusted parchment paper. Let them proof 2 hours or until 1 ½ times their original size.
Proceed to baking or cold ferment the loaves overnight
After the loaves have proofed in the baskets at warm room temperature, proceed to baking, or cover the baskets tightly with plastic wrap and place in the refrigerator overnight to cold ferment.
About 45 minutes before you plan to bake the loaves, place a Dutch Oven or other baking pot on the middle lower rack of the oven and the lid on the upper rack and preheat the baker to 450 degrees F.
While the oven is preheating, cut a piece of parchment paper to fit the bottom of your baker. **** My parchment round was to fit the Dutch Oven with wings.
What has wings and flies in & out of a scorching hot 🥵 Dutch Oven?
Cut four 30-inch pieces of food-safe twine. ****I poured olive oil in the bottom of a ramekin, coiled the twine to fit and soaked the twine in the oil. Place the oiled strings crisscrossed on the parchment. It should look like a pie divided into 8 wedges.
If you cold-fermented the loaves overnight, remove one loaf from the refrigerator at this point.
Invert one of the boules from the proofing basket onto the parchment paper. Center it on top of the string. Tie the strings on top being careful not to pull too tightly to give the loaf room to expand.
Score the loaf uses small slashes, if desired.
****Pull the middle rack with the Dutch Oven on it out of the oven. Using the parchment wings, lift the tied pumpkin loaf (on the parchment paper) and carefully place it in the pot. Pull the lid off the top rack and place on the Dutch Oven. Push the rack into the oven.
Bake for 15 – 20 minutes with the lid on and another 15-20 minutes with the lid off. The loaf should be a rich golden brown all around and register 200 – 205 degrees F in the center of the loaf. It should sound hollow when thumped on the bottom.
****I used the parchment wings to lift the loaf out of the Dutch Oven. Transfer the loaf to a wire rack and let it cool for 1 hour before removing the strings.
To remove the strings, cut them with scissors and carefully pull them a little bit at a time. If you pull too fast, the string could leave residue. A small knife works well for scraping the string off as you go. ****I had no difficulty removing the twine.
After the string has been removed, let the loaf rest on the cooling rack until completely cool.
Repeat the process with the other loaf allowing the oven and baking pot to preheat to 450 degrees F. before baking.
I gave away my pumpkin shaped loaf (yes even with that horrid explosion spot). We kept the loaf for apple butter and peanut butter! Come on, I know you want to bake this.
Bread Experience is the host kitchen this month. If you want to bake along with us and receive your Buddy Badge, please send Cathy a photo and link by October 29th to be included in the roundup.
Send an email to breadexperience at gmail dotcom and include BBB October Submission in the subject. It’s time to get baking!
Our host kitchen of the month is Judy at Judy’s Gross Eats. She can tell you about this bread taking the internet by storm. I’m going to tell you about how this is simply amazing. Our son and his three kids raved about the milk bread they baked all during the pandemic. They loved how you could squeeze it and it came back. They just really loved it. Whole grains…ha, those were awful tasting things that ruined any bread. This was all white. This was real bread. I loved watching their productions, the photos and the movies and what they put on their slices. But white bread just isn’t my thing. I didn’t try it.
Then here comes Judy with this milk bread. AND here’s a friend with a birthday. Wow! Great opportunity to bake a spectacular white bread that I can give away. So I baked white bread…I was taking it to the party…there was wind and rain…party got canceled…didn’t give away bread…Gorn loved it.
Truly, this makes for spectacular baking but in my mind, on my taste buds, white bread even with the fillings I used (and they were really really good) I just find white flour bread bland. I feel sure there will soon be a time I bake this again and make it with some character flours.
The magic of three basic ingredients always blows my mind. With this bread, it is a technique and shaping that bring it into the realm of the GLORIOUS. Technique is cooking the flour into a paste, the tangzhong, and adding that to the dough. Shaping adds the final magic. I’m astounded by breads that look spectacular and difficult…then turn out to me relatively simple to execute, and this definitely fits in that category.
My fillings. Well, this recipe called for dividing the dough into five pieces. That gives you the opportunity to use five different fillings all in the same loaf. I used Biscoff Crunchy Cookie Butter, peanut butter, brown sugar & cinnamon, chocolate and left the last plain. Not surprisingly I liked the Biscoff and the peanut butter the best. Fillings can be sweet or savory and my mind swims with the possibilities.
I lost track of width I should have made the five rolls and ended up with misfit. Judy’s misfit I think was stunning, mine not so much but it still worked. I did like the idea of different fillings. Fermenting in my mind, you could make these five rolls smaller and make more pieces and create many surprise flavors. That might make more work but it sounds interesting.
Japanese Milk Bread from King Arthur Baking Company
1. To make the tangzhong: Combine all of the ingredients in a small saucepan, and whisk until no lumps remain.
2. Place the saucepan over low heat and cook the mixture, whisking constantly, until thick and the whisk leaves lines on the bottom of the pan, about 3 to 5 minutes.
Three minutes.
3. Transfer the tangzhong to a small mixing bowl or measuring cup and let it cool to lukewarm.
4. To make the dough: Weigh your flour; or measure it by gently spooning it into a cup, then sweeping off any excess. Combine the tangzhong with the remaining dough ingredients, then mix and knead — by mixer or bread machine — until a smooth, elastic dough forms; this could take almost 15 minutes in a stand mixer. I started doing this by hand as I like that best BUT I quickly felt I would get a much better result with the kitchen aid AND I got the smoothest dough ball ever.
Baby smooth bottom! Twelve minutes in the KitchenAid.
5. Shape the dough into a ball, and let it rest in a lightly greased bowl, covered, for 60 to 90 minutes, until puffy but not necessarily doubled in bulk.
6. Dough shaping: Divide the dough into 5 pieces. Roll each piece into a thin, oblong shape, then, using a sharp object (I used my 6 inch bench scraper), start about 2/3s from the designated top and make 1/8” to ¼” cuts.
This is almost five minutes long I’m sorry, I have to learn some editing 😌 Yes, we have pesky fruit flies in the film. Please excuse the straw like grey hair that gets in the way.Continue reading →
Wild Naan Sangak adapted from our recipe for Wild Naan, and the recipe for Persian Pebble Bread in “Taste of Persia” by Naomi Duguid
makes one long bread
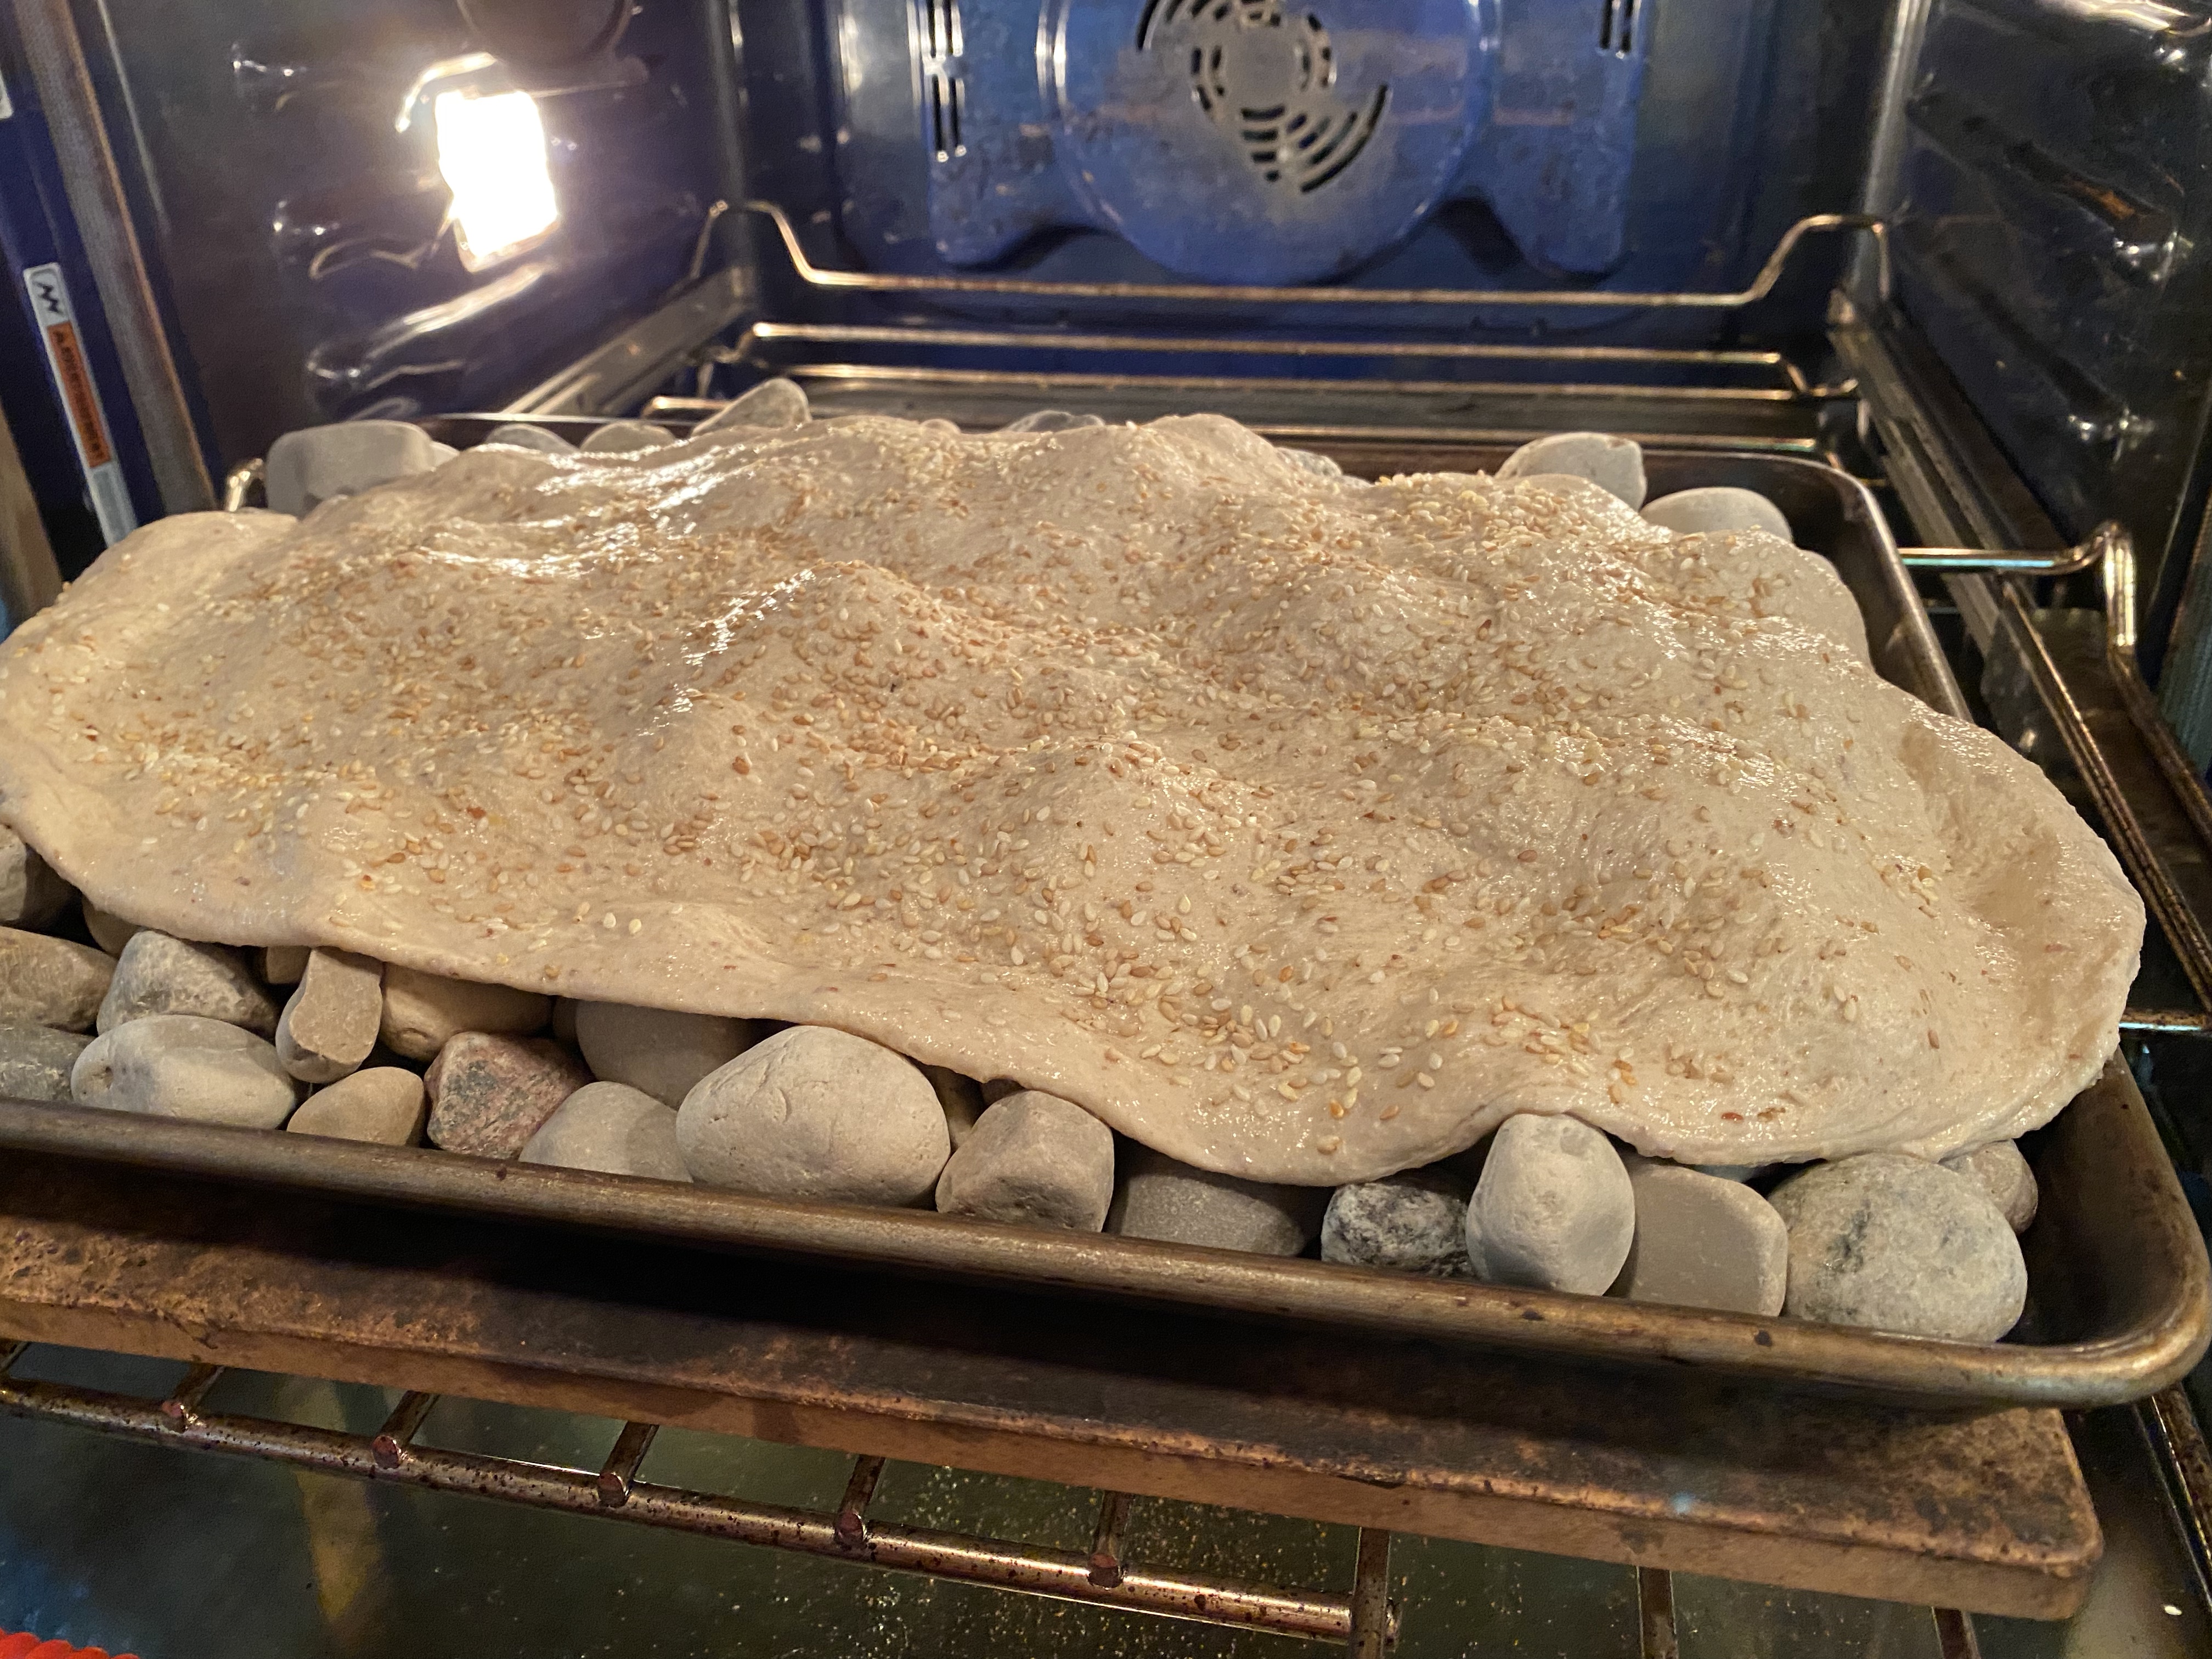
Have I ever said Baking Bread is an Adventure…? Well, if I have failed to tell you such, let me just be sure to iterate it loud and clear now. Baking Bread is an Adventure! Baking Bread is an Adventure! Baking Bread is an Adventure!
Plenty of rocks here. Which ones do I use…
Elizabeth, our Kitchen of the Month, was very up front as to the rock being involved in the recipe she was considering. She says she more or less forced us into this recipe. I thought we all pretty much thought this sounded like a great idea. So here we go, off to find rocks…what kind of rocks. Oh, you know, pebbles, river rocks. Elizabeth found her’s at a garden store. The stores around here seemed either not to know what I was asking for or they were sold out. So I looked for an alternate source.
The business we’ve worked with for driveway gravel and excavation seemed like a good place to try. Try explaining to an excavator/concrete mixer fellow how you’d like to purchase enough small rocks, pebbles, fairly smooth to cover the bottom of a half sheet pain. It did make it easier to explain that I took my sheet pan with me. Jim Beckman gave me directions to the gravel pile and I drove out, parked in front of it, climbed up the gravel, sat down and hand picked each rock. Big gravel, dirt and cement trucks rolled by as I filled my sheet pan. I got several looks but no one stopped to ask what I was doing.
Hot Rocks Bread (renamed from Elizabeth’s Wild Naan Sangak and the recipe for Persian Pebble Bread in “Taste of Persia” by Naomi Duguid)
makes one long bread
My Rye Sourdough Starter
Leavener
• 50 grams rye sourdough culture 100% hydration
• 50 grams room temperature water
• 50 grams ‘no-additives’ 100% whole wheat flour
Leavener, continued (optional for hot weather baking)
• all of the above
• 15 grams room temperature water
• 15 grams ‘no-additives’ 100% whole wheat flour
Actual Dough
• 320 grams unbleached organic all-purpose flour (I mixed white whole wheat, spelt and AP flour all organic.)
• 5 grams wheat germ
• 15 ground flax seed
• 180 grams room temperature water
• 25 grams plain Greek yoghurt
• 15 grams (1 Tbsp) olive oil
• All of the leavener, when it floats – showing that it’s as strong as it can be
• 8 grams salt + 5 grams water
Shaping
• flat bottomed cookie sheet
• water
Topping, optional
• sesame seeds
1. LeavenerLate in the evening on the day before you will be making naan sangak, put a spoonful of culture from the fridge into a small bowl. Stir in 50 grams water and 50 grams whole wheat flour. Cover with a plate and put into the cold oven (if the night temperatures are cool, turn the oven light on) to leave overnight.
2. Leavener, continuedIn the morning of the day you will be making naan sangak, particularly if the weather is warm, take a small spoonful of the leavener and see if it floats in a bowl of cool water. If the starter is quite bubbly but that little amount sinks, stir 15 grams water and 15 grams whole wheat flour into the bowl from the previous night. Cover with a plate and leave until about noon. If the kitchen is cool, omit this step and proceed to the next one. I do apologize Elizabeth, I guess I just have great faith/trust in my rye starter and skipped this.
3. Actual DoughOn the day you will be making naan sangak, check to see if the leavener floats in a small bowl of cool water. If the leavener is domed but it doesn’t float, wait for 30 minutes or so and try again. If the leavener is bubbly but flat or concave on the surface, stir in about 5 grams each of whole wheat flour and water. Cover with a plate and leave it on the counter out of draughts. Check again again for floating about 20-30 minutes later. It will probably float. Proceed with making the actual dough.
4. Using a bowl that is large enough for the dough to triple, sift flour in. Whisk in wheat germ. Add 180 grams water, yoghurt, olive oil, and all of the leavener. Using a dough whisk or wooden spoon, stir just enough to mix it together. Cover with a plate and leave on counter for about 20 minutes. Here I felt the dough was sticky and stiff.
5. Kneading and adding the salt: Whisk salt and 5 grams water into a small bowl and pour on top of the dough. Wash your hands and leave one hand wet. With the back of your hand against the side of the bowl, reach down into the bowl to the bottom of the dough and pull it up to the fold it over the top. Turn the bowl with your other hand and repeat 4 or 5 times. Cover the bowl with a plate and set aside on the counter for about 20 minutes. The addition of the water and salt and the dough began to loosen a little and was slightly less sticky.
6. Repeat the previous step 2 or 3 times more. You’ll notice that the dough is smooth and silky to the touch. It may also be quite slack. Don’t be overly concerned. Slack is good. Each time I folded the dough, I dipped my hands in water which resulted in a beautifully smooth silky dough.
This is my abacus: each time I fold the dough, I flip up one measuring spoon and set my phone timer for the next otherwise I’d be a lost case.
7. Proofing: Cover with a plate and leave on the counter. (Check the dough from time to time as the afternoon progresses into evening. Wet your hands and gently fold it whenever it has doubled. I did this once.
8. Preheating the Stones:Around dinnertime on the day you will be baking the bread, put the cookie tray of stones into
Loved the sesame seeds. The rosemary was lost.
◦ the barbecue on a pizza stone over direct heat, close the lid, and turn it to high.
◦ the oven on the middle shelf of the oven set at 450F. This is the way I baked the HOT ROCKS BREAD.
◦ Shaping:While the stones are preheating, use the palms of you hands to slather water over the bottom of another cookie tray. Turn the risen dough onto the tray (the dough will still be pretty slack). Wet your hands again and gently guide and flatten the dough into a rectangle, making sure that one end of the rectangle is very close to the narrow side of the tray. Gently lift the bread up and down again to make sure it is not stuck to the pan. Evenly scatter sesame seeds (if using) on top.
◦ Baking:When the stones are hot hot hot, carry the tray of dough and tip it at the back edge of the tray of hot stones. DO NOT TOUCH THE STONES WITH YOUR HANDS! The dough should begin to slide off the back of the wet tray. If it does not, gently nudge any part that is sticking with a thumb or finger. Gently pull the dough tray back towards the front of the barbecue to stretch the dough onto the hot stones. Once the dough is on the stones, it WILL stick for the first part of baking. Don’t even imagine you can rearrange the dough. “Slowly tip the plate so that the dough begins sliding off of the wet plate onto the pebbles. Gently pull the plate back in a smooth slow motion as the rest of the dough slides and lands on the pebbles. Help it along the way but make sure you don’t touch the hot pebbles! Once the dough is on the pebbles do not attempt to rearrange it, as it will already be stuck to the stones.” – Omid Roustaei, The Caspian Chef | Naan Sangak – Persian flatbread Close the lid of the barbecue if using. (Use direct and indirect heat on the barbecue.)
Sticky Rocks! Loosen with knock from a knife handle.
◦ I considered oiling the rocks to perhaps minimize sticking. My first bake I used water on the bottom of a sheet pan. There was no slide to this method: I lifted an edge and by tilting the pan sharply the dough laid onto the rocks. Virtually every rock that touched the bread stuck to the bread. The rocks were easily knocked off with the end of a knife. For my second bake, I dusted the sheet pan with semolina like when I do pizza. The dough easily slide off and only one rock stuck to the bread. However there were a couple of places where the semolina was thicker and showed a build up. I brushed the excess off before serving.
◦ It takes 5-10 minutes to bake the bread. My bread took about 20 minutes to bake. Turn the tray around from time to time to account for uneven heat in the barbecue and oven. USE OVEN MITTS!! To check to see if the bread is done, use blunt-nosed tongs to gently lift the bread from the stones. Some of the stones may stick to the bread. Don’t worry about that. Enough of the stones will fall off onto the tray to let you check for doneness.
Lovely.
◦ cooling slightly: When the bread is done, bring it inside on its tray of hot stones. Some of the stones will remain attached to the bread. Once the bread cools for about 5 minutes, the stones can be dislodged relatively easily with oven mitts or a spoon. BE CAREFUL!! THE STONES ARE STILL VERY HOT! If the stones are extremely reluctant to release themselves, it seems to indicate that the bread has not quite finished baking; simply bake it a little longer and try again.
Use a pizza wheel to cut the de-stoned bread and serve it immediately with Persian stews, Indian-style curries, chili con carne, soup…. It’s good with grilled vegetables too. I feel it was more interesting and fun to just break a piece off. Served to several friends, this was lovely with cheese or avocado or artichoke or salami or well you get the idea.
And we know that you can’t wait to heat up those river stones on a tray so you can make Naan Sangak too! To receive a Baking Buddy Badge to display on your site, post about your Persian Pebble Bread adventure in the next couple of weeks (we love to see how your bread turns out AND hear what you think about it – what you didn’t like and/or what you liked) before the 29 August 2021.
Here’s how to let us know:
email me » Remember to include your name and a link to your post » Please type “BBB August 2021 bread” in the subject heading
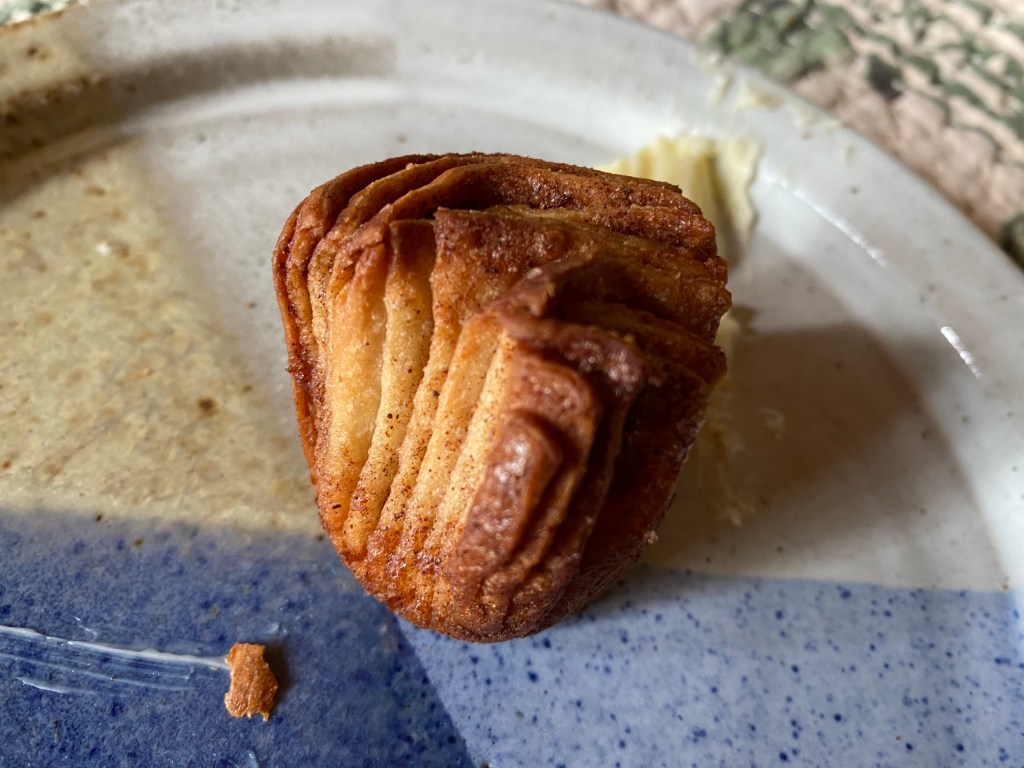
What you may ask is a Cruffin? Since the Babes are Baking Cruffins this month, that would be a fair question. In simplest terms a cruffin might be a cross between a croissant and a muffin but it is neither a croissant nor a muffin. Mostly what you need to know about a Cruffin is: they are insanely beautiful and taste marvelous! That’s really what a Cruffin is BUT if you want to know more details check out Aparna’s post at My Diverse Kitchen.
I think these should be named oatmeal mushrooms.
There is an art to writing a recipe BUT there is an art to reading a recipe as well and clearly I am woefully lacking in reading skills. Perhaps my math is just as lacking. The recipe Aparna gave us clearly stated “this recipe makes 8 cruffins” … I ended up with 17. Can’t read, can’t count.
My cruffins are dark – I used half white whole wheat with half regular AP flour and brown sugar – and I’m ok with that. I will admit the BBB’s who bake with white flour got a gorgeous gourmet picture perfect golden cruffins. I’ll settle for the subtle caramel flavor I get with the brown sugar.
This recipe makes 8 Cruffins (see it said it right there)
For the Dough :
25 grams brown sugar (this was just sweet enough for us)
1 1/4 tsp dry yeast
100 grams white whole wheat flour
101 grams white AP flour
50 gm unsalted butter, chilled
1/4 tsp salt
183 oat milk (did not use any water but used all oat milk)
For Lamination :
120 gm unsalted butter, at room temperature
To Decorate/ Serve :
Speculaas spice/Cinnamon sugar
DIRECTIONS :
I add the dry yeast directly to the flour with other ingredients.
In a medium bowl mix together the flour, yeast, sugar, salt and chilled butter cut into small pieces. Add milk and knead into a soft and elastic dough that comes away from the side of the bowl. The dough should not be sticky. Add a little more milk or flour, as required to achieve this consistency of dough. I found I needed at least half cup more of regular AP flour to obtain a soft supple dough that was not sticky.
Shape the dough into a ball and transfer it to an oiled bowl, turning the dough to coat it well. Cover and let the dough rise till double in volume. This should take between an hour to two depending on ambient temperature. Mine took about an hour and 45 minutes.
In the meanwhile prepare your baking pan and keep aside. Butter and very lightly flour the cavities of your muffin or popover tray.
Dust your working surface lightly with flour and turn the dough out. Lightly knead to deflate the dough. Divide into four equal pieces. Roll out each piece to a 60x20cm (24X7 inches) sized piece. The dough sheet will be very thin. If you have a pasta machine you can use that as it is easier to roll out thin sheets with it. I cut the dough into two pieces (60cm x 40cm each) and cut into 4 pieces after buttering each.
Spread about 30 to 38 gm butter (I started with 150 grams of butter and had 50 left) of soft butter over each rolled out piece of dough. I sprinkled half with cinnamon sugar and the other half with speculaas spice. Cut each piece into half, lengthwise, creating two thin strips.
Roll one thin strip into a tight roll. Place this at the edge of the second strip and continue rolling till you have one thick roll. This will give your cruffins more layers.
Cut roll in half lengthwise. Roll each half, like a circle (cinnamon roll style)with the cut layers side showing the outside. Make sure to tuck both ends under so it doesn’t open up on baking. Place the roll in the prepared muffin or popover pan.
Repeat with all the dough pieces. Cover the pan with a kitchen towel and allow to rise for about 45 minutes. The rolls should look puffy and have risen to almost the edge of the cavities.
Bake the cruffins at 190C (375F) for about 30 minutes or till golden brown and done. My smaller size baked in about 24 minutes. Turn them out onto a rack and let them cool. I skipped toppings and thought they were just perfectly delicate and sweet enough. Serve warm with coffee or tea.
My Cruffin were small (17 instead of 8) and more brown than golden but still insanely beautiful and marvelous tasting with coffee in the morning, hot tea in the late afternoon, coffee in the morning, hot tea in the late afternoon … oh gosh, it’s time to bake again as I know you will want to do. I want these again with my morning coffee … and my late afternoon tea!
Coffee or tea?
And I do thank you just very much for cruffins Aparna!
Our Kitchen of the month was Kelly (Hobby Baker) at A Messy Kitchen and she brought us a doozy of a bread but wow oh wow it will give you cause to celebrate. Maybe you got your vaccination, maybe you got a new car, maybe you got sunshine when rain was expected, maybe the cat came home, maybe you can’t think of a reason to celebrate: if you bake Potica you’ll have reason enough to celebrate.
The start.
I baked again with my friend Mary. She baked a rye loaf for her family and then took photos of the Potica. What that really translated to is the story of how we’ve all let looking at a picture and reading through a recipe intimidate us into not trying. I still remember Bread Chick in the Daring Bakers putting up Julia Child’s baguette recipe some 30+ pages long and thinking REALLY, then stepping back and just taking it one step at a time gets you started on the journey. Before you know it you’ve come to: Bake it in the oven and BINGO you have bread! Now Mary wants to come back to bake with me again to tackle Potica and I want to try the poppyseed filling with walnuts and chocolate…and I want to try a Spanakopita filling. I am absolutely sure spanakopita will be spectacular. Sort of hoping one of the Babes went that way.
Do not be intimidated by photos that make things look difficult. Do not let long directions in a recipe intimidate, just take one at a time. You truly can do this! Bake with us.
Povitica or Potica
Add in butter.
DOUGH 100 grams whole wheat pastry flour 185 grams pastry flour 1/2 teaspoon 0.05 oz (1.4 g) dry yeast (~½ tsp) 135 grams whole milk 0.5 oz (15 g) water, used more milk instead 1/2 teaspoon salt 1 large egg 40 grams sugar, divided 22 grams butter melted, divided WALNUT FILLING 9.9 ounces (280 g) walnuts 3.35 ounces (95 g) sugar ½ tablespoon unsweetened cocoa powder 0.1 oz (3 g) cinnamon powder pinch of salt 2 ounces (58 g) unsalted butter 2.1 ounces (60 g) whole milk 1 large egg yolk ¼ teaspoon vanilla extract TOPPING, Looks pretty but adds too much sugar for my taste
Makes seeing when a dough doubles so much easier.
POPPYSEED FILLING This is the filling I used but NEXT bake will use walnuts and/or chocolate added to it. 250 g poppy seeds (8 oz or 1-1/2 cups) 50 g sugar (1/3 cup) 50 g honey (2-1/2 tablespoons) 50 ml milk (4 T) to start (may need up to 3/4 cup) 1 tablespoon butter 1 egg (can be omitted) 1 tablespoon cinnamon 3/4 teaspoon cloves 2 tablespoons rum (or other spirits) 1 tablespoon vanilla grated rind of 1 lemon
1. In a bowl or stand mixer, combine the flour together with the dry yeast. Then add the milk, water, egg and salt. Mix the ingredients in the bowl until a fairly smooth and homogeneous dough is obtained. Add the sugar in two additions, kneading each time until it is fully integrated. Knead the dough until it is smooth and silky with at least a medium gluten development. Work in the butter in about three additions until smooth again. Knead for about 12-15 minutes to develop the gluten well and obtain an elastic, soft, and very well developed dough. It may be slightly sticky but should pass the windowpane test. If it does not, the final stretching will not be possible without tearing.
2. When the dough is properly developed, form into a ball and place in a lightly oiled bowl. Cover with plastic wrap and let rise until it doubles its volume. This can take up to three hours.
3. Make the filling while the dough is rising. Grind poppyseeds in small batches in coffee grinder for about a minute. The resulting mixture should look and feel like damp sand. Melt honey and butter in milk, add sugar, and stir till dissolved. Add poppy seeds and stir. Simmer for a few minutes, adding more milk if needed. Take off stove. Beat egg with rum, then stir it in gradually so the filling doesn’t curdle. Add other flavorings. Add more liquid if needed and continue to simmer till thick. (Don’t overdo this–it thickens as it cools.) Makes about 2 cups.
In a food processor add nuts together with sugar, cinnamon, salt and cocoa powder. Blend until the nuts are finely chopped and transfer to a bowl. In a saucepan or microwave, heat the milk along with the butter until it just boils. Remove from the heat. Pour the milk into the nut mixture. Add the vanilla and the egg yolk and mix until completely homogenized. Set aside at room temperature, covered, until ready to fill the povitica.
4. Stretching the dough:
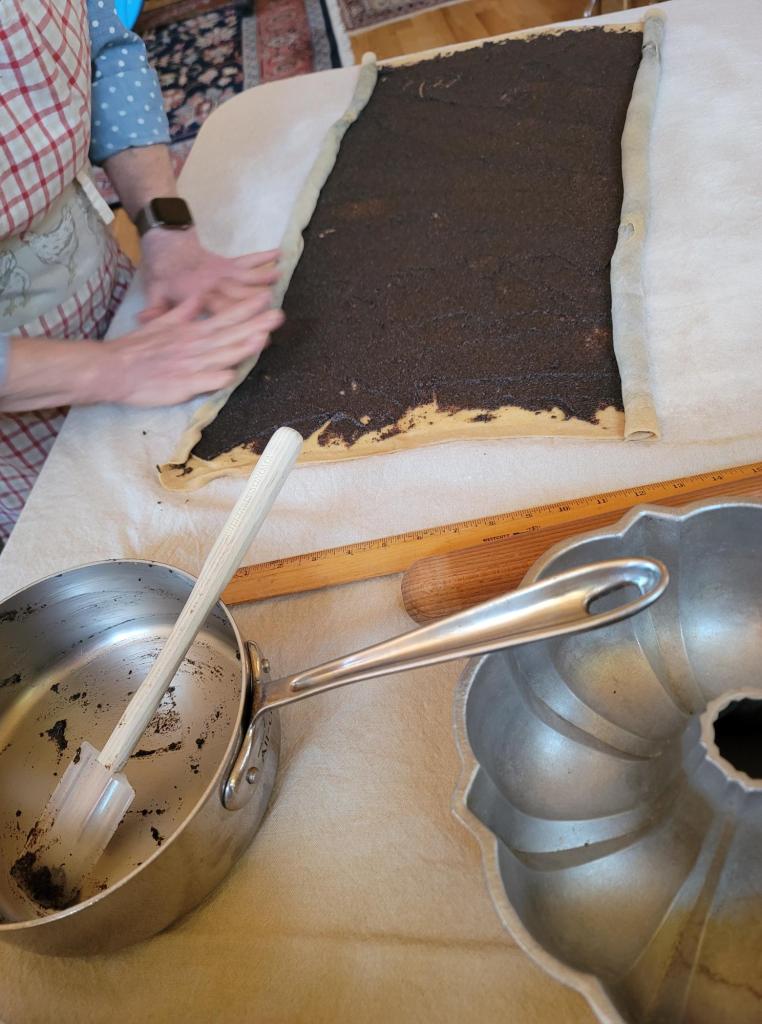
Lay out a sheet or cloth on a wide, flat surface. I used a drop leaf table and a linen table cloth but a card table would probably be the perfect size. Sprinkle the work surface very lightly with AP flour. Turn out the dough and de-gas it gently. Roll the dough out into a very thin rectangle with a rolling pin, then continue to carefully stretch with hand to about 25½x18-in. (65 x 45 cm) rectangle. **The dough should be about three times as long as your pan. Very gently and slowly work the dough with your hands, stretching from the center to the edges. It should remain soft and elastic and stretch without tearing as long as the gluten was developed and the process is taken slowly.
Stretching the dough.
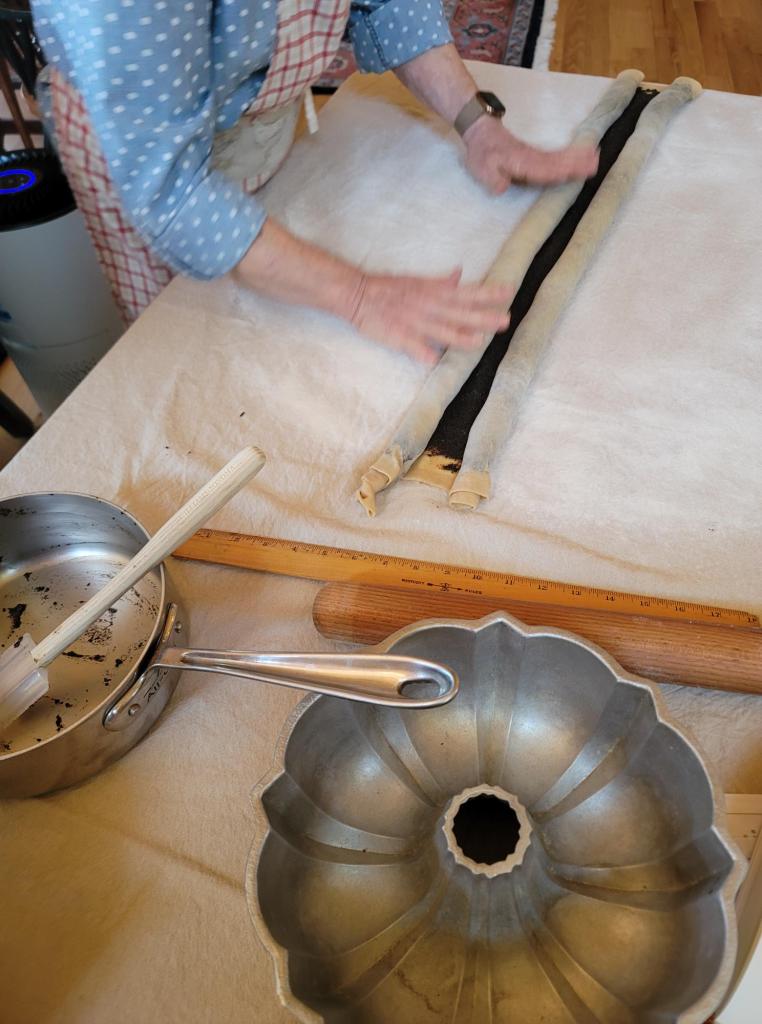
5. Roll up the dough. Starting with the long edge that has filling to the edge, roll the dough on itself making sure that there is no gap between each layer. Start at one end and just turn up the edge all the way across. Then continue to roll from edge to edge carefully and with the help of both hands. I rolled from both long edges into the center then laid it into a bundt pan; it only went around one and a half times.
Rolling Rolling Rolling
Come together now…
6. Once the entire sheet is rolled up, carefully pinch and seal the long edge. Shape the roll into an S and place it into the pan. It will take two hands, scoop in from the ends and carefully lift into the pan. Other shaping methods including rolling up in a circle like a snail and baking in an earthenware baker, or cutting the roll into sections and lining them up in the loaf pan. Using sections and a smaller loaf tin will yield a taller loaf.
And throw it in the pan!
7. Cover with plastic and let the dough rise until the dough has puffed up somewhat. This will be most evident looking at the ends of the dough to see any increase in size. Again, this can take 1-3 hours.
Bake Povitica. Preheat the oven to 350ºF. Brush the top of the loaf with half of the butter and place in the center of the oven. Bake for 15 minutes, then reduce heat to 300ºF and leave for 45 minutes more. The total baking time is 60 minutes.
Remove from the oven and brush with the remaining butter. More butter is always better. Let it rest in the pan for 20 minutes. Then turn out the loaf and allow to cool completely on a rack. Dust with powdered sugar if desired.
Top line is putting dough into pan seam side down. Bottom line is where the dough was doubled.
8. This loaf should ideally be cut from the bottom to keep the outside edges/top from crumbling. Excellent with coffee or tea!
Really, you think you could keep this in the house 5 days …. I don’t think so.
This loaf will keep for 4-5 days in a sealed bag or a week in the refrigerator. That is totally laughable because with two people in my house half of this was gone in a day and a half. My friend took the other half home and it was gone that night. It is either store it or look for bigger pants. It may also be frozen in portions.
We would love for you to try this impressive looking and very tasty bread and bake along with us this month! (It’s not as difficult as it looks!) No blog is necessary to participate, a picture will do. Just send a picture or your post of your finished povitica to Kelly by the 30th of this month at eleyana (AT) aol (DOT) com. New recipes are posted every month on the 16th. Check out our Facebook group to see the participants’ baking results during that time.
Since I have a good friend who was 2 weeks past her second vaccine and I was a month past my second vaccine, we baked together in my kitchen. It was a celebration! We didn’t wear a mask but I did let my HEPA air filter run. Originally I was going to do this sourdough, Karen gave us permission – like a Babe would need permission. Since I planned to do this with my friend Mary, I felt it would be easier for her if we did a biga with the yeast. I’ll try the sourdough at a later date. We started with an Olive Oil tasting. Just three so it was mini but still fun and instructive.
Our Mini- Olive Oil Tasting
I did a search for the best baking Olive oil and Monini came up, I ordered it from Amazon. From the local small Montegue Foods store, I picked up Lucini on a whim. A few days earlier, we were in Muskegon and we stopped in at the Cheese Lady. Had there been no pandemic, I would have tasted a batch of their many olive oils. The Hojiblanca was recommended as between mild and robust, so I tried that one. We both found the Monini robust, bitter, and spicy at the end. We liked it. The Lcini would have been our second choice; it had a strong olive oil flavor and was spicy especially at the back of the tongue at the end. The Hojblanca we felt was so mild it wouldn’t have added anything to the bread flavor. We went with the Monini: Mary’s son described the bread tasting robust, a little bitterness and spicy at the end! Wow, I felt that was nice confirmation of our choice. Karen recommended a hearty fruity flavored extra virgin olive oil. I will return to the Cheese Lady shop and request a more robust olive oil to try next. I love her cheeses!
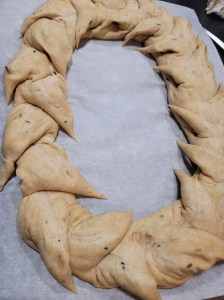
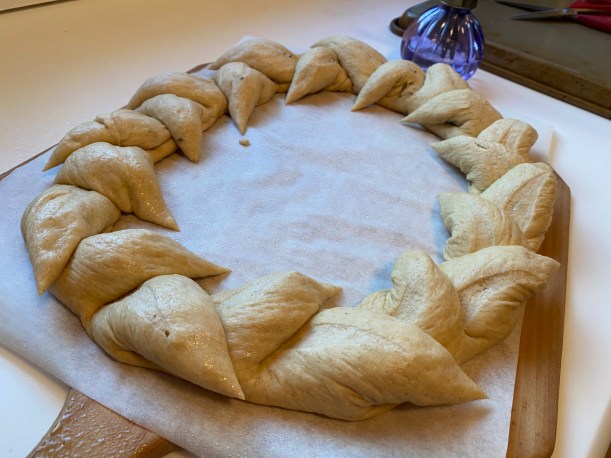
Olive Oil Wreath
Recipe By: Karen from Karen’s Kitchen Stories adapted the recipe from the book Della Fatoria Bread by Kathleen Weber Yield: 1 loaf
Biga 125 grams AP flour, (3/4 cup plus 2 1/2 tablespoons) 1/2 teaspoon instant yeast 83 grams water, 75 to 80 degrees F (1/4 cup plus 1 1/2 tablespoons) Olive Oil Wreath 100 grams of the biga, (1/4 cup plus 3 1/2 tablespoons) 285 grams 75 to 80 degree F water, (1 cup plus 3 1/2 tablespoons) 60 grams extra virgin olive oil, (1/4 cup plus 2 teaspoons) 10 grams instant yeast, (1 tablespoon) 500 grams all purpose flour, (3 1/2 cups plus 1 tablespoon) 2 1/2 teaspoons salt
Directions:
BIGA: Mix the biga ingredients until combined. It will be sticky. Place it into a lightly oiled bowl, cover, and let sit for 10 to 18 hours.
Leftover biga can be refrigerated for up to 3 days to make more loaves. Or if you bake with a friend, divide in half and you each have a loaf!
FINAL WREATH DOUGH In the bowl, add the biga, water, olive oil, and yeast and mix until the biga is broken up.
In a medium bowl, whisk the flour and salt together. Add it to biga mix until moist, then knead about 5 minutes.
Turn the dough out onto a floured work surface and briefly knead by hand. Place it into an oiled bowl our dough rising bucket and cover with oiled plastic wrap. Let rise in a warm spot to proof for 1 1/2 to 2 1/2 hours until really puffy, more than doubled.
Turn the dough back out onto a floured work surface and deflate the dough. Gather up the edges and preshape the dough into a ball. Flip the ball and place it seam side down on the work surface. Push the dough against the work surface in a circular motion to tighten the top. Pull the dough toward you to elongate the dough into an oval and let rest for 10 minutes.
Shape the dough into a 1 1/2 inch by 42 inch long piece. To do this, turn the dough over, seam side up and pull the dough into a rectangle shape. Wrap the longer sides over each other like an envelope. Gently rock the dough with your hands to elongate the dough. Let it rest for about 10 minutes if the dough resists.
I used parchment and a peel anticipating sliding the formed loaf onto a hot baking stone.
We put Mary’s on parchment and in a box to keep cold air drafts off as she was transporting her ring in the car to bake in her oven at home.
Gently place the dough on the pan or parchment and form it into a circle, overlapping the ends. Cover loosely with oiled plastic wrap and set the dough in a warm spot and let rise for 1 to 1 1/2 hours.
In the meantime, heat your oven, with a rack on the lowest level with a steam pan, and a rack in the middle above the steam pan and fitted with a baking stone. OR what I did was mist the oven before and 2 minutes after the loaf went into the oven.
Heat the oven to 450 degrees F.
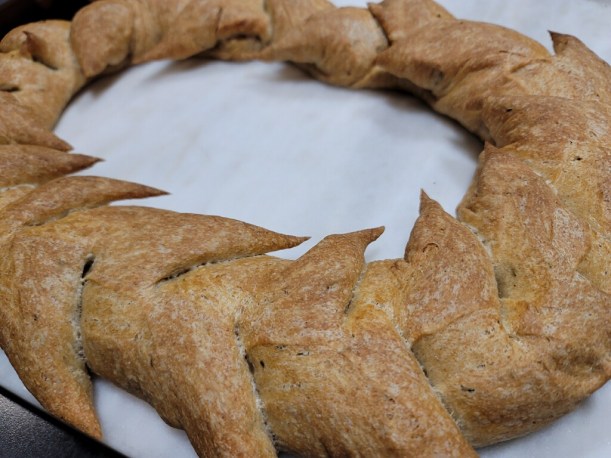
Using scissors, cut partially through the dough at a 45 degree angle from the top and move the cut dough to one side. Cut almost but not all of the way through. Continue to make more cuts, every 3 inches, and move the cut dough pieces to alternating sides until you go around the wreath. Don’t cut from the sides, cut from the top. 3 inches is arbitrary to some extent, closer or farther apart will give you smaller or larger pieces to pull apart.
Mary’s perfect epi cuts!
Place the pan or parchment (using a peel) with the shaped dough onto the stone and add 1 cup of ice cubes to the steamer pan. Immediately close the oven door and reduce the heat to 400 degrees F.
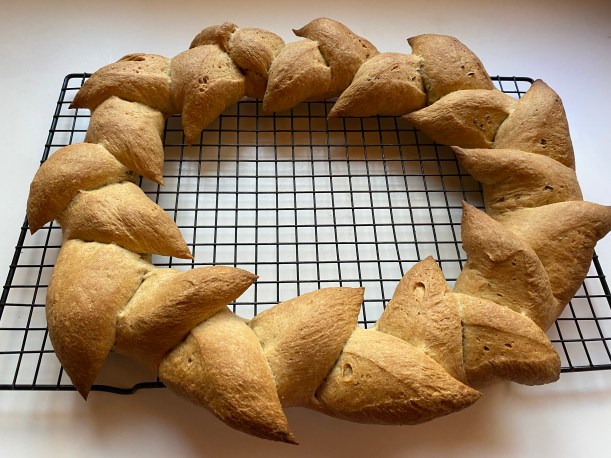
Bake for 30 to 35 minutes, until golden brown.
Transfer the loaf to a cooling rack and let cool completely.
I am super proud to say both Mary and I got beautiful bakes. While the dough rested and rose, we went for a beautiful walk in the woods. I was getting late in the day so she took both her loaves home to bake in her oven. (The second loaf we each bake was the BeeKeeper’s Pain De Mie).
I hope you’re planning to bake with us. This is simply a perfect celebration bread ~ surely you have something to celebrate: It’s Friday – the sun is shining – it’s raining so the spring flowers will bloom – heck celebrate Great Olive Oil Wreath! This is certainly one to bake.
The Crumb
Scale it!
I was going to keep the pandemic ponytail but … nope it’s gone.
Begs to be pulled apart…
For complete details about this month’s recipe, the BBB and how to become a BBBuddy, please read:
Saint Patrick’s Day or Spring this is the CELEBRATION BREAD to CHEER!!
This is a naturally-leavened loaf made with matcha green tea powder and flavored with candied orange peel and orange blossom water. It doesn’t include any extra sweetener which neither Cathy nor I thought it needed. It is a beautiful green color before baking and becomes a lighter green after baking.
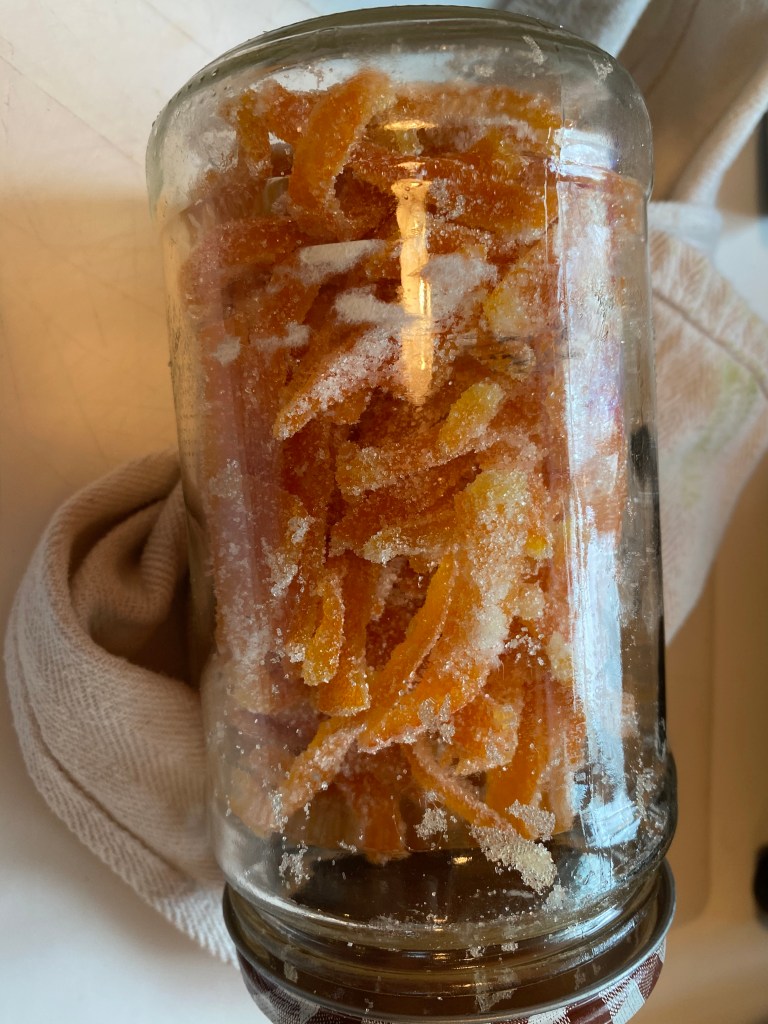
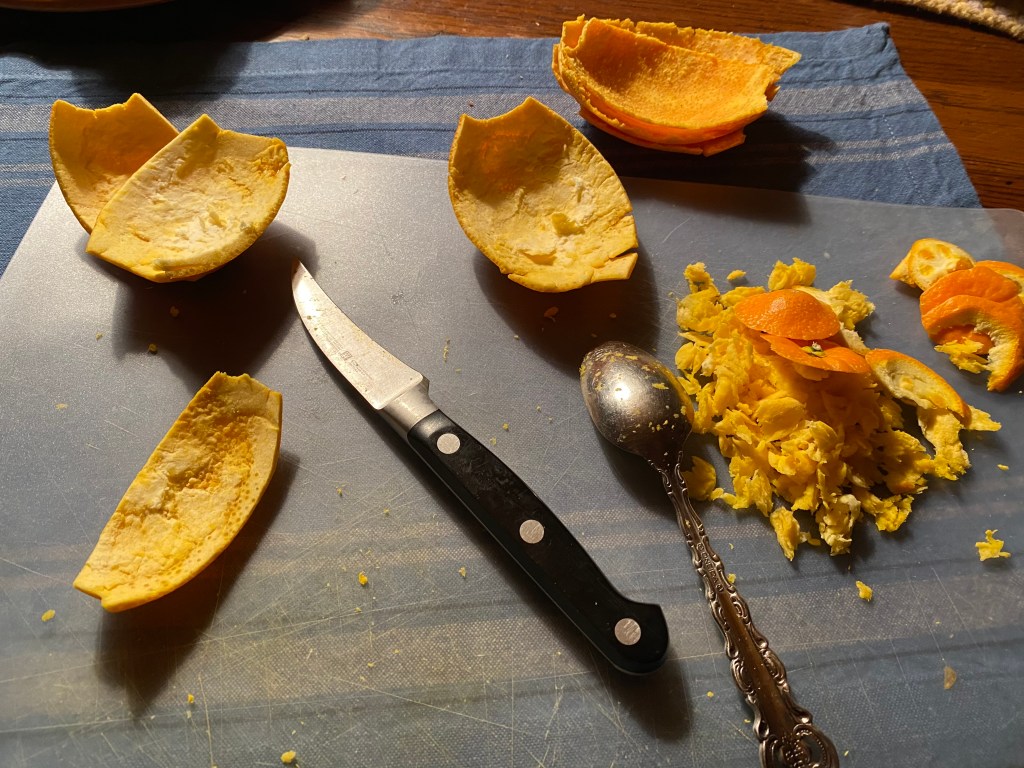
LEARNED: Again: homemade is better. DO NOT wear your favorite white while messing with matcha … unless you want it to be green which is fine for St Patrick’s Day. 150 grams of orange peel will probably make prettier loaves but with less orange sweetness. Allow the homemade orange peel to dry at least 24 hours or more. Plan ahead to made it several days in advance. I used Cathy candied orange peel process found here (https://www.breadexperience.com/making-candied-orange-peel/)
My first bake I used a total of 510 grams flours made up of 255 grams organic AP, 100 grams white whole wheat and 155 grams bread. My second bake I used 260 grams organic AP and 250 grams white whole wheat. While both bakes gave me dense loaves, I believe the bread flour bake gave me a slightly less dense loaf.
CANDIED ORANGE PEEL: When I was in high school, I remember my mother making candied grapefruit peel to give as Christmas gifts one year. Her comment was it was spectacular, certainly the most spectacular thing she had ever made and she would never do it again…and she didn’t. I will tell you I cursed most of the five hours it took for me to remove the pith from the rind. I followed Cathy’s candied orange peel recipe HERE. The orange peel I bought was dramatically fatter (contained lots of pith). It was bitter when tasted alone and much less sweet when baked in the bread. Still, the friend I gave a loaf of the second bake loved the bread. Would I do it again … maybe, it would depend on how gracious I was feeling. When I used the homemade orange peel, I baked with it the following morning. Kneaded in, it caused the dough to come apart and took considerable time to come back together.
Cathy admonished us not to cheat on the orange peel. Being the Babe I am of course I had to increase what was called for in the recipe. Yes I used 200 grams. The increased amount made it harder to incorporate it into the dough and probably caused a more rustic and rougher surface (less pretty) but I think the addition was worth the exponential increase in taste. The first bake I added the matcha with the salt. It took considerable kneading to get an even distribution. The second bake I added the matcha with the flour. I will add it to the flour from now on and have changed the directions to reflect that.
First Bake on left, 2nd Bake on right.
Green Tea and Orange Loaf
Recipe From: Cathy (breadexperience) Adapted from The Larousse Book of Bread by Eric Kayser Yield: 4 small loaves Levain 50 grams all-purpose flour 50 grams water 25 grams sourdough starter (I used 100% hydration starter)
Final Dough 500 grams all-purpose flour, plus more for dusting 250 – 300 grams water, divided 125, 125, 50 10 grams salt + 15-20 grams water 30 grams olive oil 25 grams orange flower water 10 grams (2 tsp) matcha tea powder 150 grams candied orange peel, chopped or finely diced
There are two ways to incorporate the starter in this bread. 1) Feed your sourdough starter the evening before you plan to bake, let it rest overnight at warm room temperature, then use 100 grams of the fed sourdough in your loaf. If you choose do use the fed starter without creating a levain, you may need less water. Cathy actually used more water with this method. 2) Create a levain. This method is presented below.
Levain
In the evening of the day before making the bread: Place the starter, flour and water in a small bowl. Mix with a wooden spoon until the flour is stirred in well. Cover the bowl with a plate, or bees wrap, and let it rest overnight in a warm place.
Final Dough
1. Pour 125 grams water, orange blossom water and olive oil over the levain. Mix completely to break up the levain.
2. In a large bowl, add the flour and matcha. Pour the levain/water mixture over the flour and mix to incorporate. Add the rest of the water, gradually, and as needed to fully hydrate the dough. I used the 300 grams.
Cover, and let the dough rest for 20-30 minutes, then sprinkle the salt over the top and dissolve it with 15 grams of warm water.
3. Cover, let rest for 30 minutes, then fold in the candied orange peel and knead the dough until it becomes smooth, and elastic. Add more water if the dough starts to tear. My dough tore horribly and required more kneading to come back together. Note: Cathy’s dough was sticky after adding the candied orange peel and almost too dry up until that point. My dough never seemed dry. Shape into a ball, cover, proof for 2 hours. Stretch and fold the dough after 1st hour. Let rest for final hour. It should increase in volume by the end of the final proof.
On left: very moist adding orange peel. On right: broken up after adding salt in 20 grams water 1st bake. Did better 2nd bake with just 10 grams water.
4. Remove the dough to a lightly dusted work surface. Divide the dough into 4 equal pieces, about 300 grams each. Cathy’s divided into 260 grams each. Shape into balls, cover with a dish towel and let rest for 15 minutes.
5. Roll the dough pieces between your hands to create tension, and form smooth and well-rounded boules. Place the loaves, seam-side down on a parchment-lined baking sheet. Cover with a damp cloth and let proof for 1 hour 15 minutes. I allowed mine to proof for 2 hours. I put the four loaves on parchment and covered them with a large stainless steel bowl that also then was used to cover them in the oven.
6. Preheat the oven to 450 degrees F. with a baking stone on the bottom shelf . Score the loaves in a crosshatch pattern (or the pattern of your choice). Transfer the loaves on the parchment to the preheated oven. Then place covering pan/bowl on top. Bake for 18 minutes. Mine took an additional 16 minutes to come to an internal temperature of 200°F. Whole grains take longer to bake. Don’t burn them. Remove from the oven and leave to cool on a wire rack.
Would you like to bake with us?
Bread Experience is the host kitchen for March, and would love for you to make this Green Tea and Orange Loaf with us! You’ll get your own Buddy Badge! Plus a delicious bread to enjoy.
Bread Submission Guidelines:
Just bake your version of this bread and post about it on your blog (by March 29th).
If you don’t have a blog, no worries, just post a photo in the Bread Baking Babes Facebook Group
Mention Bread Baking Babes with a link to the Kitchen of the Month, that’s – Cathy of Bread Experience.
Then send an email to breadexperience (at) gmail (dotcom) with BBB Green Tea and Orange Loaf, and Cathy will send you your Buddy badge to display on your blog.
If you make your own or buy the candied orange peel, I know you will enjoy this bread!! Go for it.
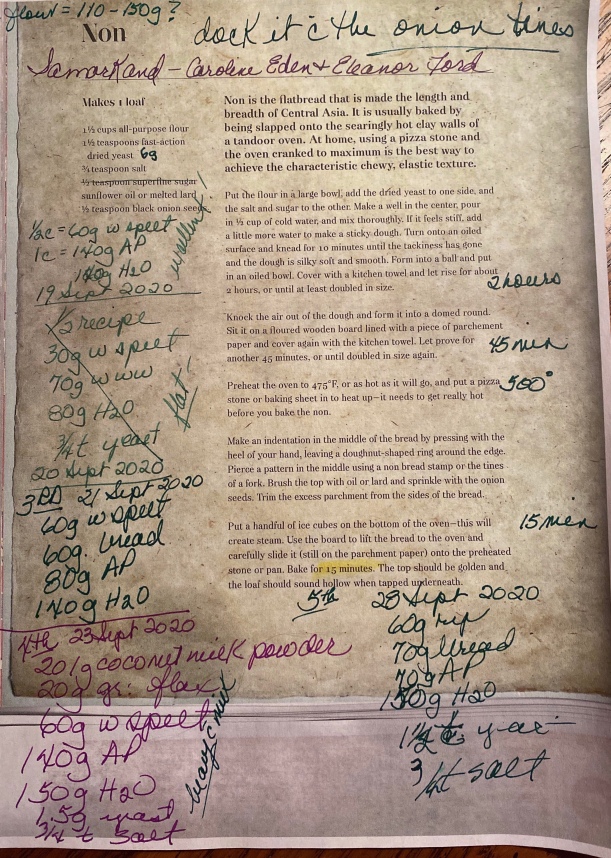
Recipe From: Samarkand: recipes & stories from Central Asia & the Caucasus by Caroline Eden & Eleanor Ford
Yes. This is our Baker’s Dozen Anniversary!
Amazing that this little group of Bread Baking Babes has been around on the internet for the incredible Baker’s Dozen years! I’ve missed very few of the breads the group has baked. There’s not been one bread in all those years that I haven’t learned from and enjoyed. Most of the breads I’d enjoy baking again. There have been simple breads. There have been scary breads. When I started baking bread sometime in the 70’s, there was nothing easy about it and failure seemed to always be a possibility. Baking all these breads over all these years has brought me to the startling conclusion that really dough just wants to be bread. Some dough will be more successful bread than others but generally, it will be better than anything that would come in a plastic bag and plenty of loaves will be as good as or better than the gourmet bakeries. More than ever during this pandemic baking bread brings me sanity.
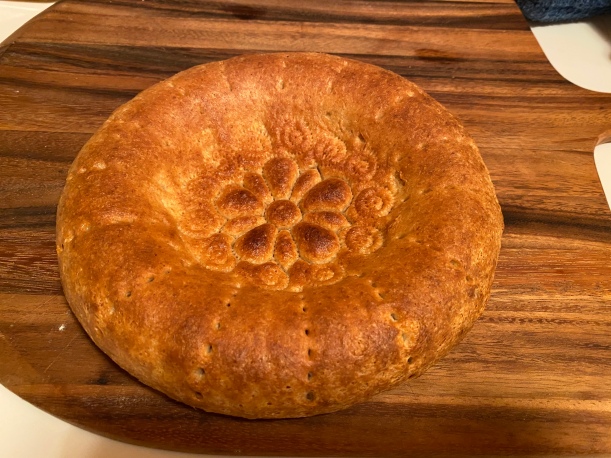
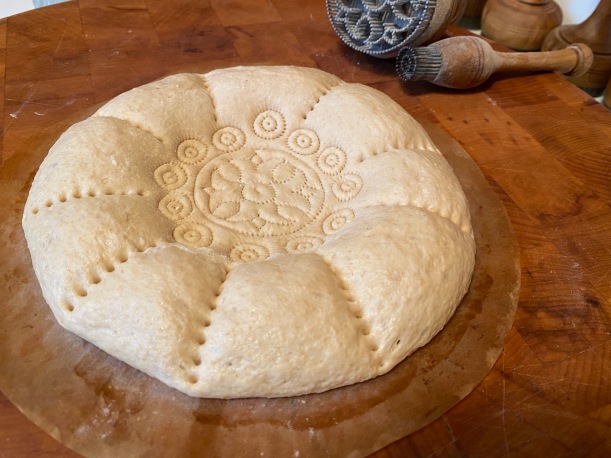
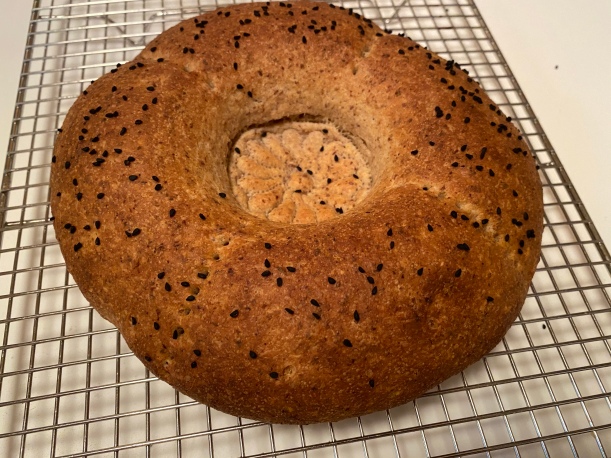
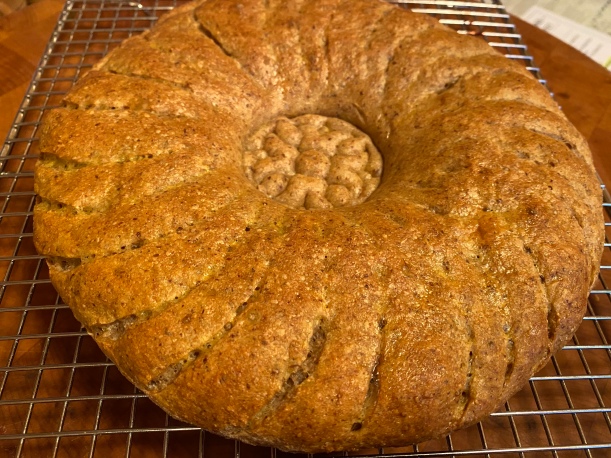
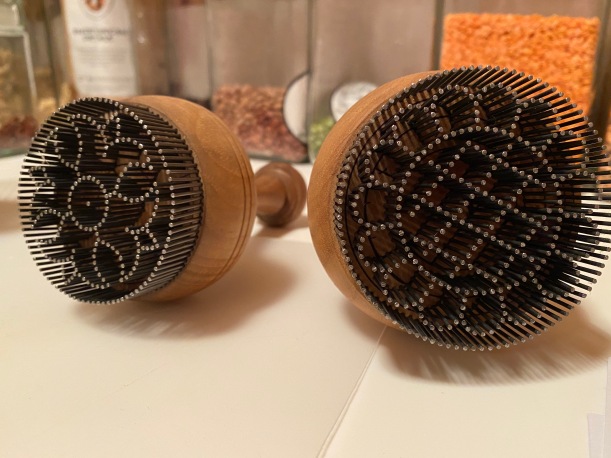
Traditionally this bread is never cut – a knife is an instrument of war. Docking the rim with an onion cutting tine makes it easy to break off sections.
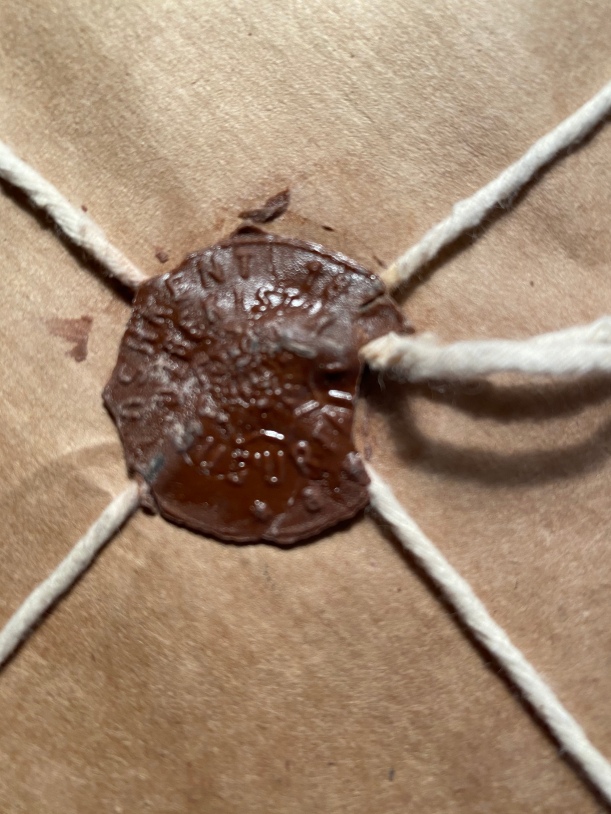
How did I come to this bread? A long time ago I came across this thing called a bread stamp on Amazon. I’d never seen one, never seen a bread that used one, had no ideas why I should have one but I ordered two of them. They were beautiful but I had no idea what I should do with them. I took them to a baking class and ask if anyone had seen them used. Nope. … Maybe a year ago, I saw a picture of bread stamps in a book I had and then I found the recipe for the bread. SEVERAL MONTHS AGO, Elizabeth ask about doing this recipe and improvising or using the bread stamp. The idea seemed to take hold and I was way past due to try my bread stamps.
Sealing wax! My bread stamp came in brown paper with sealing wax!
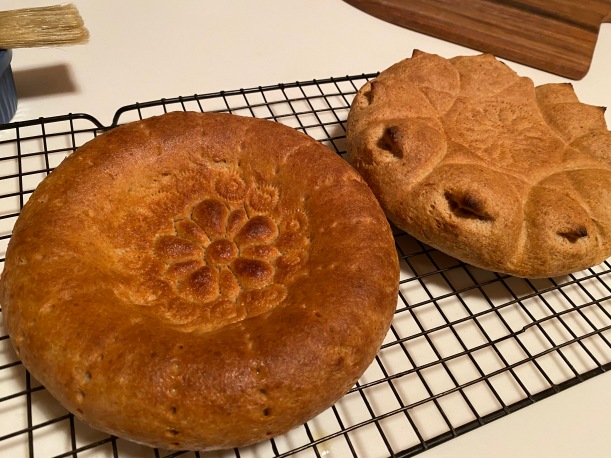
I think I baked my first loaf on 19 September 2020 and the second loaf on 20 September 2020; at this point I truly would only be able to count if I had taken photos of each loaf and I am pretty sure I didn’t take every bake. This truly is an everyday loaf. Easy to put together in the evening to rest overnight in the fridge and bake first thing in the AM. Easy to mix first thing in the AM and have coming out of the oven for lunch. Easy to mix after lunch and serve with appetizers and/or dinner. I have not baked this three times in one day. No, I have not.
I really played with many combinations of flours but always totaling 200 grams.
When I put this up for the Babes I was really thinking it would be a great try to make it into a sourdough. We were able to do that and it was nice bread. In the end, for me at any rate, I felt the allure of this bread was the ease and everydayness of it and I went with the straight yeast version. I know it will come to my rescue many times in the future.
I also recognize that this bread has been made for centuries (many centuries), after all it is mentioned in the ‘Epic of Gilgamesh’. For the best article I found on this bread try http://www.aramcoworld.com/articles/July-2015/The-Fabled-Flatbreads-of-Uzbekistan . There are multiple uTube videos. Two of the best we’ve found are: this one shows you how to use scissors and a fondue fork in place of a bread stamp and this one shows using a glass Just search for bread stamp or Easy Uzbek Bread or How to make Tashkent Obi Non You’ll be overwhelmed. but in a fun way.
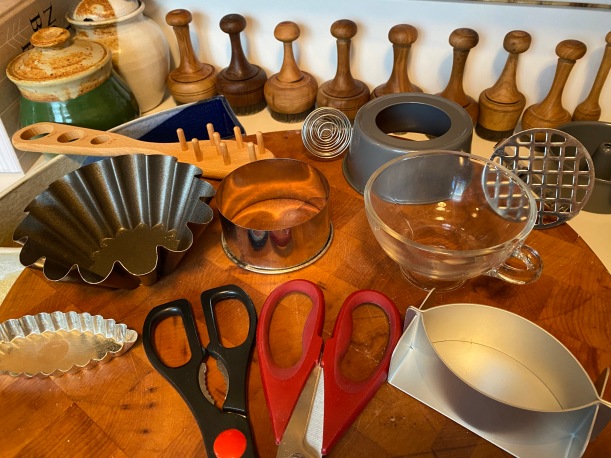
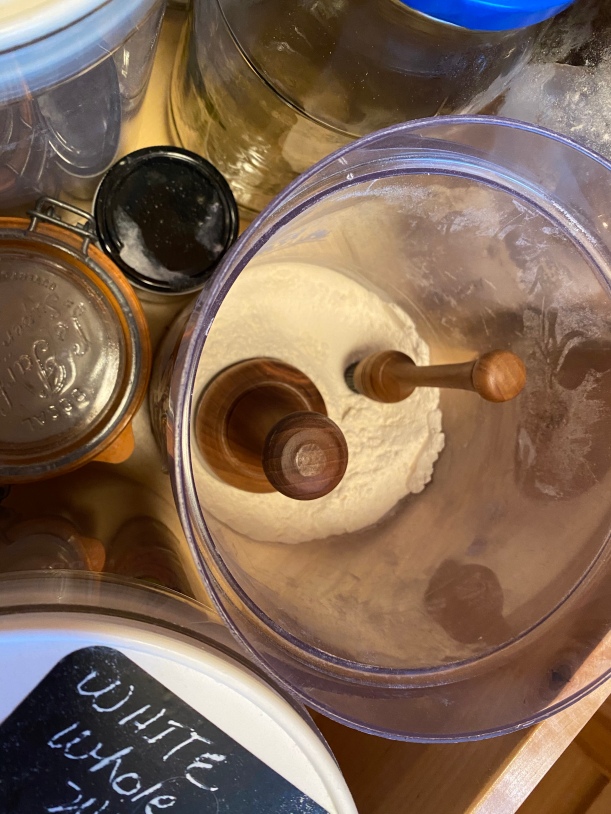
You can do this without a bread stamp. You already have multiple implements in your kitchen that you can use.
Items that might be used to emboss the dough. A fondue fork was used in the uTube video, I don’t have one.
I know the world is crazy right now and goodness knows I am way past ready to be done with the virus. At the same time mixing and kneading bread is something of a saving grace for me. This makes beautiful and tasty bread. You can do it.
BBB ~ Non, Naan, Tashkent Obi Non:
ORIGINAL
1 1/2 cups AP flour 1 1/2 teaspoons yeast 3/4 teaspoons salt oil 150 grams water METRIC 200 grams flours 15-20 grams ground flax seed 7 grams yeast 6 grams salt 150 – 180 grams water, to make a sticky dough oil, to knead dough on counter VARIATIONS 60 grams whole grain spelt, total flours will =200 grams 60 grams bread 80 grams white whole wheat flour 15-20 grams ground flax seed 7 grams yeast 6 grams salt 150-180 grams water, to make a sticky dough oil, to knead dough on counter SOURDOUGH STARTER Late the night before baking 100 grams rye starter 50 grams whole grain spelt flour 50 grams bread flour 70 grams white whole wheat flour 130 grams water NEXT MORNING 3/4 teaspoon salt oil of your choice
STRAIGHT DOUGH Whisk together the flour(s), yeast, ground flax if using and salt. Add water to make a sticky dough. This should not be a stiff dough. Pour a little oil on the counter surface and knead the dough until the dough loses it’s tackiness and is silky smooth and soft. Cover and let rise till doubled in size. Anywhere from 90 minutes to 2 hours.
2. Knock some of the air out of the dough and form it into a dome ball. Set the dome on parchment paper and cover. The mixing bowl usually works well to cover it with. Let proof again until doubled in size. This may only take 45 minutes to an hour.
3. Preheat the oven with baking stone. I first baked this at 475°F. I have since baked it at 500°F. I baked it under a stainless steel bowl but found misting the oven twice in the first 4 minutes worked best for me.
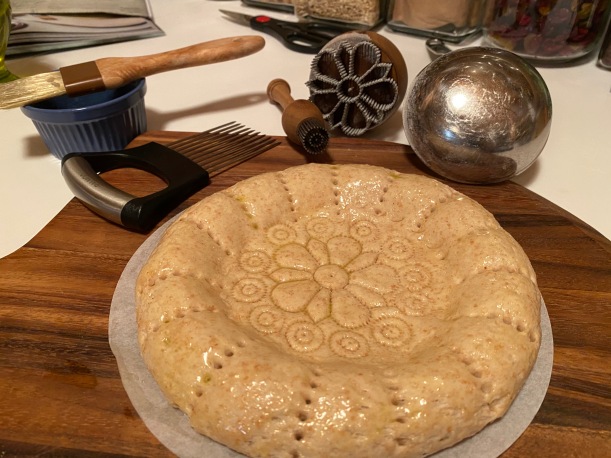
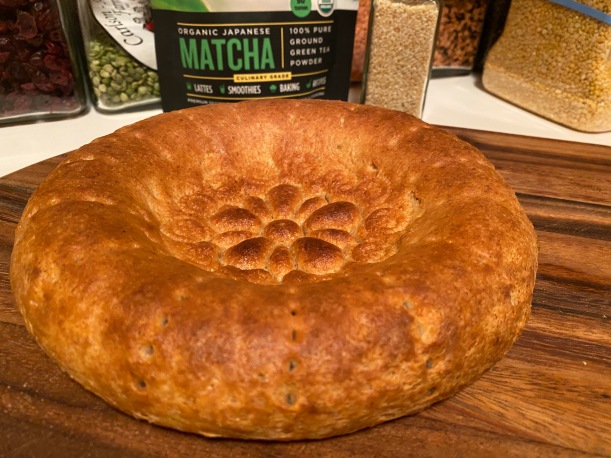
4. Make an indentation in the middle of the bread by pressing with the heel of your hand. I found starting the indentation with my largest ladle worked well and then I was able to enlarge it with my fingers. The indentation should be larger than the bread stamp pattern you plan to use. Dip the bread stamp tines in flour. Pierce the middle of the dough with the floured bread stamp. Press firmly to get a good imprint. Brush to top of the bread with oil, butter, egg with a pinch of salt. Sprinkle with onion seeds or sesame seeds OR get carried away and make it your own.
5. Bake for 15 to 18 minutes. The top should be golden and the loaf should sound hollow when tapped on the bottom. The center will be somewhat cracker like and the outside rim light and puffy.
SOURDOUGH: The night before I mixed starter, flours and water together. It was a very wet dough. I did not knead it.
The next morning I dusted the counter with bread flour, flattened the dough on the dusted counter, pour the salt on the dough and kneaded it adding flour until it was smooth and no longer sticky. The salt did not break the dough as I kneaded. I can not guess how much flour I added.
Finally I flattened the dough on a parchment round and covered it with a large bowl. At five hours later it had risen nicely. I oiled the top and used my hand to flattened it in the middle then used the bread stamp to stamp it. I didn’t get a clear stamp imprint; I needed a larger flattened center. Sprinkled sesame seeds on the oiled top.
I baked the loaf on the parchment on a baking stone covered with a stainless bowl at 500°F for 15 minutes. Removed the bowl, turned the oven down to 450° and continued baking for 4 more minutes. Internal loaf temperature was 208°.
Traditionally this bread is never cut – a knife is an instrument of war.Bread stampsDip the bread stamp in flour.
We would love for you to try this bread. We would love to hear about your experience.
I really think you want to give this a go! To receive a Baking Buddy Badge to display on your site, post about your Naan adventure in the next couple of weeks (we love to see how your bread turns out AND hear what you think about it – what you didn’t like and/or what you liked) before … usually its the end of the month but this time I’m extending that a week so the date will be 7 March 2021.
Don’t miss this awesome video referred to us by Aparna!
Here’s how to let us know:
comments my kitchen at mac dot com » Remember to include your name and a link to your post » Please type “BBB February 2021 bread” in the subject heading
And check out what the other Babes had to say about this one.